
User`s guide


Chapter 3 - Robot Installation
44 Adept Quattro s650H Robot User’s Guide, Rev A
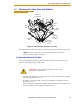
Install Mounting Hardware
NOTE: When mounting the robot, note the following:
• The base casting of the robot is aluminum and can be dented if bumped
against a harder surface.
• Verify that the robot is mounted squarely before tightening the mounting
bolts.
• All mounting hardware is user-supplied.
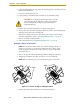
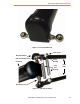
1. Place split lock, then flat washers on the bolts.
Bolts are M16x2.0 if threaded into the robot base mounting tabs.
Bolts are M12 or ½ in. if going through the robot base mounting tabs into nuts.
2. Insert the bolts through the holes in the frame mounting pads and into the
threaded holes in the robot base mounting pads. See Table 3-2.
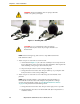
If using through-bolts, insert the bolts through the holes in both the mounting
pads and through the threaded holes in the robot base mounting pads into nuts.
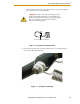
3. Tighten the mounting hardware to the specifications listed in Table 3-2.
NOTE: Check the tightness of the mounting bolts one week after initial
installation, and then recheck every 6 months. See Chapter 8 for periodic
maintenance.
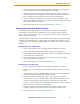
Table 3-2. Mounting Bolt Torque Specifications
Standard Size Minimum Specification Torque
Threaded into base (aluminum):
Metric M16x2.0 ISO Property Class 5.8 98 N•m (74 ft-lb)
Using base mounting tab hole as through-hole:
Metric M12 ISO Property Class 9.8 100 N•m (75 ft-lb)
SAE ½ in. SAE Grade 7 100 N•m (75 ft-lb)