
User`s guide


Replacing a Platform
Adept Quattro s650H Robot User’s Guide, Rev A 105
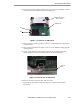
11. Connect the new battery to the unused connector on the battery bracket, but do
not disconnect the old battery.
There is only one way to plug in the connector. See Figure 8-6.
12. Once the new battery is connected, you can disconnect and remove the old
battery.
You will need to cut the cable tie holding the battery in the bracket.
NOTE: Dispose of the battery in accordance with all local and national
environmental regulations regarding electronic components.
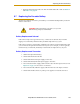
13. Place the new battery in the battery bracket, and secure it and the “diag” cable,
using a cable tie.
• The battery has shrink-wrap around the battery itself, its wires, and several
components. It is important that these components (which can be seen as
bumps in the shrink-wrap) face towards the ‘V’ in the battery bracket.
• Fold any excess wiring (red and black) under the battery, so that it lies
between the battery and the ‘V’ in the battery bracket.
• The “diag” cable must be cable-tied to the bracket (and battery) to relieve
strain on the Status Display connector. See Figure 8-6.
14. Reinstall the Status Display panel with four screws.
• Take care that the “diag” cable is routed away from the AIB fan inside the
robot base.
• Be careful not to hit the top of the amber lamp with the back of the battery
assembly.
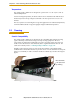
8.8 Replacing a Platform
Replacement
NOTE: Refer to “Attaching the Outer Arms and Platform” on page 45 for
details on installing the outer arms. Removal is the reverse of installation.
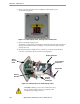
1. Remove the four pairs of outer arms from the four pairs of ball studs on the
installed platform.
2. Attach one pair of outer arms to each of the four pairs of ball studs on the new
platform.
• The platform is installed flange-down.
• Ensure that the numbers on the platform match the joint numbers on the
underside of the robot base. This places the platform tool flange closest to the
Status Display. See “Clocking the Platform to the Base” on page 45.
CAUTION: Do not overstretch the outer-arm springs.
Separate the ball-joint sockets only enough to fit them over
the ball studs.