
User`s guide


Chapter 8 - Maintenance
102 Adept Quattro s650H Robot User’s Guide, Rev A
Installing a New AIB Chassis
Harness Connections
1. Carefully remove the new chassis from its packaging, check it for any signs of
damage, and remove any packing materials or debris from inside the chassis.
Verify that the AIB is Adept P/N 08500-000.
2. Carefully place the chassis, on its heat-sink fins, next to the robot.
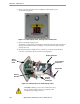
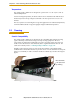
3. Using a 5 mm Allen key, connect the ground wire to the chassis. See Figure 8-4.
The chassis is grounded to the robot base through the bare aluminum where they
meet.
4. Connect the J27 cable to the J27 connector on the PMAI and engage the securing
latches.
5. Connect the J11 cable to the J11 connector on the PMAI and engage the securing
latches.
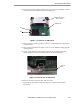
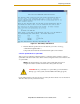
6. Connect the white amplifier cable (motor power) to the amplifier connector
located on the chassis bracket. See Figure 8-3.
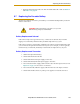
7. Insert the chassis into its mount, at the top of the base.
8. Lower the chassis into place against the mount, making sure that none of the
cables get trapped or pinched and that the chassis O-ring is not damaged during
installation.
9. Once the chassis is in place, use a 5 mm Allen key to tighten the chassis securing
screw. See Figure 8-1 on page 100.
10. If the robot will be used in the presence of chemicals that are caustic to aluminum,
follow the instructions at “Caustic Compatibility” on page 110.
External Connections
1. Connect the 200/240 VAC supply cable to the chassis AC input connector.
2. Connect the XSLV cable to the chassis XSLV connector.
3. Connect the 1394 cable to the chassis SmartServo connector.
4. Connect any other cables which may be connected to the chassis, such as XIO or
RS-232.
5. Connect the 24 VDC supply cable to the chassis +24 VDC input connector.
6. Switch ON the 200/240 VAC input supply to the chassis.
7. Switch ON the 24 VDC input supply to the chassis.
8. Switch ON the SmartController.
9. Once the system has completed booting, test the robot for proper operation.
If you have problems bringing up the robot after AIB replacement
• Verify that all system cables are fully seated and installed correctly. See Figure 4-1
on page 51.
• Remove power from the AIB, then verify that all AIB electrical connectors are fully
seated.
After checking AIB cables, restore power to the robot and reboot the controller.