
Installation Manual


3
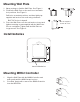
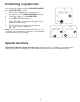
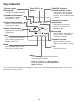
Optional Decorative Cover Plate installation
Use the Optional Cover Plate when you need to cover
paint gap from the old control.
4. Separate the Junction Box Adapter from the Cover
Plate. See Figure 4.
5. Mount the Junction Box Adapter to the wall or an
electrical box using any of the eight screw holes.
Insert and tighten mounting screws supplied with
Cover Plate Kit. Do not overtighten. Make sure the
Adapter Plate is level. See Figure 5.
6. Attach the Wall Plate by hanging it on the top hook
of the Junction Box Adapter and then snapping the
bottom of the Wall Plate in place. See Figure 6.
7. Snap the Cover Plate onto the Junction Box Adapter.
See Figure 7.
Use 2x
supplied
screws #6
5/8”
7
6
5
4
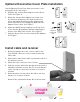
Install cable and receiver
1. Before mounting indoor unit, connect cable to the
5-pin CN105 connector on the control board in the
indoor unit.
2. Mount indoor unit. Route cable to preferred location of
the wireless receiver.
3. Attach the 5 pin connector to the receiver.
4. Push the excess cable back through the indoor unit or
behind the wireless receiver. Do not cut or modify the
cable. Use zip tie connections on back of receiver if
needed.
5. Mount wireless receiver next to the indoor unit (see
below) or in a remote location.
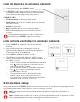
Mount in the orientations shown. Do not block vents.
MCR31400
X
X
OR
OR
UPDATE
IMAGE