Page 1 of 49
SAFETY INSTRUCTIONS For safety and protection, please read the user guide before using the Satellite Terminal, iSaviTM Model: SH-100. In particular, do read this safety section carefully. Keep this safety information where you can refer to it, if necessary. The following general safety precautions must be observed during all phases of operation, service and repair of this equipment.
Battery Safety Use only Addvalue-supplied or approved AC adapters with the terminal and for recharging the batteries. The use of batteries that are not Addvalue-supplied or approved may pose increased safety risks. Do not dispose of batteries in a fire, as they may explode. Batteries may burn or explode if damaged. Do not dismantle, open, bend or cut cells or batteries. Do not attempt to modify or remanufacture the battery. Do not immerse or expose the battery to water or other liquids.
COPYRIGHT © Copyright 2014 Addvalue Innovation Pte Ltd. All rights reserved. This publication and its contents are proprietary to Addvalue Innovation Pte Ltd. No part of this publication may be reproduced in any form or by any means without the written permission of Addvalue Innovation Pte Ltd., 8, Tai Seng Link, Level 5 (Wing 2), Singapore 534158. WARRANTY Addvalue Innovation Pte Ltd has made every effort to ensure the correctness and completeness of the material in this document.
REGULATORY INFORMATION Federal Communication Commission Notice FCC Identifier: QO4-ISAVISH100 USE CONDITIONS: This device complies with part 15 of the FCC Rules. Operation is subject to the following two conditions: This device may not cause harmful interference, and this device must accept any interference received, including interference that may cause undesired operation.
Industry Canada Statement: IC Identifier: 5023B-SH100ISAVI This device complies with Industry Canada license-exempt RSS-170 and RSS-GEN210 standard(s). Operations subject to the following two conditions: (1) this device may not cause interference, and (2) this device must accept any interference, including interference that may cause undesired operation of the device. Le présent appareil est conforme aux CNR d'Industrie Canada applicables aux appareils radio exempts de licence.
Declaration of Conformity: Addvalue Innovation Pte Ltd., 8, Tai Seng Link, Level 5 (Wing 2), Singapore 534158. declares under our sole responsibility that the Product, brand name as Wideye and model: SH-100 Satellite Terminal , iSavi to which this declaration relates, is in conformity with the following standards and/or other normative documents: ETSI EN 301 489-1, -17, -19, -20, ETSI EN 301 681, ETSI EN 300 328, EN 50385, EN 50371, ITU-R M.
SAFETY INSTRUCTIONS .......................................................................................................................... 1 COPYRIGHT ................................................................................................................................................. 4 WARRANTY ................................................................................................................................................. 4 TRADEMARKS .........................................
1 INTRODUCTION Your iSaviTM satellite terminal is specially designed to be compact and easy to use with a standby battery lifespan that is comparable to laptops and smart phones. Together with a corresponding service package from Inmarsat, your iSaviTM can meet the data and voice communications needs for the modern global business traveler, NGO field workers and many more types of user. Key Features • Built-in 802.11 b/g/n access point with 30 metre range (with built in Wi-Fi antenna).
System Requirements Network • IEEE 802.11b/g/n wireless clients Requirements • Inmarsat iSatHub Micro-SIM card Browser based Web Smart devices or personal computer with the following Console operating systems: Requirements • iOS or Android TM, • Windows®, Macintosh ® , or Linux-based operating system Recommended Browsers: • Google ChromeTM • Safari® • Internet Explorer ® • Firefox ® TM Users have to ensure they have the latest version of Java installed where necessary. Visit www.java.
2 GETTING STARTED Note: The antenna is embedded inside the transceiver.
iSavi terminal control Your iSaviTM can be controlled in 2 ways: 1. Web console: Any browser provides access to configure and operate the terminal. See Section 3 NAVIGATING THE WEB CONSOLE. 2. IsatHub Control app: The application is designed for everyday administration of your iSavi terminal including managing data usage and sharing the data connection with other devices. It provides a more limited set of functionality than the web console functionality.
Point the terminal and connect to the network Make sure you place your iSaviTM outside with a clear view of the sky. Your iSaviTM needs be pointed towards the sky in the correct direction to ensure connection to the Inmarsat satellite network. Turn on the terminal by pressing the Power Button for five seconds. It takes around one to two minutes for your iSaviTM to power up and enter antenna pointing mode. There are three methods for antenna pointing: 1. LED visual pointing mode 2.
Audio Assisted Pointing Mode 1. The terminal is in LED visual pointing mode by default. To switch into Audio assisted pointing mode, press and hold ‘Exit Pointing Mode’ button for 5 seconds. 2. The four arrow LEDs will change into flashing green pattern when antenna pointing audio mode is activated, refer Appendix A: Antenna Pointing LED Status Table. 3. The beeping sound indicates the signal strength. The frequency of the beeping will become higher when the signal is stronger. 4.
Accessing data and calls When you first access data over the network, you may need to enter the APN username and password supplied to you with your SIM card by your service provider. Please make sure you have these available. Refer to the Data Profile section for the setting if required.
Refer to the section Status of Terminal. Note: Signal strength need to be at least 42dBHz and above for an acceptable service to commence. You may check the signal strength and registration status using home page of web console or the smart phone Control app. If the signal strength level indicated in the web console is low under registered condition, you can slowly adjust the terminal angle and monitor the signal strength displayed in web console.
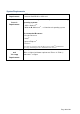
3 NAVIGATING THE WEB CONSOLE Menu Overview DATA Data Profile TELEPHONY SIP Setting SMS Compose SETTING Accounts Terminal Settings - Reboot Terminal Firewall Inbox - Setup - Incoming Rule Sent - Outgoing Rule Wi-Fi - Factory Reset - System Info - Firmware Upgrade - Wireless Setting - Security Setting - Information Drafts Device Management Terminal Info SIM Security - Logs -SIM PIN - Call Log -Terminal to SIM Language Support Status of Terminal The Home page provides the status inform
Status Indicates registration and data connection status. Signal Indicates terminal received signal strength. GPS Indicates GPS information Battery Indicates available capacity of the battery. Temperature Indicates current operating temperature status. Click “Activate Data Connection” or “Deactivate Data Connection” in order to activate or deactivate data connection. Note: Signal strength must be 42 dB or above for the iSaviTM terminal to successfully connect or register to the network.
Data Data Profile Setting Navigate to Data > Data Profile in order to modify the connection type. Connection profile defines the connection type. User can select from a list of profiles to be the default primary profile and connection type. Note: From a smart phone or tablet, the Control app will always use the connection profile defined as default You can create your customized primary profile. Profile Name Change the profile name as desired.
IP Configuration By default, a Dynamic IP Address is selected. To use a Static IP Address: i. Select Static IP Address and enter the IP Address in the space provided. Limited Connection You can control the data usage of the user by setup the limited connection time or volume. Note: The data connection will be automatically deactivated when the volume had reached the defined limit.
Firewall Protection Setting The firewall function is disabled by default and users need to navigate to the firewall setup page to enable it. Setup Navigate to Data > Firewall > Setup to change the Firewall protection profile setup . Follow these steps to change the profile setting. i. Select profile name. ii. Click Edit to modify the setting. iii. By default, your iSaviTM accept all the incoming packets. You can edit the profile name and define the rules to allow or reject incoming packets.
iv. By default, your iSaviTM reject all the outgoing packets You can enable the packet by select the rule name. Note: The incoming and outgoing rules in the profiles are predefined in the general rules. If you would like to add in new rule for specific profile, click Add and fill in the details.
Incoming Rule To define general incoming rule, navigate to Data > Firewall > Incoming Rule to add and define up to 10 rules to allow or reject incoming packets. Outgoing Rule To define general outgoing rule, navigate to Data > Firewall > Outgoing Rule to add and define up to 10 rules to allow or reject outgoing packets.
Access Rights Setting according to MAC address Navigate to Data > Device Management to set the allowed MAC address and the access rights. MAC address is a number that uniquely identifies any device connected to a network. Once the device is connected to the terminal, the MAC address will be shown in the page. From this page, you can also check the number of connected devices, their MAC addresses and the data usage of the terminal.
You can add a new MAC address by clicking Add or create a nickname for the existing MAC address by clicking on the Edit button. Data usage of the device is available in the bottom of the page. i. Define a nickname for the device. ii. Key in the allowed MAC address (for newly added). iii. Check if the MAC address belongs to the smart phone or tablet used to host the Control app. Only one device is allowed to use the Control app each time. iv.
Telephony SIP Setting Navigate to Telephony > Call Setting > SIP setting> SIP Server to change the RTP Codec. Note: SIP calls with the iSaviTM terminal require a special SIP client application on your smart phone or tablet. The IsatHub Voice app is available from the App Store or Google Play. SIP calls from a Windows or Macintosh PC are not supported. Use of any other SIP application will not benefit from the voice connection to the Inmarsat network and may suffer technical issues in congested areas.
SMS Compose a new SMS Navigate to SMS > Compose to enter compose page. i. Enter the recipient’s phone number in the Phone no. box. Type the message in the text editor box. ii. Click Append GPS to include the current GPS location in the SMS. iii. Click Send to send the SMS iv. To save an unsent SMS, click Save and the unsent SMS will save in Drafts. v. Check the box ☑if you wish to store a sent SMS into SIM card.
View Received SMS Navigate to SMS > Folders> Inbox to view received SMS. Reply to an SMS from Inbox: i. Select the SMS you plan to reply to by clicking the particular SMS by clicking the ☑ ii. Click Reply. iii. The inbox console will switch over to Compose mode. Enter your reply in text box. Click Send to send the SMS. Forward an SMS from Inbox: i. Select the SMS you plan to forward and click Forward.. ii. The inbox console will switch over to Compose mode. Enter your reply in text box.
View Draft SMS Stored SMS are saved inside draft folder. Navigate to SMS > Folders> Draft to view Draft SMS. Send a draft SMS: i. Select the draft SMS you plan to send and click Send ii. The SMS will be sent to the recipient. Forward a draft SMS to other recipient: i. Select the draft SMS you plan to send and click Send. ii. Click Forward. iii. The draft console will switches over the Compose console. iv. Enter the recipient’s number in the Phone No. field. v. Click Send. vi.
Settings Create Account for Web Console Access Navigate to Settings > Security> Account to create or edit an account for Web Console and Control app access. Only one User and one Admin account are allowed for your iSaviTM. Add a new account: i. Click Add. ii. Fill in New Password and Re-type Password. iii. Click Add. iv. The new account will be added into the account list. Delete an account: i. Select the account which you want to delete. ii. Click Delete. iii.
Change account password: i. Select the account which you want to change the password (example: admin). ii. Fill in the Old Password, New Password and Re-type Password. iii. Click Update for the new password to take effect. Note: SSID network name is the Wi-Fi network name that other users will see on their smart phone, tablets or personal computers when they view a list of available networks. You can get the default SSID of your iSaviTM from product label.
Navigate to Settings > Security> Wi-Fi> Security Settings to set password of your Wi-Fi network. Security Mode: Disabled or select the security mode for the wireless local area network. Three different security modes are available: • Wired Equivalent Privacy (WEP) For 64-bit encryption - You can enter either 5 ASCII characters or 10 hexadecimal digits (any combination of 0-9, a-f, A-F, empty string is not permitted).
Configure SIM Security SIM PIN If the security feature is enabled, a prompt requests you to enter the SIM PIN each time you power up your iSaviTM. This helps prevent unauthorised use of your SIM. Disable this feature to skip PIN entry process. Navigate to Settings > Security> SIM Security> SIM PIN to enable SIM PIN. 1. Click SIM PIN to configure the SIM PIN settings. 2. Select Disabled if you do not need to set the SIM PIN. 3. Select Enabled to set the SIM PIN. 4.
Terminal Settings Navigate to Settings > Terminal Settings> Reboot Terminal to reboot the terminal. Navigate to Settings > Terminal Settings> Factory Reset to factory reset the terminal. Enter default security code 0000 for factory reset. You can also perform factory reset by referring to the following step: i. With the terminal off, remove the SIM card. ii. Press the ‘Power’ button for 5 seconds. iii.
Firmware Upgrade Firmware upgrade allows you to update your iSaviTM with the latest operating software. There are two methods for upgrading the iSaviTM firmware. Firmware upgrade by Safe Mode over Wi-Fi vii. With the terminal off, press and hold ‘Exit Pointing Mode’ button. viii. Press the ‘Power’ button for 5 seconds. ix. Release both ‘Exit Pointing Mode’ button and ‘Power’ button. x.
Important Information and Log File Navigate to Setting > Terminal Info> Information in order to check for the detail of the terminal. You may need to supply this information when contacting your service provider. Event Logs and Error Logs Navigate to Setting > Terminal Info> Logs to view the Event Log of Error Log of the terminal. Click Export all Logs in order to export the logs.
4 TROUBLESHOOTING AND FAQ Terminal Fail to Power Up Problem Possible Root Cause TM My iSavi does not switch on successfully SIM Card Problem LED Situation 19: Fatal error (‘Power’ button LED colour turn to red) Solution Battery not connected properly to the iSaviTM transceiver. Check if the battery is attached correctly. Press and hold the Power Button for 5 seconds. Battery pack is in low charge condition. Check if the battery needs charging.
Antenna Pointing Problem Possible Root Cause Solution LED Situation 14: Azimuth and Elevation are correct but low signal strengthLED visual pointing mode. (All the four Antenna Pointing LEDs flashing in green ; ‘Exit Pointing Mode’ button flashing in red) Terminal is blocked by building or wrong locating position. LED visual pointing mode is using magnetometer and GPS to do the pointing.
Antenna Pointing Problem LED Situation 16: Registration Failure(All the four LEDs flashing in amber, ‘Exit Pointing Mode’ button flashing in red) Possible Root Cause Solution Registration time-out Press and hold ‘Exit Pointing Mode’ button for 3 seconds to enter Antenna Pointing Mode again. LED Situation 21: Interference by electrical devices Magnetic interference detected.
SMS Problem My Web Console cannot receive a text message Web Console Problem Unable to access Web Console Possible Root Cause Solution SMS inbox is full. Maximum SMS storage is dependent on SIM card memory. If the memory is full, delete a few texts to free up memory for new messages. Some local networks do not have agreements in place to send SMS to the Inmarsat network Ensure the sender tries another network to send messages. Possible Root Cause Solution Wi-Fi connection.
Safe Mode and Firmware Upgrade Problem Possible Root Cause Unable to enter Incorrect steps for safe mode. button pressing Terminal continues to start in normal mode. Solution Ensure the ‘Exit Pointing Mode’ button is pressed and held. Press and hold ‘Power’ button for 3 seconds. Release ‘Exit Pointing Mode’ button and ‘Power’ button. Firmware Upgrade Failure Incorrect upgrade package/file is selected. Ensure that correct firmware upgrade package is used. Wi-Fi connection is lost.
5 CARE AND MAINTAINENCE Caring for your iSaviTM Your iSaviTM is a highly sophisticated electronic device. Complying with the following recommendations will help you to protect your warranty coverage and extend your terminal’s life: • Keep your terminal dry. Liquids or moisture can contain minerals that will damage electronic circuits.
APPENDIX A: ANTENNA POINTING LED STATUS TABLE LED Legend * Flashing in sequential pattern.
LED Legend * Flashing in sequential pattern CW: Clockwise CCW: Counterclockwise Note: Flashing LED is represented by symbol with zebra stripes Situation Power Button Arrow LED Exit Button Status 1 Terminal is OFF. 2 Powering up (firmware loading). * 3 Acquiring GPS. * 4 Tilt UP and Turn CLOCKWISE for correct pointing. 5 Tilt UP and Turn COUNTERCLOCKWISE for correct pointing. 6 Tilt DOWN and CLOCKWISE for correct pointing. 7 Tilt DOWN and COUNTERCLOCKWISE for correct pointing.
LED Legend * Flashing in sequential pattern Note: Flashing LED is represented by symbol with zebra stripes Situation Power Button Arrow LED Exit Button Status 11 Azimuth is correct. Tilt DOWN for correct pointing. 12 Azimuth and Elevation are correct. Press Exit Button to exit Antenna Pointing and register to network. 13 Registering to network. * 14 Azimuth and Elevation are correct but Low † signal strength. 15 Registered to network successfully. Network Registration Failure.
LED Legend * Flashing in sequential pattern Note: Flashing LED is represented by symbol with zebra stripes 21 22 † GPS not available after timeout. † 23 Audio Pointing Mode ON- Global beam is † not available. 24 Audio Pointing Mode ON- Global beam is available. 25 26 † Magnetic interference detected. Safe Mode is enabled. Powering down.
APPENDIX B: TECHNICAL SPECIFICATIONS Operating Frequency: Satellite Transmit: 1626.5 – 1660.5 MHz and 1668 – 1675 MHz Satellite Receive: 1518 – 1559 MHz GPS Frequency: 1574.42 – 1576.42 MHz Dimensions (L x W x H ) Overall Terminal 180 x 170 x 30 mm 7.09 x 6.69 x 1.18 in Transceiver 130 x 170 x 30 mm 5.12 x 6.69 x 1.18 in Standard Battery Pack 50 x 170 x 30 mm 1.97 x 6.69 x 1.18 in Weight Overall Terminal 900g 1.98lbs Transceiver 640g 1.
Battery Standard: 10.8V @ 3Ah (3S1P) Li-ion Battery Pack High Capacity (Optional accessory): 10.8V @ 6Ah (3S2P) Li-ion Battery Pack Item Battery Type Nominal Voltage Standard Battery Capacity Charging temperature Operating temperature Min. charge cycles Specification Lithium ion, rechargeable 10.
APPENDIX C: ISATHUB COVERAGE MAP At the time of printing Inmarsat has announced that the change to the Alphasat satellite in the EMEA region has been postponed until March 2015. The coverage will change to the following when the change occurs.