
User guide


www.addonics.com Technical Support (M-F 8:30am - 6:00pm PST) Phone: 408-453-6212 Email: www.addonics.com/support/query/
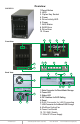
Drive Installation
1. Be sure all doors are unlocked, use the provided keys to unlock if needed.
2. Gently pull the lever on the door to release it.
3. Insert the drive as shown on the label inside the door: The SATA connector
toward the rear, with label side to the right. The drive should slide in easily,
don't force it.
4. Close the door on the drive bay. It should also give little resistance, don't force
it. It can help to slightly tug the lever while snapping the door shut to make it
easier. As soon as the drive is in position it will power up.
5. The drives may be locked in place if desired.
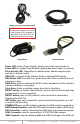
Direct Attached Storage (“DAS”) Connector
The Secure NAS unit's RAID array may be connected from the DAS connector
directly to a computer using the eSATA cable provided. This connection can be
useful for adding content directly to the RAID array.
NOTE: The DAS Connector is a hardware controlled switch, activated by inserting an eSATA cable
into the eSATA port on the back of the Secure NAS unit. The Secure NAS unit's RAID array will
instantly disconnect from the NAS controller inside the unit, even if there is nothing connected to the
other end of the eSATA cable. DO NOT connect an eSATA cable to the DAS Connector except
when using the RAID array with an external computer.
RAID Configuration
The Secure NAS unit does not support SATA Port Multipliers. Using the unit with
more than one drive requires a RAID configuration.
Using identical drives for all settings other than LARGE is strongly
recommended. Creating a LARGE array using drives that have different
properties will use all space on all members, and performance will match that of
the member in use during any particular I/O operation. Creating a RAID using
drives that are not all the same size will result in all members using only as
much space as the smallest member. Creating a RAID using drives that have
different performance will degrade the overall performance of the array.
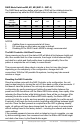
Any number of drives may be installed in the unit, the RAID Modes available are
as follows:
NOTE: RAID 0 and LARGE modes are NOT recommended for use on the Secure NAS unit.
Number of drives
RAID Mode
1
JBOD Mode only
2
RAID 0, 1, CLONE, LARGE
3
RAID 0, 3, 5, CLONE, LARGE
4
RAID 0, 10, 3, 5, CLONE, LARGE
5
RAID 0, 3, 5, CLONE, LARGE