Addlogix Wireless PC2TV InternetVue 2100 User’s Guide Version 3.01.
Addlogix Wireless PC2TV InternetVue 2100 Version 0.2 Table of Contents 1 1.1 1.2 1.3 2 2.1 3 3.1 3.2 4 4.1 4.2 4.
Addlogix Wireless PC2TV InternetVue 2100 Version 0.
Addlogix Wireless PC2TV InternetVue 2100 1 Version 0.2 Introduction 1.1 Product Description The Addlgoix Wireless PC2TV InternetVue 2100 device is a graphics/video converter that enables you to wirelessly connect your desktop or laptop computer to any display such as a television, projector, or computer monitor.
Addlogix Wireless PC2TV InternetVue 2100 Version 0.2 1.3 Minimum System Requirements Operating System • • • Microsoft Windows 2000 Professional (SP4) Windows XP Home / Professional Edition SP2 Windows Vista Computer System • • • • 1 2 Pentium 4 or M >1.5 GHz1 512 MB of RAM 802.11b/g capability (built-in or external adapter)2 10MB free hard drive space Dual-core recommended 802.
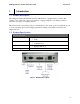
Addlogix Wireless PC2TV InternetVue 2100 2 Version 0.2 Hardware Setup 2.1 Attaching InternetVue 2100 to a Television or Monitor 1. Connect a DVI or VGA cable to the appropriate DVI or VGA port on the InternetVue 2100. 2. Connect the other end of the cable to the appropriate DVI or VGA port on the television, projector or monitor. 3. To enable audio, connect a stereo cable from the television, monitor or external speakers to the stereo jack connector on the InternetVue 2100. 4.
Addlogix Wireless PC2TV InternetVue 2100 3 Version 0.2 Software Setup 3.1 Installing Software Before you install the InternetVue 2100 software, remove any earlier version of the InternetVue 2100 software installed on the computer. See “Uninstalling Software” for removal instruction. 1. Load the CD that came with the InternetVue 2100 into the computer CD/DVD drive. The Setup program should Auto-Start (or click on PC2TVSetup.exe to start the program) 2.
Addlogix Wireless PC2TV InternetVue 2100 Version 0.2 3.2 Uninstalling the Software 1. Click Start and navigate to All Programs > PC2TV 2. Click Uninstall and the software removal process will begin. 3. When the un-installation process is finished, reboot your PC.
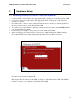
Addlogix Wireless PC2TV InternetVue 2100 4 Version 0.2 InternetVue 2100 Software Application 4.1 Using the Configuration Wizard After installing InternetVue 2100 software, on the first application start, the Configuration Wizard will appear to guide you through the initial setup. The Wizard can also be selected by clicking the Wizard button in the Advance View screen. Figure 3: Configuration Wizard Welcome Screen The wizard guides you through each configuration screen.
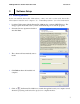
Addlogix Wireless PC2TV InternetVue 2100 Version 0.2 Figure 4: Configuration Wizard Password Setup Screen The Password (optional) restricts access to Advance and Internet Settings. Password can be up to 32 characters in length.
Addlogix Wireless PC2TV InternetVue 2100 Version 0.2 The Device Name (optional) allows you to use a name in place of the PC2TV’s default display ID. The Device Name can be up to 4 characters in length. Figure 6: Configuration Wizard Wireless Settings Screen The Wireless Network settings allow you to select one of the three possible connection configurations for your PC2TV device: 1.
Addlogix Wireless PC2TV InternetVue 2100 Version 0.
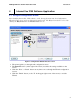
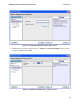
Addlogix Wireless PC2TV InternetVue 2100 Version 0.2 4.2 Using the Software Figure 8: InternetVue 2100 Application 1. At start-up, the application automatically scans for Wireless PC2TV InternetVue 2100 devices. 2. If one InternetVue 2100 is located, the SSID of that device will appear in the Wireless Display List. 3. If multiple InternetVue 2100s are located, the Wireless Display List appears with the SSID of each device. Select the one you want to connect to, and click on Connect button.
Addlogix Wireless PC2TV InternetVue 2100 Version 0.2 display. Select this option when you want to “hide” the screen. Advanced View (button) Expands the InternetVue 2100 application, allowing you to configure advanced settings such as: General - Resolution, Desktop Display, Device Settings, and Configuration Summary. Display Connection - Wireless Channel Number. Internet Connection - External Network Connection Wired or Wireless, TCP/IP, and Wireless Settings.
Addlogix Wireless PC2TV InternetVue 2100 Version 0.2 Accessing Application Help To access Application Help, click on the “?” (Application Help) button. Figure 10: Application Help Screen 4.3 Advanced Settings To access the Advanced settings, click the Advanced View button on PC2TV InternetVue 2100 Application.
Addlogix Wireless PC2TV InternetVue 2100 Version 0.2 The PC2TV InternetVue 2100 application expands to its full view, as shown below: Figure 12: InternetVue 2100 Application General Resolution, Desktop Display, Device Settings, and Configuration Summary. Display Connection Wireless Channel Number. Internet Connection TCP/IP, and Wireless Settings (External Network Connection Wired or Wireless). Advanced Password Setup (Password restricts access to Advanced and Internet Settings.
Addlogix Wireless PC2TV InternetVue 2100 Version 0.2 Video Settings Figure 13: General – Video Settings Screen Resolution sets the quality of the image sent from your PC to your TV or Monitor. Increasing the Resolution, increases the amount of data sent over your wireless connection, and may exceed the capability of your wireless network. You should select the lowest resolution that gives acceptable image quality on your TV or Monitor.
Addlogix Wireless PC2TV InternetVue 2100 Version 0.2 location of the Extended Mode virtual display area (for example, to the right or left of the normal viewing area of your PC display). To send DVD video to your TV or Monitor, start playing the DVD in your media player, and drag the media player into the Extended Mode virtual display area. Device Settings Figure 14: General – Configuration Summary Screen Network Connection LAN shows the connection from your PC to the PC2TV device.
Addlogix Wireless PC2TV InternetVue 2100 Version 0.2 Wireless Channel Number Figure 15: Display Connection – Wireless Channel Number Screen Channel selects one of the wireless channels to use for the connection from your PC to the PC2TV device. You may need to change the wireless channel number to improve video quality, if too many wireless access points in your area are using the same channel number.
Addlogix Wireless PC2TV InternetVue 2100 Version 0.2 Wireless Settings Figure 17: Internet Connection – Wireless Settings Screen The Wireless Network settings allow you to select one of the three possible connection configurations for your PC2TV device. 1. The “Do not allow external network connections” setting means there is no connection from the PC2TV device (either wireless or Ethernet cable) to the Internet. 2.
Addlogix Wireless PC2TV InternetVue 2100 Version 0.2 Password Setup Figure 18: Advanced – Password Setup Screen Password restricts access to Advanced and Internet Settings. Password can be up to 32 characters in length.
Addlogix Wireless PC2TV InternetVue 2100 5 Version 0.2 Troubleshooting Be sure your PC is on and it’s in not standby or hibernate mode. In addition, make sure the PC’s wireless network interface is enabled and it supports either 802.11g or 802.11b specification. Installation Questions and Issues Do I have to reboot after installing the Wireless PC2TV InternetVue 2100 application? After the application is installed, the application checks if the driver installation requires a reboot or not.
Addlogix Wireless PC2TV InternetVue 2100 Version 0.2 What WiFi configuration is necessary to use the Wireless PC2TV InternetVue 2100? On the computer, check the WiFi configuration to ensure that the wireless radio is enabled and set to Infrastructure mode. Each Wireless PC2TV InternetVue 2100 must have a unique SSID. Identical SSIDs on more than one unit will cause unpredictable application behavior.
Addlogix Wireless PC2TV InternetVue 2100 Version 0.2 An Ethernet network cable is connected either to the Wireless PC2TV InternetVue 2100 or your computer. The Wireless PC2TV InternetVue 2100 application is launched. If you are projecting: Check the bullet items listed above. Stop projecting from within the application, and then project again. If the Internet connection still does not work, close the Wireless PC2TV InternetVue 2100 application, and restart it.
Addlogix Wireless PC2TV InternetVue 2100 6 Version 0.2 FAQ General Operation Can more than one computer project to the same Wireless PC2TV InternetVue 2100/projector combination at the same time? The Wireless PC2TV InternetVue 2100 manages users on a first-come, first-served basis. This implies that if one user is projecting, others must wait until the first user closes their Wireless PC2TV InternetVue 2100 application or stops projection.
Addlogix Wireless PC2TV InternetVue 2100 Version 0.2 Can the Internet be accessed while projecting through the Wireless PC2TV InternetVue 2100? The Internet can be accessed either through the computer, the Wireless PC2TV InternetVue 2100, or a wireless access point (if one already exists while being projected onto the display).
Addlogix Wireless PC2TV InternetVue 2100 Version 0.2 One of the settings is to put the onboard wireless adapter on "power save mode". When this is enabled (default setting in most cases), it makes the wireless adapter go to sleep several times a second to reduce power consumption. This behavior is acceptable for data but for 'real time' applications, like graphics & video display, there is significant adverse impact on the link quality and performance required for this type of application.
Addlogix Wireless PC2TV InternetVue 2100 Version 0.2 If I have set but forgot my password setting how do I reset it? Factory default can be restored by press and hold the “Factory Reset Switch” for the VGA/DVI units or the “Component/Composite Video Switch” for the component/composite units, for five seconds. Once the default setting is restored, you can then reconfigure the settings.