InternetVue™ User’s Manual v3.06.
Table Of Contents Introduction ................................................................................................................................................ 1 Retail Box Contents ................................................................................................................................... 2 Overall Requirements ................................................................................................................................ 3 Hardware Specifications.....
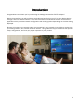
Introduction Congratulations and thank you for purchasing the Addlogix InternetVue PC2TV adapter! With the InternetVue, you will be able to send video and audio from your PC to your display device through a wired or wireless network. The PC2TV software includes device drivers and the PC2TV application which provides network configuration and viewing options depending on the video being displayed.
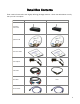
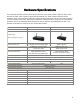
Retail Box Contents Each model of InternetVue has slightly differing package contents. Check the table below to verify that your set is complete.
Overall Requirements The InternetVue products require the use of the PC2TV software for capturing your PC's video, and sending it to the receivers over the network. This process is very CPU-intensive, especially when full-motion video is involved. Therefore, CPU type and speed are the most critical factors in achieving satisfactory InternetVue performance. Minimum CPU Type CPU Speed CPU Cores RAM Networking Operating System Optimal Any CPU with SSE2 instruction support. Visit: http://en.wikipedia.
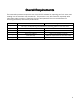
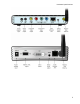
Hardware Specifications The InternetVue PC2TV receiver comes in two versions, the IV-2020, which is best for home users, and the EV-2100, more suited for office and educational use. Both models utilize the PC2TV software, which uses proprietary method of capturing audio and video from your PC, then sending it over the network to the units. Because this capture / decode process is unique to the InternetVue products, there is no standard which hackers can use to decipher "eavesdropped" AV data.
Hardware Specifications 5
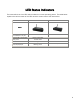
LED Status Indicators The InternetVue has front LEDs which indicate its current operating status. The table below explains the various states of the LEDs and the current state of the InternetVue: InternetVue 2020 InternetVue 2100 Displaying splash screen(s), not connected to any PC.
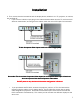
Installation 1. First, ensure that the InternetVue and the display device, whether it is a TV, projector, or monitor, are powered off. • If you have an IV-2020, simply plug in the video and audio cables into the TV, and into the IV2020 as shown below, ensuring that the cables match the color of RCA jacks on both ends. TV with Component Component Video Inputs result in the best image quality Some older TVs do not have Component Video inputs,but a Composite Video input will work too.
Installation Connecting the EVEV-2100 to a projector using the VGA port. Note that this applies to the DVIDVI-D port as well. When connecting connecting to a TV, the connectors may be different. The VGA input can br referred to as "PC" or "RGB". Do NOT power on any device until the entire configuration is finished. 2. If it is NOT feasible to have a wired connection between the InternetVue and your router or network switch, then skip this step.
Installation However, if your InternetVue can be connected using a wired connection to your router or network switch, go ahead and do so. Having a wired connection between the InternetVue and the router can simplify connectivity and maximize video and data throughput between your PC, the InternetVue itself, your local network resources, and the Internet (your InternetVue package has a 7-foot Ethernet cable included). InternetVue receiver Router or Network Switch 3.
Booting Up the InternetVue and Running the PC2TV Software Whenever you power up the InternetVue receiver, it goes through a 30 to 45-second bootup process. On an IV-2020, it automatically detects which video output connector is being used. As for the EV-2100, both outputs are enabled simultaneously. During the bootup process, a set of test screens appear. With an IV-2020, these images can help you determine if your Component Video cables are connected properly.
Booting Up the InternetVue and Running the PC2TV Software That's it, you're ready to go! Simply double-click the PC2TV icon on your Windows desktop to launch the software: The PC2TV software will try to automatically connect to your InternetVue unit using your PC's wireless connection. Otherwise, you can instruct it to connect using your network instead: The differences and advantages of "Direct" and "Network" connections are better explained in the InternetVue Network Configurations section.
DIRECT and NETWORK Connection Methods There are TWO main methods of connecting to your InternetVue receiver - Direct, Direct and Network. Network DIRECT: Typically, there would only be one InternetVue in your vicinity, and the PC2TV software will try to connect to that unit automatically. If there is more than one InternetVue, or if you prefer to connect manually, the PC2TV software will present you with the window shown above.
DIRECT and NETWORK Connection Methods In this example, your PC connects to the InternetVue directly. The InternetVue will get internet access from your router either through a wired or wireless connection. If the connection is wireless, the PC2TV software will ask you to Enter the Network Key of your wireless router unless you've already done so, or if your router does not have any encryption.
DIRECT and NETWORK Connection Methods NETWORK: The second method is to connect through your existing network. This means the AV is not sent direct-wirelessly to the InternetVue from your PC, but rather to your router, then from your router, to the InternetVue.
DIRECT and NETWORK Connection Methods In this example, your PC connects to the InternetVue through your router, whether wired or wireless. Your PC will get internet access from your router through the same connection. In order to establish a wireless connection between your router and the InternetVue, you will need to first connect using the DIRECT method, then enter your router's Wireless Network Key, if any.
Entering the Wireless Network Key If you are making a DIRECT connection from your PC to the InternetVue, you might be prompted to enter a wireless network key, as shown below: This network key is THE NETWORK KEY (or "PASSWORD" or "PASSPHRASE") OF YOUR WIRELESS ROUTER. For it to work with your InternetVue, this key should be between 8 and 23 characters long. Do not call Addlogix Tech Support for this network key because they do not know what what it is.
Disabling 3rd3rd-Party Wireless Utilities In order for InternetVue to work properly, it must have control over your computer's wireless network adapter. Windows has its own wireless networking interface. In XP, that is called the "Wireless Zero Configuration". The InternetVue PC2TV software works well with Windows utilities, but not with some 3rd-party wireless utilities. In those cases, you MAY have to disable the 3rd-party utility.
Each computer is different. Navigate to your computer's Wireless Network Connection. For example, in Windows XP, click on START > SETTINGS > NETWORK CONNECTIONS > right-click on Wireless Network Connection, then select PROPERTIES. Click on the Wireless Networks tab: Put a checkmark in the box indicated above. Click OK. Now, if you go back into PROPERTIES again, click the VIEW WIRELESS NETWORKS button, the window should now look this, where it shows a list of local wireless access points.
Tips and Tricks Here we will describe some ways to increase performance of your system in order to maximize InternetVue performance. 1. Update your drivers. Make sure your computer has the latest drivers for the following hardware subsystems: • Wireless Network Card • CPU power management drivers • Graphics processor / card (not essential but recommended) • Router / Access point firmware (not essential but recommended) 2. Ensure that your CPU is running at full speed.
Tips and Tricks 3. Disable 3rd-party wireless utilities. Refer to the Disabling 3rd-Party Wireless Utilities section. 4. The InternetVue utilizes QPlayer when playing back many different file formats. Try to download the videos or movies you will be watching with the InternetVue so that QPlayer can be used. For example, videos on the web are usually flash-based. Watching them straight from the web will require the use of your browser.
QPlayer QPlayer (or QV Player) is a specially-written application designed to work with the InternetVue receiver. QPlayer becomes the default media player for locally stored media files of nearly all types, formats, and CODECs. Notice how the icons of media files change to the QPlayer icon only when the PC2TV software is running (see above). However, there are still some file types that are not (yet) compatible with QPlayer.
QPlayer When the PC2TV software is running, the default media player of media files supported by QPlayer becomes QPlayer. Simply double-clicking on the file launches QPlayer: The greatest benefit that QPlayer brings to InternetVue is its ability to playback videos in three modes: PROJECTION MODE In Projection Mode, video is rendered in full screen on the InternetVue display, and is also rendered in a QPlayer window on your PC. This mode uses high CPU processing resources.
QPlayer MIRROR MODE In Mirror Mode, everything displayed on the PC is also shown on TV. This is the standard, "duplicate" video mode. This mode also uses a significant amount of processing power. TV ONLY MODE TV Only Mode is the most useful mode when playing back movies. Here, video is only rendered on the InternetVue display, not on the PC display, thereby saving CPU resources and making it run smoother as well. In this mode, you can also run other programs while video is being played on the InternetVue.
QPlayer DVD Playback DVDs played using other software typically results in a blank, green, or purple screen on the InternetVue display because the software DVD player renders video in overlay, which is not compatible with InternetVue. The solution is to playback DVDs and other videos using QPlayer. Playing DVDs in QPlayer is as simple as clicking on FILE > OPEN DVD. QPlayer is based on the open-source program, "Media Player Classic.
PC2TV Main Interface The main PC2TV interface provides you with a quick way to viewing modes (Video Mode, Photo Mode, Hide), setting Advanced Options, and selecting which unit to connect with. The function of each item is shown above. When connected using the Direct method, the InternetVue SSID will be shown (ie. PC2TV-4741). However, if you are connected through the Network method, the IP address will be shown instead (ie. 192.168.1.
Viewing Modes There are three modes of viewing video with the InternetVue: Photo Mode • Best image quality. Ideal for showing photos, slow-moving images, spreadsheets, presentations, webpages, or anything requiring fine detail reproduction. • Output Resolution on the IV-2020 is 720p • Output Resolution on the EV-2100 is 1024x768 • • • Video Mode Best frame rate. Ideal for showing videos at up to 30 fps. Output Resolution on the IV-2020 is 480p Output Resolution on the EV-2100 is 640x480.
Advanced Options Upon expanding the Advanced Options window, you will be presented with the Summary, as shown above. This tells us that: • The PC is connect to the InternetVue using a Direct wireless connection. If you are connected to the InternetVue using the Network method, the Summary will show "Wired" instead, regardless of whether the connection is wired or wireless to the router.
Device Settings Here, you can change the last four characters of your InternetVue's SSID. You can use alphanumeric characters only. Also, you can enable the Access Code option here. Enabling the Access Code, will require the user to enter a code prior to connecting to the InternetVue. This code will be shown on the splash screen. The purpose of this code is to minimize unauthorized connections to the InternetVue by users who are not within the viewing area of the display device.
TV Type This window appears only if you have an InternetVue 2020. Here, you can select the type of TV you are using in order to maximize quality.
Connection Summary This screen will show you which output connectors are being used. With an InternetVue 2100, both DVI and VGA are enabled, as shown above.
Wireless Channel This option is only available if your are connected to the InternetVue using the Direct method and if the InternetVue is NOT wirelessly communicating with your router for internet access. Here, you can change the wireless channel being used between your PC and the InternetVue. Other wireless networking devices in the area can cause interference when using the same channel. Frame rate can improve if you select an unoccupied wireless channel.
TCP/IP Settings If your InternetVue is connected to your router either by a wired or wireless connection, you can specify whether it should obtain its IP address from your router automatically, or if you prefer to set a static IP address for it.
Wireless Settings When you click on this option, the following window will appear for a short period of time. Click on OK to proceed: In this window, you can select from three options for internet access through the InternetVue. Note that this is relevant only if you are connecting using the Direct method. If you are connecting to the InternetVue using the Network method, the option selected here is of little consequence because your PC will be getting internet access directly from your router.
Wireless Settings The InternetVue will only use its wireless connection for internet access. Here, you will need to click your wireless access point or router, then press the SELECT button. Press the REFRESH button to search the vicinity if your router is not visible in the list. This may require you to enter the wireless network key. If you wish to manually enter your wireless router's settings, click on the window will open up: button.
Password Setup An optional password can be entered here to prevent other users from changing settings. If you have forgotten your password, simply press the Factory Reset button for about 20 seconds. If you have a password and wish to disable it, click the CLEAR button, then press APPLY. When the password is enabled, only the GENERAL section of the PC2TV software will be available: To unlock the software, click on the DEVICE SETTINGS page, then click on the UNLOCK button.
Password Setup To lock the software again, simply press the lock button on the same page: 36
Video Settings Quality Settings Here, you can select how video is compressed and sent from your PC to the InternetVue. • Optimize Video Playback for Image Quality - Does not perform additional compression on video stream in order to maintain better image quality, however frame rates may drop. • Optimize Video Playback Playback for Frame Rate - Performs additional compression on video stream to maximize frame rate when the PC2TV software detects video playback. Image quality will be lower.
Video Settings In extended mode, you can use the same Windows Display Properties controls to manipulate the screen resolution on the InternetVue display. Right click on an empty space on your desktop, then click PROPERTIES. Click on the SETTINGS tab: In this example, there are 5 virtual displays on this computer. To see which one is the InternetVue display, click on the IDENTIFY button, and see what number comes up on the InternetVue display.
Infrared Remote Control The Infrared Remote Control provides you with a simple way to control the mouse pointer, make mode changes (Video Mode, Photo Mode, Hide), launch a browser, and perform basic text entry. Only the IV-2020 works with remotes, the EV-2100 does not have an IR receiver port. Note that the remote will only work when the PC2TV software has established a connection with your InternetVue 2020 receiver.
• • Infrared Remote Control If you have the AM5412 remote (the unit on the right in the image above), select it, then click APPLY: If you have the CF Trackpad remote (the unit on the left in the image above), select it, then click APPLY: Here are the button mappings and functions of the remotes: 40
Infrared Remote Control 41
Infrared Remote Control *Blink is 3rd-party free software NOT supported by Addlogix. It can be downloaded at www.myblink.
Advanced Tricks Using One PC to Display the Same Content on Two InternetVue Receivers Currently, the InternetVue solution is one-to-one. However, there is a way to have one physical PC send the same video stream to two InternetVue receivers. NOTE: This will only work on powerful machines, preferably dual or quad-core systems with Hardware Virtualization capabilities in its CPU. 1. Make sure that the InternetVue unit have been assigned IP addresses from your router/DHCP server.
Advanced Tricks 3. Create a virtual machine on your computer, and install Windows XP, 2000, or Vista on it. 4. Install the PC2TV software in that Virtual Machine's OS. If the content you are displaying is fullmotion video, it is best to run the Virtual Machine's desktop resolution at 640x480. If the content is static or slow-moving images, you can set the resolution higher.
Advanced Tricks 5. Make sure that the Networking Adapter in the Virtual Machine settings is tied to your computer's Network Adapter which is on the same network (whether wired or wirelessly) as the router connecting to the InternetVue receivers. Double check this by checking the IP address of your Virtual Machine's network adapter, and compare it to the IP address shown on the InternetVue TV. They should share the same first three octets (a.b.c.x, where a, b, c are the first three octets).
Advanced Tricks The overall network topology becomes: 6. Install / run the program you will to display on the TV. Now you can connect to the first InternetVue receiver using the Network method in the Virtual Machine.
Advanced Tricks Set the PC2TV to the appropriate viewing mode, then run the application which will be displaying your audio/video content. 7. To stream to the second InternetVue, run the PC2TV software on the host OS, and connect to the second InternetVue receiver. This the PC2TV program on the host OS: When connected to the second InternetVue, enable Extended mode. You should set the resolution of that extended desktop to match the resolution of the Virtual Machine.
Advanced Tricks Please note that full-motion video is very taxing on a CPU core. Also, full-motion video utilizes about 20-30mbps of network bandwidth. It is recommended that a gigabit link be used between the host PC and the router/switch, and that 100Base-T be used to the individual InternetVue receivers. However, if the content being displayed is not full-motion, then lower-bandwidth connections may be used.
Troubleshooting: FirstFirst-Time Connection Without Without Wireless You can also fill out a Support Ticket at addlogix.com/wbs PC SETUP: My PC does not have a wireless network adapter, only a wired ethernet connection to the router. PROBLEM: I am trying to connect to the InternetVue for the first time, and the PC2TV software does not see it even though it is connected to my router, and my PC is also connected to my router.
Troubleshooting: Video Playback Troubleshooting: Video Playback You can also fill out a Support Ticket at addlogix.com/wbs Problem Possible Causes Sluggish, choppy playback on InternetVue display device Weak or intermittent wireless network signal caused by antenna issues, distance, obstructions, or interference. Solutions / Workarounds / Notes • • • • • • • • Slow or intermittent wired network signal caused by poor cabling connections, too much network traffic, collisions, or network too slow.
Troubleshooting: Video Playback software to capture, compress, and transmit it smoothly. Keep in mind that the IV-2020 output display resolution in Video Mode is 480p while the EV-2100 is 640x480. Larger videos will simply be scaled down to those resolutions. Video pauses at the The InternetVue hardware is beginning for a optimizing compression for couple seconds maximized frame rate. • This is normal behavior.
Troubleshooting: Video Playback SETTINGS tab: 3. Click on the ADVANCED button to open the Advanced Properties window. 4.
Troubleshooting: Video Playback 5. Move the HARDWARE ACCELERATION slider to the 2nd notch from the left. Click OK on all windows to close. You will need to close and reopen any media player or applications that may be running the video before this change would take effect. I have a multimonitor setup. The application I would like shown on the InternetVue display is not appearing. The PC2TV software can be set to This is normal behavior.
Troubleshooting: Video Playback Move the slider to 1024x768. If your display device has a native resolution lower than this such as 800x600, move the slider further to the left until you reach 800x600.
Troubleshooting: Audio Issues You can also fill out a Support Ticket at addlogix.com/wbs Problem Possible Causes Solutions / Workarounds / Notes When connecting to the InternetVue, there is no audio coming from the display device's speakers. The incorrect input is selected on the display device or the volume is set too low. • • Increase your display device's volume Ensure that the correct input is selected The audio cable is disconnected or damaged.
Troubleshooting: Audio Issues Your InternetVue 2020 needs to have its firmware updated. Insert the included CD (v3.06.10) into your PC's CD/DVD drive and follow the installation instructions. Connect to your InternetVue and follow the firmware upgrade procedure. • Buzzing audio, or audio on one speaker only The audio cable is disconnected or damaged.
Troubleshooting: Audio Issues currently running, but there is sound from others. After disconnecting from the InternetVue receiver, there is no audio coming from my PC speakers. Assuming no changes were made with While connected to the InternetVue, click on START > SETTINGS > CONTROL PANEL > your PC's audio hardware connections, SOUNDS AND AUDIO DEVICES. Click on the AUDIO tab, and make sure that the first two the incorrect audio device is selected devices are set to your PC's audio device.
Troubleshooting: Wireless Connectivity You can also fill out a Support Ticket at addlogix.com/wbs Problem Possible Causes The InternetVue SSID The InternetVue receiver is not does not appear in the powered on. PC2TV Display List The PC2TV software needs to be restarted. Your PC's wireless network adapter is not enabled. Weak or intermittent wireless network Solutions / Workarounds / Notes Ensure that the InternetVue is powered on.
Troubleshooting: Wireless Connectivity signal caused by antenna issues, distance, obstructions, or interference. • • • • • • • 3rd-party Wireless Configuration software is interfering with PC2TV software No wireless internet The Network Key entered into the connection between PC2TV software does not match the the InternetVue and Network Key of the wireless router the wireless router (PC is connected to InternetVue using Direct method) Your router is not or cannot provide access to the InternetVue.
Troubleshooting: Wireless Connectivity there is no wireless internet access. not functioning properly. 1. Click on START > RUN, then enter "services.msc" 2. Scroll down and double-click "Wireless Zero Configuration" 3.
Troubleshooting: Wireless Connectivity 4. Try connecting to your wireless router now using the Windows utility by doubleclicking on its SSID. If you haven't already done so, you may be required to enter your wireless router's Network Key. When connecting to the InternetVue, my connection speed is only 11Mbps. However, my PC's wireless adapter is 802.
Troubleshooting: General Usability You can also fill out a Support Ticket at addlogix.com/wbs Problem Possible Causes Solutions / Workarounds / Notes The Password feature is enabled on the PC2TV software, and I do not know what it is. Someone has entered a password in the PC2TV software to prevent unauthorized people from changing settings. Perform a Factory Reset The "Run as Administrator" dialog appears when attempting to run PC2TV The PC2TVAdmin service is not loaded.
Troubleshooting: General Usability 3.
Troubleshooting: General Usability Windows Vista Aero interface not working with InternetVue The Vista Aero GUI is hardwareaccelerated. Hardware-accelerated video uses overlay memory and is not compatible with InternetVue. No output, fuzzy, black The display device is not configured and white, properly. mismatched or missing colors on the display device This is a known issue. Revert back to 16-bit Basic graphics. • • • • • Verify that the display device is powered on.
Troubleshooting: General Usability output, just plug it into the correct jack, then power-cycle the InternetVue.s There is a black border Some TVs adjust, scale, and around the image on sometimes crop the image in order to the display device fit the screen This is normal behavior. Check your display device's menu if there is an option to stretch, fill, or maintain aspect ratio. Try these other settings.
Troubleshooting: General Usability • Even after pressing the Unknown cause. "X" on the PC2TV application to shut it down, it refuses to close. program: If the PC2TV process won't terminate, reboot your PC. • Find the PC2TV application button on the Start bar, right-click on it, the click on CLOSE: • Click on START > RUN then enter "taskmgr ". Click on the PROCESSES tab, select the "RemoteAppPC2TV.exe" process, right-click, and click on "End Process Tree".
Troubleshooting: General Usability • If the PC2TV process still won't terminate, reboot your PC.
Troubleshooting: Other Networking Issues You can also fill out a Support Ticket at addlogix.com/wbs Problem Possible Causes Solutions / Workarounds / Notes Networked resources such as shared printers, hard drives and/or shared folders are not accessible when connected to the InternetVue. When you connect to the InternetVue using the Direct method, textbased computer names, printer names, or other share names currently cannot be resolved through the InternetVue. This is a known issue.
Troubleshooting: Other Networking Issues Any website I enter in my browser always results in the InternetVue page shown below: This is • If you wish to show video on the InternetVue: Using your PC's wireless utility, disconnect from the generated by InternetVue receiver, then use the PC2TV software to connect instead. Delete the entry in your PC's the wireless utility showing your InternetVue's SSID.
Troubleshooting: Other Networking Issues this example, 192.168.1.143 is the Wired Network IP address of your InternetVue. If you get an output like the one shown below, then your PC and the InternetVue can communicate with each other. • • If you get an output which says "Request Timed Out", that means there is no communication between your PC and the InternetVue. Check all cable connections, routers, and switches to make sure they are all functioning properly and connected.
PAL / NTSC Conversion The InternetVue 2020 has a composite video output which is normally set for NTSC TV systems. However some TVs, such as those sold in Europe and other countries, use the PAL standard. Use this PAL to NTSC Conversion only if: • Your TV doesn't have the 3x RCA Component (Y-Pr-Pb) video inputs. If it does, use that input instead. • • • Your TV's Composite RCA-style input cannot be configured to take an NTSC signal (see your TV's documentation), but rather PAL only.
PAL / NTSC Conversion Follow the procedure precisely as follows. There are two ways to do this, and selecting the correct method depends on your overall InternetVue connectivity setup. (1) Through the network. If your InternetVue is connected to your router through a wired connection, it will get an IP address assigned to it, and will display it on the splash screen.
PAL / NTSC Conversion That's it, you're done! (2) Through your PC's wireless adapter. If your InternetVue isn't setup to communicate with your wireless router, AND using a wired connection to your router is not feasible, your only choice is to connect to it using your PC's wireless utility, NOT the PC2TV software. In the example below, the Windows XP wireless utility is used. Double-clicking on the InternetVue's SSID will begin the connection process.
PAL / NTSC Conversion Once connected, click on START > RUN, then enter "cmd". When the command line window opens up, BE PREPARED TO ENTER THE FOLLOWING COMMANDS IN QUICK SUCCESSION because the InternetVue's security feature will automatically reset the unit after 10 seconds. See the example below: telnet 10.119.23.
PAL / NTSC Conversion pwd >pal Converting from PAL to NTSC The procedure will be the same as whichever configuration suits you above, except the final command is changed: telnet [IP address] cd /etc rm pal Please note that the PAL conversion is persistent even after the InternetVue is powercycled, or a factory reset is performed.
Hiding the SSID Hiding the SSID of the InternetVue is a process which takes about 10-15 minutes. It requires a reboot of your PC, a couple installs and uninstallations, and a wired connection to the InternetVue from your router. Verify that your InternetVue has a wired Network IP address shown on the splash screen. The procedure requires you to run two files.
one point, you will need to connect to your InternetVue receiver. Click on "SELECT TV" and the following window will appear: Because you will need to connect using the IP address, click on the "Connect via Direct Connect ID" radio button, then enter the IP address in the space provided. Then, click on CONNECT, and it should prompt you about upgrading the firmware. Go ahead and click on YES. Follow the remaining instructions in the black command line window.
UnUn-hiding the SSID Un-hiding the SSID uses the same process as above, except that the folder where the files are located is "Advanced\UnHideSSID".
Turning Off the WiFi Radio Turning off the WiFi Radio of the InternetVue is a process which takes about 10-15 minutes. It requires a reboot of your PC, a couple installs and uninstallations, and a wired connection to the InternetVue from your router. Verify that your InternetVue has a wired Network IP address shown on the splash screen. The procedure requires you to run two files.
continue. When it completes, return to the "Advanced\RadioOff" folder, then doubleclick on the "RadioOff_2.bat" file, and follow its on-screen instructions precisely. At one point, you will need to connect to your InternetVue receiver. Click on "SELECT TV" and the following window will appear: Because you will need to connect using the IP address, click on the "Connect via Direct Connect ID" radio button, then enter the IP address in the space provided.
Factory Reset Performing a Factory Reset on your InternetVue will remove passwords and wireless network encryption settings stored in its memory. It will also change the SSID of the unit. To do this, follow these instructions: 1. Make sure the InternetVue is powered on and is connected to a display device you can easily view. 2. Locate the Factory Reset button on your InternetVue. On the IV-2020, it is on the back. On an EV-2100, it is in front. 3.
FCC Notice © 2008 Addlogix Inc. For Support, visit: www.addlogix.com/wbs , InternetVue™ Website: www.internetvue.