
User manual


A511 User Manual, Rev. 1.1 - 4 - 08/2007
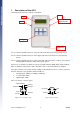
The A511 features two 7 pin testing ports. The outputs from each port are assigned different
names to properly identify the readings. For uniformity we will therefore stick throughout this
manual with the naming conventions as outlined in the following table:
7-pin connector on A511’s
Port 1 (left) Port 2 (right)
analog inputs Cabling 1, 2, 3 Cabling 4, 5, 6
counter inputs Counter1 Counter2
digital inputs DIG1 DIG2
2. Switching the A511 ON and OFF
The A511 is switched ON by pushing the “Menu ON” key.
(Due to the layout of the keypad pushing the “F3” key can also turn on the A511, but this is not
recommended.)
By default the A511 will turn itself OFF after 60 seconds of inactivity that is with no keys pressed.
When this occurs you will receive a message stating “Turn off the device! To abort press any
key.” You have three seconds to press a key to stop shutdown.
To turn the A511 OFF manually simply push and hold down the “Menu ON” key for at least 2
seconds. You will get the same message to have a chance to abort the shutdown.
Attention:
Auto-Shut-OFF will not work with the unit set to permanent monitoring mode!
3. Quick Start
This section of the manual will give you a quick overview of the most frequently used functions.
3.1. How to test analog sensors
• Make sure a standard 9V battery is inserted into the battery case in the rear of the
device.
• Switch the unit on by pushing the “Menu ON” key.
• Skip “Loading last Menu settings” by pressing the “F3” key.
• Connect your sensor to Port 1 on the left hand side of the A511. You will
immediately see how the readings in the display will change.
Note: As long as no sensors are connected the readings will remain at 0.0%.
Attention:
If you are using Port 2 rather then Port 1, you will have to switch to the corresponding
display by pressing the “F2” key.
For detailed information please check chapter 4.1.