addVANTAGE Pro 6.
Proprietary Notice The Adcon logo, Adcon Telemetry, Smart Wireless Solutions, the A720, A723 and A730 series, addIT, addWAVE, the A840 and A850 series and Telemetry Gateway, AgroExpert, addVANTAGE®, addVANTAGE Lite and addVANTAGE Pro are trademarks or registered trademarks of Adcon Telemetry GmbH. Excel® is a registered trademark of the Microsoft Corporation. Acrobat Reader® is a registered trademark of the Adobe Corporation. OOo.calc is part of the OpenOffice.
Contents Chapter 1. Introduction ________________________________________________ 7 What’s New in addVANTAGE Pro 6.
addVANTAGE Pro 6.4 Administrator Guide Chapter 3.
addVANTAGE Pro 6.4 Administrator Guide Chapter 5.
addVANTAGE Pro 6.
Chapter 1. Introduction This manual details the installation and use of the addVANTAGE Pro software product, which is used in conjunction with most of Adcon’s telemetry devices. For information about the installation and use of the telemetry devices, refer to the respective device’s manual. If you are familiar with using addVANTAGE Pro in conjunction with the telemetry devices provided by Adcon, you might want to skip ahead to “The Short Path from RTUs to addVANTAGE Pro” on page 14.
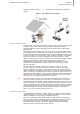
addVANTAGE Pro 6.4 Administrator Guide CHAPTER 1 What is the Adcon System? adapted to Adcon’s system. Figure 1 illustrates the components of the Adcon system. Figure 1. The Adcon Telemetry System System Components The electrically converted parameters are first stored in the memory of a remote telemetry unit, or RTU. Adcon currently provides a large array of RTUs employing different wireless technologies, from private radio to GSM/GPRS based devices.
addVANTAGE Pro 6.4 Administrator Guide CHAPTER 1 System Requirements The addVANTAGE Pro server is based on a modular concept, meaning its parts contribute to the whole but are also independent of it. The server has a framework that runs various services and each service is responsible for a function. For example: • • • • • The Security service authenticates the users and checks their privileges. The Directory service deals with all objects existing on the system.
addVANTAGE Pro 6.4 Administrator Guide CHAPTER 1 addVANTAGE Pro Services over the Internet Note: addVANTAGE Pro is compatible only with the A840 Telemetry Gateway running the firmware release 3.8.0 or higher and the A850 Telemetry Gateway. You cannot use an A730SD receiver to retrieve data into addVANTAGE Pro 6.4. addVANTAGE Pro Services over the Internet addVANTAGE Pro is built from the ground up to support the Internet.
addVANTAGE Pro 6.4 Administrator Guide CHAPTER 1 Using addVANTAGE Pro Data in Other Programs Disabling Password Protection for WAP Access The access over WAP is by default set to require a password (it is the standard user name and password of the respective user). Due to the fact that it might be difficult to enter user names and passwords on a cell phone keyboard you may want to disable it. This can be done by editing the file webapps\ROOT\WEBINF\config\ addServer.properties.
addVANTAGE Pro 6.4 Administrator Guide CHAPTER 1 Conventions and Terminology This manual does not attempt to explain basic computer use. Therefore, you should be familiar with basic computer terminology and the use of typical computer interfaces like the mouse and keyboard. Figure 2. A Sample Software Window Text Field Type information here. Checkbox Select or unselect by clicking the box. A selected box has an X or a check mark in it, while an unselected box is empty.
addVANTAGE Pro 6.4 Administrator Guide CHAPTER 1 Summary CAUTION Indicates that you might get unexpected results if you don’t follow the instructions. Cautions appear before the information they apply to. WARNING Indicates danger to yourself or damage to the device if you don’t follow the instructions. Warnings appear before the information they apply to. Tags You’ll see the terms tag and sensor used throughout this manual.
Chapter 2. Getting Started Since the initial introduction of addVANTAGE Pro 5 in 2006, you have been able to access the client software through a standard Internet browser such as Microsoft Internet Explorer or Mozilla Firefox. While you still have the option to install addVANTAGE Pro on your own machine, you can also work through an internet connection linking up to your data provider’s addVANTAGE Pro 6.4 server, accessing all the features through your web browser on that machine.
addVANTAGE Pro 6.4 Administrator Guide CHAPTER 2 Server Installation 5. 6. 7. Configure the Data Acquisition service (use Tools Data Acquisition); this service is responsible for retrieving data from the Telemetry Gateway (more details are in “The Data Acquisition Service” on page 50). You must also configure at least one server (either a Telemetry Gateway or another addVANTAGE Pro 6.4 server).
addVANTAGE Pro 6.4 Administrator Guide CHAPTER 2 Server Installation d. If you have a pre-version-6.2 Oracle database, you can use the last checkbox to convert the database for use with the updated version of addVANTAGE Pro. Figure 3. Post-installation Options Note: It is generally recommended that you keep the default selections in the installation software unless you have specific reasons for changing them. 6. The installer attempts to keep the customized .properties and .xml files after an upgrade.
addVANTAGE Pro 6.4 Administrator Guide CHAPTER 2 First Steps • convert.bat opens the interface you use to convert old databases. See “addVANTAGE Pro Versions 5.1 through 6.1” on page 89 for a description of this utility. First Steps In this section you will: • • • • Learn about the addMIN utility Start the server Connect to the addVANTAGE Pro server using a web browser Stop the server The addMIN Utility Use the addMIN utility to administer your server.
addVANTAGE Pro 6.4 Administrator Guide CHAPTER 2 First Steps you must install this package as described below; otherwise, you can skip this section. To install the extensions package, complete the following steps: 1. 2. 3. Insert the distribution CD-ROM in your computer’s CD drive. Navigate to addVANTAGE ProaddMIN 6.x. Select the Extensions tab to display the dialog shown in Figure 6. Figure 6. addMIN Extensions Tab 4. 5. Click the New button.
addVANTAGE Pro 6.4 Administrator Guide CHAPTER 2 First Steps 7. A dialog showing the available extensions based on your selection is displayed (Figure 8). Select the checkbox for each extension you want to install, or click the All checkbox to install all of the available extensions. Figure 8. Free Extensions Available to Install 8. 9. Click OK. The License Agreement for the free extensions is displayed. You must read and select the Accept button to proceed.
addVANTAGE Pro 6.4 Administrator Guide CHAPTER 2 First Steps Installing the Server As a Service If you did not install the server as a service, you can do so at any time as described below (you must log in as administrator to perform this operation): Note: The appearance of the Services utility differs slightly between different Windows platforms. 1. 2. 3. 4. 5. 6. 7. If you have not already done so, select Start All Programs addVANTAGE Pro Stop addVANTAGE Pro 6.x Server to stop the server.
addVANTAGE Pro 6.4 Administrator Guide CHAPTER 2 Navigating the Data If you need browser information for logging in, you can click the question mark ( ) on the login window. A page with login help is displayed. You can also see the documentation before you log in, or get a preview of the new features. Click the or icon as needed. Enter your User Name and Password and click the Login button to access the system. Note: The first time you log in, use the root account with the default password root.
addVANTAGE Pro 6.4 Administrator Guide CHAPTER 2 Navigating the Data The root node contains all the objects in a system. You can also think of it as the container for the database on a server. Figure 12. Expansion of Root Node in Explorer An area is an object that defines a certain place that you have associated with a specific property. It can be a field, a city, a section in a plant, a country, or any other physical place. You can also have areas within areas, or subareas. An RTU is placed in an area.
addVANTAGE Pro 6.4 Administrator Guide CHAPTER 2 Navigating the Data for example, shows the context menu for a tag for someone with admin permissions. Figure 13. Right-clicking a Tag in Explorer These features are discussed below and in other sections of this book. Rename Node Follow these steps to rename a node: 1. 2. 3. 4. Click once to highlight the node you want to rename (left side of Figure 14). Click the node again to turn the name into an edit box (right side of Figure 14). Type the new name.
addVANTAGE Pro 6.4 Administrator Guide CHAPTER 2 Navigating the Data Manual Event When you right-click a node in the Explorer, you’ll see a Manual event choice. Select it to display a dialog similar to the one shown in Figure 15. Figure 15. Creating a Manual Event 1. 2. 3. 4. 5. In the Begin Date field, enter or select the date you want to be associated with the event. Leave the Duration fields blank if this is an active event.
addVANTAGE Pro 6.4 Administrator Guide CHAPTER 2 Navigating the Data 2. Select Change values manually to display the dialog shown in Figure 16. Figure 16. Change Values Manually Dialog 3. 4. Target shows which value you selected to change. Click the down arrow next to Source to choose what you want to do: • Copy values from another tag Select this when you know another tag has the correct values and you want to copy them to the current tag. Continue with step 4.
addVANTAGE Pro 6.4 Administrator Guide CHAPTER 2 Navigating the Data Menubar and Toolbar The menubar and toolbar in the Explorer (Figure 18) provide different ways to access the features of addVANTAGE Pro 6.4. Figure 18. The Menu Bar and the Toolbar Menubar • • • • Tools: accesses addVANTAGE Pro 6.4 user options and other administrative tools. Window: refreshes the current window and allows you to select an addVANTAGE Pro 6.
Chapter 3. Security Features addVANTAGE Pro’s security is maintained through its users, groups, and roles. Everyone who uses the software has a user ID, which identifies him or her to the system. Each user belongs to one or more groups, which determine the types of nodes and services a user has access to. Each user is also assigned a role, and the role determines which actions the user can perform in addVANTAGE Pro.
addVANTAGE Pro 6.4 Administrator Guide CHAPTER 3 Administering Users, Groups, and Roles Adding, Editing, Copying, and Removing Users On the main Users and Groups dialog, click the Add icon to display the dialog shown in Figure 20. Figure 20. Adding a User Entering User Information Follow these steps to add a user: 1. 2. 3. 4. 5. 6. 7. 8. 9. Enter a User Name, which is the name that a user will type to log in. Enter the person’s Full Name, which is that user’s actual name.
addVANTAGE Pro 6.4 Administrator Guide CHAPTER 3 Administering Users, Groups, and Roles To assign groups, select the Groups tab, then click the checkbox in front of each group you want the user to belong to. Figure 21 shows the tab with the default groups, but if you added any, they are also displayed. Figure 21. Assigning a User to One or More Groups A user also needs a default group, which is used to identify objects the user creates. Choose the default group by selecting the appropriate radio button.
addVANTAGE Pro 6.4 Administrator Guide CHAPTER 3 Administering Users, Groups, and Roles Assigning Privileges to Users Use the next tab, Default Privileges (Figure 23), to set the default privileges for the selected user. The values selected in this dialog are used for any new object the user creates: panels, RTUs, extensions, and so on. Figure 23.
addVANTAGE Pro 6.4 Administrator Guide CHAPTER 3 Administering Users, Groups, and Roles Working with Groups Click the Groups tab on the Users and Groups dialog to add and remove groups in the system (see Figure 25). Figure 25. Groups Tab of the Users and Groups Dialog The admin and staff groups are available by default. If you click the Add icon, you’ll see a dialog asking for a Group Name for the group you want to create. Remember that all nodes belong to the group assigned by the user’s ID.
addVANTAGE Pro 6.4 Administrator Guide CHAPTER 3 Administering Users, Groups, and Roles Click the Roles tab on the Users and Groups dialog to view the actions permissable for the role assigned to the current user (see Figure 27). Figure 27. Roles Tab of the Users and Groups Dialog You cannot currently make any changes here. We have kept the Defaults button for a future release. Defined Roles addVANTAGE Pro defines several roles that users can be assigned to.
Chapter 4. Node Properties and Tools The robust Properties and Tools features in addVANTAGE Pro are the building blocks of the system. Properties let you tinker with node settings such as whether a node is connected to the server and what to do when a threshold is reached. The tools options affect system-wide settings such as data acquisition and e-mail. The tabs you see on the Properties dialog depend on the node type and, in some cases, your user role.
addVANTAGE Pro 6.4 Administrator Guide CHAPTER 4 Node Properties Node Action Properties With the Action tab, you can specify the action that a certain event will cause. The example below illustrates the sequence that occurs when an extension’s threshold event is “Treatment recommended” and action is “E-mail.” The extension registers itself as listener on the input tag (e.g. the Temp sensor) as soon as you set the Temp sensor as an input tag of the extension.
addVANTAGE Pro 6.4 Administrator Guide CHAPTER 4 Node Properties • Note: also system users, you can enter a shortcut in the format user{name}, such as user{root}. You can also specify a group as a recipient, such as group{admin}. The user’s phone number, or the phone numbers of each member of the group, must be set in the system. The administrator must verify the default SIP/VoIP settings and add any missing provider information before this option is available.
addVANTAGE Pro 6.4 Administrator Guide CHAPTER 4 Node Properties can also select None for any of the fields to prevent anyone from viewing or editing the node. Figure 31. Security Tab of Node Properties Dialog For Children Nodes, you select whether to have child notes get the same privileges as the user or the privileges of the node. Figure 31 also shows the Availability section. If you select the checkbox in this section, users who are not logged in will still be able to see the node.
addVANTAGE Pro 6.4 Administrator Guide CHAPTER 4 Node Properties The other difference between RTU and tag properties is the addition of the Climate setting for an RTU immediately above the Attributes button (Figure 33). You use this setting to select the type of climate applicable to the RTU’s location. You can also click Detect by GPS to automatically select a climate setting based on GPS coordinates. Figure 33.
addVANTAGE Pro 6.4 Administrator Guide CHAPTER 4 Node Properties If you disconnect an RTU or tag on the DACQ Info tab, you will need to rightclick the node in the Explorer and select Connect To hostname. Then select the device in the dialog that appears. When a tag is acquiring data, the icon for the tag and for the RTU will display in the Explorer with a tiny moving arrow.
addVANTAGE Pro 6.4 Administrator Guide CHAPTER 4 The Tools Menu d. If you used any of the “between” conditions, enter the other value in the Value2 field that appears. The following table describes how values are used with these conditions. Sample Value 1 Sample Value 2 is between (incl) 2.0 5.0 2.0, 3.0, 4.0, 5.0 is between (excl) 2.0 5.0 3.0, 4.0 is between (incl - excl) 2.0 5.0 2.0, 3.0, 4.0 is between (excl - incl) 2.0 5.0 3.0, 4.0, 5.0 Condition 3. 4. Condition Applies to e.
addVANTAGE Pro 6.4 Administrator Guide CHAPTER 4 The Tools Menu Selecting User Options To change options in your addVANTAGE Pro user profile, select Tools User options in the Explorer window. The dialog shown in Figure 39 appears. Figure 39. User Options Dialog, My Settings Tab My Settings Tab Use the My Settings tab to view or change various settings: • • Select the Language dropdown to choose the language used by addVANTAGE Pro during your sessions.
addVANTAGE Pro 6.4 Administrator Guide CHAPTER 4 The Tools Menu • • changes to, you are not asked if you want to save the panel—the panel will be saved by default. Select whether to see seconds when displaying time in a panel by clicking Show seconds in panels. If you prefer to always open addVANTAGE Pro with the panels you previously used open, select Re-open last opened panels when log in. Options for Trends These options serve three purposes: 1. 2. 3.
addVANTAGE Pro 6.4 Administrator Guide CHAPTER 4 The Tools Menu This dialog shows which crops will be visible to the user in the Explorer context menu. If a crop is not selected in this list, the user cannot add it to a node. You also see an Automatically install crop extensions when the crop is created checkbox. The addVANTAGE Pro software can automatically include disease models and calculation extensions (collectively called crop extensions) usually associated with the crop.
addVANTAGE Pro 6.4 Administrator Guide CHAPTER 4 The Tools Menu Engineering Units Tab Use the Engineering Units tab (Figure 44) to change the engineering units used to express the tags. Figure 44. User Options Dialog, Engineering Units Tab Use the System dropdown to choose how engineering units will be displayed to you. Metric and Imperial provide a set of default units that are either metric or American.
addVANTAGE Pro 6.4 Administrator Guide CHAPTER 4 The Tools Menu You can change your password and account privileges, as well as the duration of your session timeout and whether you must use your password for WAP access to addVANTAGE Pro. Some users will see only the User’s name and the password fields. Your ability to edit this dialog depends on your role. Using Server Settings You can get server information by selecting Help About.
addVANTAGE Pro 6.4 Administrator Guide CHAPTER 4 The Tools Menu • To view usage information about your server, select Tools Server Settings Server diagnostics. The dialog shown in Figure 47 is displayed. Figure 47. Server Diagnostics, Overview Tab • To view database and backup information, click the Database/Backup tab. The dialog shown in Figure 48 is displayed. Figure 48.
addVANTAGE Pro 6.4 Administrator Guide CHAPTER 4 The Tools Menu • To view all of the statistics associated with the server, click the Server statistics tab. The dialog shown in Figure 49 is displayed. Figure 49. Server Diagnostics, Server Statistics Tab • To view recent error and informational messages, click the Admin logs tab. The dialog shown in Figure 50 is displayed. Figure 50. Server Diagnostics, Admin LogsTab You can click the Reset button to clear the list of logs.
addVANTAGE Pro 6.4 Administrator Guide CHAPTER 4 The Tools Menu Note: Even though the addVANTAGE Pro software is sending the e-mails, the address must be valid. The From field can point to an e-mail alias or be a real person’s email address. Figure 51. E-mail Service Configuration 3. 4. Configure the SMTP server by entering its name into the Server name field. If your SMTP server requires authentication: a. Select the Use authentication checkbox. b.
addVANTAGE Pro 6.4 Administrator Guide CHAPTER 4 The Tools Menu 2. 3. 4. 5. Enter the Host name, User name, and Password associated with your SIP account. Click the blue triangle ( ) to display the Advanced settings shown above and make any needed changes to the fields. (optional) Enter the number used for SIP/VoIP calling and click Test! to make sure the number is valid. Click OK to close the dialog. When making telephone calls as an Action, addVANTAGE Pro plays a .wav file as instructed by the user.
addVANTAGE Pro 6.4 Administrator Guide CHAPTER 4 The Tools Menu If needed, select the Clean up database before performing the backup checkbox to compress the data before backing up the database. Click Yes when you’re ready to back up your data immediately, effectively saving a copy of your database in the backup directory. You’ll see a message notifying you when the backup is complete.
addVANTAGE Pro 6.4 Administrator Guide CHAPTER 4 The Tools Menu The Data Acquisition Service The Data Acquisition service is responsible for the replication of the raw data from the RTUs and/or other addUPI servers into your system. Figure 57 illustrates a general addVANTAGE Pro 6.4 installation from the data acquisition perspective. The wireless network shown in Figure 57 has a Telemetry Gateway that acts as the network master.
addVANTAGE Pro 6.4 Administrator Guide CHAPTER 4 The Tools Menu You can verify the functionality of any data source by selecting it in the list and clicking Test! Figure 58. Data Sources Dialog • • 2. The Poll interval shows how often the data source acquires new data. The Total poll duration is how long it takes to get that new data.
addVANTAGE Pro 6.4 Administrator Guide CHAPTER 4 The Tools Menu 4. helpful if you need to log in to fix an error you made while creating the data source. (optional) Select the Data acquisition schedule tab to display the dialog shown in Figure 60. Figure 60. New Data Source Dialog, Data Acquisition Schedule Tab 5. 6. Complete this dialog as follows: a. Set the schedule of data download according to your needs. The day and hour buttons are toggles that are “pressed” by default.
addVANTAGE Pro 6.4 Administrator Guide CHAPTER 4 The Tools Menu Retrieving Data from a Server After you configure an entry for a remote server, you can start retrieving data. The easiest way to do this is to create a new area in the Explorer and add some RTUs/tags from the remote server to that area. You can also retrieve data to an RTU created after an import operation. Our example supposes that you are starting from scratch. In other words, no data was imported from a previous addVANTAGE version.
addVANTAGE Pro 6.4 Administrator Guide CHAPTER 4 The Tools Menu Disabling the Data Transfer from a Server Follow these steps to disable the transfer of data from a specific server: 1. 2. 3. 4. Select Tools Data Acquisition. Select the host and click Edit to display the Properties dialog for the selected host. (An example of such a dialog is shown in Figure 59.) Select the Data acquisition schedule tab (Figure 60), then unselect the Use schedule checkbox. Click OK to close the dialog.
addVANTAGE Pro 6.4 Administrator Guide CHAPTER 4 The Tools Menu 3. Click Next to display the dialog shown in Figure 64. Figure 64. RTU Creation Wizard, Date Source Page Note: You can click the Finish button at any step in the RTU creation process and configure the remaining features manually. 4. Select the appropriate data source from the dropdown, then click Next to display a dialog similar to the one shown in Figure 65. Figure 65. RTU Creation Wizard, RTU Selection Page a. b. c. d. e.
addVANTAGE Pro 6.4 Administrator Guide CHAPTER 4 The Tools Menu 5. Click Next to display the dialog shown in Figure 66. Figure 66. RTU Creation Wizard, Node Template Selection Page 6. Expand the nodes as needed and select any templates you want to associate with this RTU, then click Next to display the dialog shown in Figure 67. Figure 67. RTU Creation Wizard, Security Settings Page 7. 8. 9.
addVANTAGE Pro 6.4 Administrator Guide CHAPTER 4 The Tools Menu Following are the icons you will work with when you create and use the node template library: Figure 68. Node Template Library Icons If you plan to save many different types of templates, for example, for different types of panels or disease models, you might want to organize the template library first. You can organize the template library by creating a folder for each type of template you’ll be creating.
addVANTAGE Pro 6.4 Administrator Guide CHAPTER 4 The Tools Menu You now have a library for templates. Nodes you can add to templates include all panels, crops, disease models and calculation extensions. If you create nodes from existing templates—by right-clicking an area, selecting Create new node, and choosing any of the “from template” options—the new node will be saved in the Latest used template. To be able to save new nodes in the other folders, create the node without using an existing template.
addVANTAGE Pro 6.4 Administrator Guide CHAPTER 4 The Tools Menu 4. Select an extension and click the Edit button to display the dialog shown in Figure 73. Figure 73. Properties of Missing Data Extension of Precipitation Tag 5. 6. 7. At the top of this dialog, you can see which climate, sensor, and diagnostic extension you’re working in. The Create by default checkbox indicates whether the extension should be created automatically when you add an RTU that has a Precipitation sensor.
Chapter 5. Creating Panels Lists, Trend Viewers, and Event Viewers are panels that offer different ways to view data in addVANTAGE Pro 6.4. You can right-click any panel and use the Cut, Copy, and Paste options to duplicate the panel in another part of the Explorer. The List Use the List to display a group of addVANTAGE Pro objects in a different way. The List is similar to an Explorer view, with the difference that the objects in a list are not expandable.
addVANTAGE Pro 6.4 Administrator Guide CHAPTER 5 The List Search You can also create a list as a result of a search operation. Suppose you want to search for all areas in the system having the string “Adcon” in their name. Follow these steps to search for those areas and populate the List: 1. 2. 3. 4. 5. In an Explorer, click the Search icon (the magnifying glass icon on the right side of the text box in the Explorer toolbar) to open the advanced search dialog (Figure 76).
addVANTAGE Pro 6.4 Administrator Guide CHAPTER 5 The Trend Viewer node where you started the search. Complete the Search dialog as described previously. Properties A list is a collection of nodes you want to treat as one object. For this reason, you should view properties only on the items in the list. The Trend Viewer Use the Trend viewer to see a plot of tag values stored in the database. To open a Trend viewer, click New Panel and select Trend. The trend toolbar is shown in Figure 78. Figure 78.
addVANTAGE Pro 6.4 Administrator Guide CHAPTER 5 The Trend Viewer Button 14 Go to End Sets the end date of your database at the end of the currently selected span. If you have, for example, selected to view a 7-day span, and you click Go to End, the trend viewer will show you the data of the last 7 days of your database. List 15 Span Chooser Displays the time span being used in the trend.
addVANTAGE Pro 6.4 Administrator Guide CHAPTER 5 The Trend Viewer linked to the tag color, but you can change that in the trend’s properties (see page 66). Figure 79. A Trend Viewer You can plot tags coming from different RTUs on one Trend viewer. If you have tags from different RTUs with the same name, you can easily identify them by placing the cursor in the legend for the respective tag. After a short delay a tool tip pops up, displaying the tag’s full path.
addVANTAGE Pro 6.4 Administrator Guide CHAPTER 5 The Trend Viewer 2. Right-click the selected tags and select View Data from the context menu as shown in Figure 80. Figure 80. View Data from Explorer If you want to keep this Trend, you need to save it by clicking on the Save icon. Else if you close the panel you will be asked if you want to save it, unless you have selected Tools User options Panels Automatically save panels on close.
addVANTAGE Pro 6.4 Administrator Guide CHAPTER 5 The Trend Viewer display, click the OK button. The Trend viewer displays the tags and their data in a graphic form. Figure 81. Selecting, Adding, and Removing Tags Note: If no plots are displayed, check the date and use the arrows and the calendar in the Trend viewer to move to a date and time where you have data.
addVANTAGE Pro 6.4 Administrator Guide CHAPTER 5 The Trend Viewer • • • • autoscaled sensors by assigning each to a group. For example, you could assign sensor values above a certain point to one group and values below that point to another group. Groups are entirely arbitrary and of your own making. Group numbers need not be consecutive.
addVANTAGE Pro 6.4 Administrator Guide CHAPTER 5 The Trend Viewer when a certain value is met (e.g. “when value drops below 0°C”). Figure 83 illustrates the Thresholds tab. CAUTION Do not confuse this feature with the threshold settings in the tag itself. With addVANTAGE Pro 6.4, each tag, independent from the trend, can have thresholds. When the tag’s thresholds are met, normally an action is performed. The trend’s thresholds are only informational and thus are not the same as the tag’s thresholds.
addVANTAGE Pro 6.4 Administrator Guide CHAPTER 5 The Trend Viewer Display Tab Following is an explanation of the options on the Display tab shown in Figure 84. These options apply to the Trend itself, not the individual tag selected in the Tags list. Figure 84. Trend Properties, Display Tab • • • • • • • • • Time Axis • If you select the Major Grid checkbox, vertical lines will display on the grid. The number of lines is not selectable, but it depends on the selected time range (e.g.
addVANTAGE Pro 6.4 Administrator Guide CHAPTER 5 The Trend Viewer group of RTUs and be able to inspect or compare them at a glance, such as the example shown in Figure 85. Figure 85. A Trend Viewer Showing Tags from Several RTUs You can export all of the data from this graphical view the same way as from the table view, which is described on page 72. Saving Trends Now that you’ve configured those tags, you might want to save this panel for later use.
addVANTAGE Pro 6.4 Administrator Guide CHAPTER 5 The Trend Viewer You can also save a panel any time by clicking Save. Create a Trend from a Template If you have to create a large number of identical panels on different areas, you can use the Trend from template function and save yourself some work: 1. 2. 3. 4. Create a panel in a single area by using one of the methods previously described, then add the tags you need and configure the panel’s properties. Save the panel in its area.
addVANTAGE Pro 6.4 Administrator Guide CHAPTER 5 The Trend Viewer If you want to add values to the table, right-click in the table and select Add new values to display the dialog shown in Figure 88. Figure 88. Adding a Value in the Table View Say you manually recorded values in addition to the u’s values. You can add them to the table by following these steps: 1. 2. 3. 4. 5. 6. Note: Select the Tag from the dropdown. If you right-clicked a column in the table view, that tag is displayed by default.
addVANTAGE Pro 6.4 Administrator Guide CHAPTER 5 The Events Viewer Should you want to export all the data of a selected trend, you need to: • • Set the start date to the beginning of the database (Button 5 - Go to Begin) Select Custom in the Span Chooser (List 12), then select a reasonable duration that shows all of the data on the Display tab.
addVANTAGE Pro 6.4 Administrator Guide CHAPTER 5 The Events Viewer Selecting Nodes Use the Nodes tab (Figure 92) to select the nodes whose events you want to display. It is the second tab in the Properties dialog, but you must select a node before you can select the event types to display alarms for. With addVANTAGE Pro 6.4, all nodes can issue events. Figure 92.
addVANTAGE Pro 6.4 Administrator Guide CHAPTER 5 The Events Viewer list. Use the Check All and Uncheck All buttons to select or unselect all events at once. Figure 94. Events Options Dialog, Event Types Tab The Event Types tab has several options for viewing events. First, you can select which types of events to view in the Severity section: • • • Show alarms displays alarms. Show events displays events.
addVANTAGE Pro 6.4 Administrator Guide CHAPTER 5 The Events Viewer Selecting Event Options The Events Options tab (Figure 95) has customization options for the data to be displayed in the viewer. Figure 95. Events Options Dialog, Events Options Tab • • In the Columns section, each checkbox represents a column. Select the columns you want to see in the viewer The Duration Options mirror the settings on the toolbar. You can choose to Always jump to last available data or not.
addVANTAGE Pro 6.4 Administrator Guide CHAPTER 5 The Events Viewer while it’s the Statistic extension that has an alarm, the Hop crop and the Dimi area folder also show the alarm icon. Figure 97. Alarm Icons in the Explorer Locating the Source of an Alarm If you notice in an Explorer that an area shows an alarm, you can right-click the node and select Show Events. An Events viewer properly configured for you is displayed, showing only the alarms pertinent to the selected object.
addVANTAGE Pro 6.4 Administrator Guide CHAPTER 5 The Events Viewer The dialog shown in Figure 99 appears. Figure 99. View/Save dialog for Event List PDF Notice that the file is named report.pdf by default. You can view the document immediately by selecting Open with, or you can use Save to Disk to save the file to the default location for your downloaded files. If you open the PDF, then save it, it is by default saved in your Temp folder.
addVANTAGE Pro 6.4 Administrator Guide CHAPTER 5 The Events Viewer Note: The original panels are not affected. Figure 100. Linked Panels To change the properties of an individual panel, right-click the appropriate panel and select Properties.
Chapter 6. Working with Extensions and Crops As with previous versions, the addVANTAGE Pro 6.4 software has extended functionality through additional software modules called extensions. Extensions are entities that perform calculations. The types of extensions you work with are calculation extensions and disease models. Crops are nodes that store information about phenophases, irrigations, and treatments. They are not extensions.
addVANTAGE Pro 6.4 Administrator Guide CHAPTER 6 Adding Extensions and Crops to an Area running in parallel) it can take up to several minutes. The properties in the Crops, Treatments, Inputs, Irrigation and Extension tabs may force a recalculation if changed. You can also force a recalculation of one or more extensions by selecting the respective extension in the Explorer, right-clicking, and selecting Recalculate.
addVANTAGE Pro 6.4 Administrator Guide CHAPTER 6 Properties for Extensions and Crops 2. 3. Select the sensor where you want the diagnostic extension added (use the shift and control keys if you’re selecting multiple sensors). Right-click the highlighted areas and select Create New Node RTU diagnostics extension. You can also select Create New Node RTU diagnostics Create all missing or Create New Node RTU diagnostics Create from template.
addVANTAGE Pro 6.4 Administrator Guide CHAPTER 6 Properties for Extensions and Crops The Crop Tab Use the Crop tab (Figure 103) to specify and monitor the phenological stages of crops. Figure 103. Apple Crop Properties, Crop Tab Note: Clicking a phase causes a graphic depiction of the phase to be displayed on the right side of the dialog, if such a graphic is available.
addVANTAGE Pro 6.4 Administrator Guide CHAPTER 6 Properties for Extensions and Crops If the chemical you want to apply is not in the system’s database, you must first add it. For more details about adding to or modifying the chemicals database, refer to the addVANTAGE Pro 6.1 Extensions and Crops manual. Figure 105. Apple Crop Properties, Treatments Tab Adding Treatments A spraying application usually follows a treatment recommendation (displayed in the Events list).
addVANTAGE Pro 6.4 Administrator Guide CHAPTER 6 Properties for Extensions and Crops The Irrigation Tab Use the Irrigation tab (Figure 107) to create irrigation schedules for the crop. Figure 107. Apple Crop Properties, Irrigation Tab Adding an Irrigation Schedule When you add an irrigation schedule, you are telling the model what type of irrigation, how long the irrigation occurs, and how much irrigation the crop gets (Figure 108). Follow these steps to add this schedule: 1. 2.
addVANTAGE Pro 6.4 Administrator Guide CHAPTER 6 Properties for Extensions and Crops The Extension Tab Most calculation extensions have an Extension tab, as shown in Figure 109. Figure 109. Statistic Extension Properties, Extension Tab The Extension tab contains options and configuration panels that are specific to the extension. The Advanced Settings Tab The Advanced settings tab (Figure 110) provides additional information about the extension options. Figure 110.
addVANTAGE Pro 6.4 Administrator Guide CHAPTER 6 Properties for Extensions and Crops The Inputs Tab The Inputs tab (Figure 111) allows you to set the input tags for the extension. The extensions have an intelligent algorithm that searches for the appropriate tags, but only within the extension’s own area. Figure 111. Extension Properties Dialog, Inputs Tab Adding Inputs If some tags are missing and the auto discovery feature fails, you should manually intervene to identify the required tags.
addVANTAGE Pro 6.4 Administrator Guide CHAPTER 6 Properties for Extensions and Crops you can unselect the Use climate settings checkbox and enter or select the data you want. The Schedule settings are the same as for calculation extensions.
Appendix. Appendix This appendix contains additional information concerning your addVANTAGE Pro server installation, configuration, and maintenance. You’ll also learn which thirdparty tools Adcon employs. Upgrading From Previous addVANTAGE Releases Depending on the version of addVANTAGE you already have, and whether you want to continue using the data you already collected, two options are available.
addVANTAGE Pro 6.4 Administrator Guide APPENDIX Upgrading From Previous addVANTAGE Releases Figure 114 shows the first window of the conversion tool when no local 6.2 database was found. The conversion is ready to start. Figure 114. Database Conversion is Ready to Begin Note: If you are an expert user who needs to convert a database, you can click the ellipses ( ) to open a dialog (Figure 115) where you can enter a different IP address to use for the conversion. Figure 115.
addVANTAGE Pro 6.4 Administrator Guide APPENDIX Fine-tuning your addVANTAGE Pro Server Figure 116 shows the conversion in progress. Figure 116. Database Conversion is in Progress addVANTAGE Pro Versions Prior to 5.1 If your database format is earlier than addVANTAGE Pro 5.1, please contact Adcon Telemetry (info@adcon.at). Fine-tuning your addVANTAGE Pro Server During the initial setup procedure, certain parameters of your addVANTAGE Pro 6.
addVANTAGE Pro 6.4 Administrator Guide APPENDIX Public Trends addVANTAGE Pro and select one of the RAS profiles you just created from the dial-up connection dropdown shown in Figure 59 on page 51. Figure 117. RAS Advanced TCP/IP Settings in Windows 2000 and XP Note: The dial-up feature is currently implemented and works only under Windows 2000 and XP. For these operating systems, note that the option “Use default gateway on remote network” must be unselected.
addVANTAGE Pro 6.4 Administrator Guide APPENDIX Third-Party Tools • • • The way addVANTAGE decides if this is the first or second format is the T between the date and time. If the T is contained, the second format is assumed. The hours is the number of hours you'd like to view. If you don't set this parameter, the default is the number of hours most recently used when the panel was opened in addVANTAGE. The tagIndex is the number of the tag that is selected (which is important for displaying the y-Axis).
addVANTAGE Pro 6.4 Administrator Guide APPENDIX Third-Party Tools bcprov-jdk14-131.jar Version 1.31, Current Version 1.37 http://www.bouncycastle.org/ MIT License keymanager.RSACipher commons-beanutils.jar Version 1.7, Current Version 1.8.3 http://jakarta.apache.org/commons/beanutils/ The Apache Software License, Version 1.1 Toolkit which is used for webdevelopment commons-codec-1.3.jar Version 1.3, Current Version 1.3 http://jakarta.apache.org/commons/codec/ Apache License Version 2.
addVANTAGE Pro 6.4 Administrator Guide APPENDIX Third-Party Tools commons-net-3.1.jar Version 3.1 http://commons.apache.org/proper/commons-net/ Apache License Version 2.0, January 2004 export extensions, FTP Queue commons-validator.jar Version 1.1.3, Current Version 1.3.1 http://jakarta.apache.org/commons/validator/ Apache License Version 2.0, January 2004 Used to validate entries in webapplication datetimepicker2.7.jar Version 2.7, Current Version 2.7 http://www.lavantech.
addVANTAGE Pro 6.4 Administrator Guide APPENDIX Third-Party Tools hibernate-entitymanager.jar Version 3.4.0.GA, Current Version 3.4.0 GA https://www.hibernate.org/397.html LGPL Database framework hsqldb.jar Adcon-Version http://hsqldb.org/ LGPL (Version 3, June 2007) Database iText-2.0.7.jar Version 2.0.7, Current Version 5.0.0 http://itextpdf.com/ LGPL (Version 2.1, February 1999) PDF creation jaas.jar http://java.sun.
addVANTAGE Pro 6.4 Administrator Guide APPENDIX Third-Party Tools jfreechart-1.1.1_adcon.jar Version 1.1_adcon, Current Version 1.0.6 http://www.jfree.org/jfreechart/ LGPL (Version 3, June 2007) Chart drawing tool jmf.jar http://java.sun.com/products/java-media/jmf/ JMF License Java Media Framework, used to play Wave files in SIP calls jsf-api-1.2_04-p02.jar Version 1.2_04-b16-p02, Current Version 2.0 http://java.sun.
addVANTAGE Pro 6.4 Administrator Guide APPENDIX Third-Party Tools myfaces-impl-1.2.3.jar Version 1.2.3, Current Version 2.0.0-alpha http://myfaces.apache.org/ Apache License Version 2.0, January 2004 Webapp programming framework nist-sdp-1.0.jar http://jain-sip.dev.java.net/ Public Domain Used in SIP Calls ojdbc14.jar Version 10.2.0.1.0, Current Version 10.2.0.1.0 http://www.oracle.com Bought Used in the Oracle database connection quartz.jar Version 1.6.0, Current Version 1.6.0 http://www.opensymphony.
addVANTAGE Pro 6.4 Administrator Guide APPENDIX Third-Party Tools velocity-1.4.jar Version 1.4, Current Version 1.5 http://velocity.apache.org/ Apache License Version 2.0, January 2004 Framework that supports web development velocity-tools-1.1.jar Version 1.1, Current Version 1.3 http://velocity.apache.org/ Apache License Version 2.0, January 2004 Framework that supports web development WinRegistry-4.5.jar Version 4.5 https://code.google.com/p/java-registry/ LGPL v3 Used for installer xalan.jar Version 2.
Index A acknowledged events, 75 action types, 34 active alarm/event, 75 Adcon system, 7–9 adding actions, 34 areas in Explorer, 23 data source, 51 extensions and crops to areas, 81 irrigation from events viewer, 77 manual events from events viewer, 77 multiple extensions and crops, 81 objects to a List, 60 RTU diagnostics to a tag, 81 RTU diagnostics when adding RTU, 41 tags to trends, 65 treatments from events viewer, 77 users, 28 addMIN file, 16 addMIN utility database tab, 48–?? extensions tab, 17
addVANTAGE Pro 6.4 Administrator Guide data source security, 52 extensions and crops, 82 gateway, 9 log display, 44 update configuration, 37 context sensitivity, 11 conventions document, 12 convert.bat, 17, 89 converting 5.1 to 6.1 database, 17, 89 database earlier than 5.
addVANTAGE Pro 6.
addVANTAGE Pro 6.
addVANTAGE Pro 6.
addVANTAGE Pro 6.4 Administrator Guide exporting data, 72 instrument view, 73 linking panels, 78 opening, 62 saving a view, 70 selecting options, 66 setting thresholds, 67 trends creating from events viewer, 77 default options, 41 making public, 36 setting up public, 93 types of events for Events Viewer, 74 U uninstalling addVANTAGE Pro 5.