
User guide


Quick Start
EV10AQ190x-DK - User Guide 2-1
1067BX–BDC–12/11
Section 2
Quick Start
2.1 Operating
Procedure
1. Install the Software as described in section 4 Software Tools.
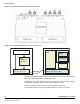
2. Install the FPGA code into ML605 Xilinx evaluation board (see Section 5.3
“FPGA Programming” )
3. Turn OFF the ML605 Xilinx evaluation board.
4. Fix Heatsink/Fan to the ADC if no external form of ventilation is to be used (see
Section 3.4)
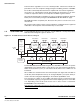
5. Connect the QUAD 10-bit Demo Kit on ML605 Xilinx evaluation board.
6. Connect the power supplies of both evaluation boards.
7. Connect the USB cable.
8. Turn ON power supplies of QUAD 10-bit Demo Kit.
9. Turn ON power supplies of ML605 Xilinx evaluation board.
10. Launch the EvalkitQuadAdc10Bits.exe software.
11. Check if currents are correct (see Section 4.5.5 Power).
12. Select the ADC mode of your ADC (4 channels or 2 channels or 1 channel)
13. Turn the mode ADC test ramp active (see chap Section 4.5.2 TEST).
This sequence is mandatory to allow the synchronization of 4 channels into
FPGA
14. Launch acquisition and check if sample signal is correct.
15. Return to normal mode (Turn OFF Test mode).
16. Connect a RF generator on Analog input.
17. Turn on the RF generator.
18. Launch acquisition (see Section 4.5.7 Acquisition).
2.2 Troubleshooting
2.2.1 Installation Check that you own rights to write in the directory (administrator rights).
Check for the available disk space.
Check that the USB port is free and properly configured.
– QUAD 10-bit connected to USB 2 driver