
User's Manual
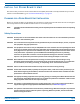


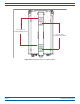
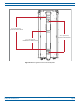
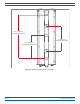
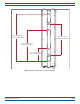
Table Of Contents
- Install the Prism Remote Unit
- Planning for a Prism Remote Unit Installation
- Unpack and Inspect the Prism Remote Unit and Components
- Mount the Prism Remote Unit
- Ground the PRU Chassis
- Connect a Network Cable to the PRU Chassis
- Connect Fiber Cable to the PRU Chassis
- Connect the Antenna Cable
- Determine the Circuit Breaker or Fuse for the PRU
- Connect the Power Wiring
- (Optional) Connect the Prism Remote Unit to a UPS

Install the Prism Remote Unit
FWPP-504-02 FlexWave
®
Prism Remote Unit and RF Module Installation Guide
© May 2017 CommScope, Inc. Page 37
Additional Tools and Supplies Required for Wood-Pole Mounting
WhenmountingthePRUtoawoodpole,inadditiontothesupplieslistedin"ToolsRequiredforAllMounting
Methods”onpage36,thefollowingsuppliesareneeded:
• oneelectric
drill,1/2-inchorlarger
• one1/2-inchdrillbit
• tw
o1/2-inchsquare-headthrough-boltorequivalentthatislongenoughtoextendthroughtheutilitypole
• two1/2-
inchsquarenutorequivalent
• two1/2-inchsqu
arewasher
• oneormoreap
propriately-sizedwrenchesforthrough-bolts
• oneadjustablewrench
Additional Tools and Supplies Required for Flat-Surface Mounting
• oneelectricdrill,1/2-inchorlarger
• one5/8-inchwren
ch
• tw
o1/2-inchflatwashers
• two1/2-inchlockwashers
• fo
rmasonrywallinstallationsonly:
– tw
o1/2x11/2-inchhexboltsformasonrywallinstallations
– tw
o1/2-inchconcretewallanchorsformasonrywallinstallations
– two3/4-
inchmasonrydrillbit(formasonrywallinstallations)
• fo
rwood-framedwallinstallationsonly:
– one3/4-inchpressure-treatedp
lywood,sizedtoaccommodatethePRU(seeTable19onpage31)
– fas
tenersforsecuring3/4-inchplywoodtowall
– one9/16-inchstandarddrillbit
– two
1/2x1-inchhexbolts
– two1/2-inchTeeNuts