
User's Manual
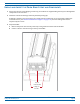

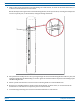
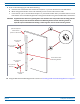
Table Of Contents
- Install the Prism Remote Unit
- Planning for a Prism Remote Unit Installation
- Unpack and Inspect the Prism Remote Unit and Components
- Mount the Prism Remote Unit
- Ground the PRU Chassis
- Connect a Network Cable to the PRU Chassis
- Connect Fiber Cable to the PRU Chassis
- Connect the Antenna Cable
- Determine the Circuit Breaker or Fuse for the PRU
- Connect the Power Wiring
- (Optional) Connect the Prism Remote Unit to a UPS

FlexWave
®
Prism Remote Unit and RF Module Installation Guide FWPP-504-02
Page 48 © May 2017 CommScope, Inc.
Install the Prism Remote Unit
9 Refertothefollowingfigureanddothefollowing:
a From
thesideofthebackerthatwillfacethewall,drivea1/2-inchTeeNutintoeachdrilledhole.
b Moun
ttheplywoodbackeronthewallandfirmlysecureittothewall’sinteriorstuds.
c L
ocatethetwo1/2x1-inchhexboltsandplacea1/2-inchlockwasherand1/2–inchflatwasheroneach
boltandthensecuretheMountingBrackettotheplywoodbackerusingtheassembledboltsandwashers.
CAUTION! If plywood backer board or supporting wall is not smooth
or does not provide a flat mounting plane for
the PRU, add 1/2-inch flat washers between the Mounting Bracket and the mounting surface as
required to prevent the PRU from twisting or distorting when secured to the mounting surface.
10 H
angthePRUfromtheMountingBracketasshownin"InstallingaPRUontheMountingBracket”onpage51.
Tee Nut
3/4-inch Plywood
backer board
(secure to wall studs)
1/2 x 1-1/2-inch
Hex bolt
1/2-inch Flat
washer
1/2-inch Lock
washer
1/2 x 1-1/2-inch
Hex bolt
1/2-inch Flat
washer
1/2-inch Lock
washer
Prism Remote Unit
Mounng Bracket