
User's Manual
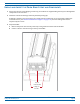

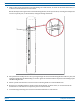
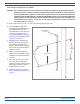
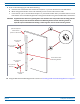
Table Of Contents
- Install the Prism Remote Unit
- Planning for a Prism Remote Unit Installation
- Unpack and Inspect the Prism Remote Unit and Components
- Mount the Prism Remote Unit
- Ground the PRU Chassis
- Connect a Network Cable to the PRU Chassis
- Connect Fiber Cable to the PRU Chassis
- Connect the Antenna Cable
- Determine the Circuit Breaker or Fuse for the PRU
- Connect the Power Wiring
- (Optional) Connect the Prism Remote Unit to a UPS

Install the Prism Remote Unit
FWPP-504-02 FlexWave
®
Prism Remote Unit and RF Module Installation Guide
© May 2017 CommScope, Inc. Page 47
Wood-Framed Wall Mounting Procedure
1 Referto"MountingCautions”onpage42beforebeginningthisprocess.
2 LocatetheMountingBracketprovidedwiththePRUMountingKit.
3 O
btainthetoolsandsupplieslistedin"ToolsRequiredforAllMountingMethods”onpage36and"Additional
ToolsandSuppliesRequiredforF
lat-SurfaceMounting”onpage37.
4 Ob
tainplywoodwithaminimumthicknessof0.75-inches(19.0cm)tobeusedasabackerboard.
CAUTION! If the PRU is installed in a
n area in which there may be moisture, use pressure-treated plywood.
5 Cutthepressure-treatedplywoodtothecorrectsiz
etoaccommodatethePRUbeinginstalled(see
dimensionsinTable19onpage31).
6 To
avoidahazardouscondition,firmlysecurethebackerboardtotheinteriorframingofthewall.
7 Holdthe
MountingBracketuptothewallandmarkthelocationoftheMountingBracket’stwomounting
holesontheplywoodbacker:
8 Dril
l9/16-inchholesintheplywoodbackerattheholepositionsmarkedinStep7.
3/4-inch Plywood
Backer Board
(secure to wall studs)
Mounng
Bracket
Mark the locaon
of the two mounng
holes