
User Manual


ADCP-75-159 • Issue 1 • August 2003 • Section 3: Host Unit Installation
Page 3-4
© 2003, ADC Telecommunications, Inc.
3 HU MOUNTING PROCEDURE
The HU may be mounted in either a 19-inch or 23-inch EIA or WECO equipment rack. Both
US standard and metric machine screws are included for rack mounting the HU. When loading
the HU in a rack, make sure the mechanical loading of the rack is even to avoid a hazardous
condition such as a severely unbalanced rack. The rack should safety support the combined
weight of all the equipment it holds. In addition, maximum recommended ambient temperature
for the HU is 50º C (122º F). Allow sufficient air circulation or space between units when the
HU is installed in a multi-rack assembly because the operating ambient temperature of the rack
environment might be greater than room ambient.
Use the following procedure to install the HU in the equipment rack:
1. The HU is shipped with the mounting brackets installed for 19-inch rack installations. If
mounting the HU in a 19-inch rack, proceed to step 4. If mounting the HU in a 23-inch
rack, proceed to step 2.
2. Remove both mounting brackets from the HU (requires TORX screwdriver with T20 bit)
and save screws for reuse.
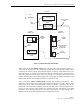
3. Reinstall both mounting brackets so the long side of the bracket is flush with the HU front
panel as shown in Figure 3-2. Use the screws removed in step 2 to re-attach the brackets to
the HU chassis.
Figure 3-2. Installing the Mounting Brackets for 23-Inch Rack Installations
Warning: Wet conditions increase the potential for receiving an electrical shock when
installing or using electrically powered equipment. To prevent electrical shock, never install or
use electrical equipment in a wet location or during a lightning storm.
Note: To insure that all optical connectors remain dust-free during installation, leave all dust
caps and dust protectors in place until directed to remove them for connection.
17864-A
FOR INSTALLATION IN 23-INCH
RACKS, REMOVE AND REINSTALL
MOUNTING BRACKETS AS SHOWN