
Car Speaker User Manual


6
Sign configuration
Before installing a sign, you may want to change one or more of the sign’s default settings by changing
settings on DIP switches inside the sign.
To access and change DIP switches, follow these steps:
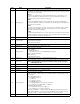
Setting DIP switches
1. Remove power from the sign.
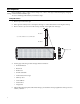
2. If the sign is mounted, remove it and place the sign on a flat surface before removing the end cap.
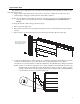
3. Remove the two (2) screws from the end cap located on the right side of the sign:
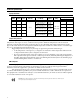
4. See the pages following to make changes in these functions:
• EOL termination
• Baud rate
• RS485 echo
• IR remote disable
• Demonstration messages
•Memory clear
• Serial address
• Data format
• Diagnostics
5. After making the appropriate DIP switch changes, re-attach the end cap. Tighten the end cap screws to
14 lb-in, 1.58 Nm.
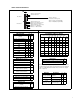
12345668910 12345668910
End cap screws
DIP switch 1
DIP switch 2
ON
Use a small screwdriver to move each DIP switch.