
Car Speaker User Manual


22
Ceiling mounting instructions
Guidelines
A ceiling mounting bracket is not provided with the sign. Fasteners to attach the sign to a ceiling are also
not supplied.
The specific type of fastener required will vary depending on the physical characteristics of the material
(e.g., concrete, brick, wood) to which the sign is being mounted. Do NOT install directly to drywall, plasterboard,
or other fragile support.
• Fasteners for ceiling mounting brackets must be appropriate for the type of construction and material
to which the sign will be mounted.
• Each of the fasteners must be capable of supporting four (4) times the weight of the sign.
•A sign must be attached to an overhead support capable of supporting four (4) times the weight of the
sign.
• For adequate ventilation allow at least 1 inch (2.54 cm) clearance all around the sign.
Directions
1. Disconnect power from the sign.
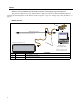
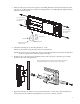
2. Remove the upper screw from each end cap. Slip the bottom of one hook support into the grooves
between the tops of each end cap and the main housing:
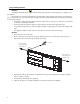
3. Replace each end cap screw. Make sure that the screw has gone through the hook support. Tighten
screw to 14 lb-in, 1.58 Nm.
4. Mount ceiling attachments (not supplied).
5. Attach hook supports to ceiling attachments. (Connection material not supplied.)
Hook support
Remove top end cap
screw and slip the hook
support into groove.
Remove top end cap
screw and slip the hook
support into groove.