
Car Speaker User Manual


21
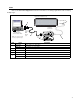
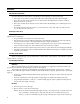
3. When the end caps have been removed, place each sliding bracket into the channel in the back of the
sign. Use two (2) Keps fasteners to attach a mounting bracket to each sliding bracket. Tighten the Keps
fasteners to 24 lb-in, 2.7 Nm:
4. Attach the remaining two (2) mounting brackets to a wall.
NOTE: Do NOT install a sign directly to drywall or plasterboard.
NOTE: No fasteners are provided for the outer set of mounting brackets. The fasteners selected must
be able to support four (4) times the weight of the sign.
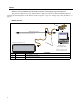
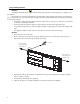
5. Mount the sign on the wall. Use the supplied fasteners and cotter pins to attach the sign mounting
brackets to the wall mounting brackets:
6. Replace the end caps. Be careful not to pinch any internal wires or catch other components between
the lip of the end cap and the housing. Tighten end cap screws to 14 lb-in, 1.58 Nm.
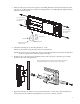
Remove end cap and
place sliding bracket
into channel.
Remove end cap and
place sliding bracket
into channel.
Sliding bracket
Mounting bracket
Keps fasteners
Tighten the Keps fasteners
to 24 lb-in, 2.7 Nm.
After the best viewing angle for the sign has been selected and cotter pins have been
inserted and bent, tighten the 5/16” (7.94 mm) fasteners to 60 lb-in, 6.8 Nm.