
Technical data


5.8 Selecting the deletion method
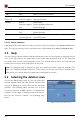
5.8.3.1 Deletion pattern
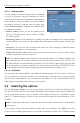
You can disable or enable the parameters individually
(fig. 8), if necessary, using the selection box at the
respectively left side of the parameter. Depending on
their activation, they will be taken into account within
the deletion process. As default, only the upper para-
meter Deletion pattern is enabled. You define a dele-
tion pattern as follows:
• Deletion pattern: Here, you set the pattern to be
used for overwriting the sectors. Please consider
the following note.
• Alternating pattern: If this parameter is enabled, the pattern indicated here is always written
on the medium in a further run immediately after the pattern specified under ‘Deletion pat-
tern’.
• Iteration(s): The value set here indicates how often the cycle consisting of deletion pattern
and alternating pattern is to be repeated.
• Finalize with random values: After having executed all repetitions, a final run with random
numbers as a pattern can be carried out.
Note: The deletion patterns are entered in hexadecimal notation. The deletion pattern is al-
ways interpreted as 32 bit value. However, you can also enter a value of 16 or 8 bits only.
This value will then be automatically converted in a 32 bit value by placing the entered value
2 or 4 times after one another. Example: The input mask converts 5Fh into 5F5F5F5Fh. There
is small display behind the input field graphing the entered value as a binary curve.
5.8.3.2 Verification
You can select the option Verify for the different deletion patterns and the final run. If this op-
tion is enabled, the respective deletion run is followed by a verification run to check whether
the previously written patterns can be read from the medium, i.e. it is verified whether the de-
letion pattern has actually been written on the medium.
5.9 Selecting the options
On the dialog page Options, you can set the options with which you want the following dele-
tion process to be executed. Principally, HDShredder automatically sets the optimal options for
the selected drives and the type of deletion. Only modify the options to troubleshoot prob-
lems (7 Troubleshooting) or when you are sure that this improves the performance of HD-
Shredder.
Note: An improper modification of options can possibly lead to a deterioration of the deletion
performance.
If the settings of the individual options comply with your demands, click [Next]. You then
come to the next dialog page where you can start the deletion process (5.10 Deleting data).
29
fig. 8: User defined deletion patterns