
Technical data

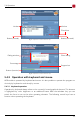
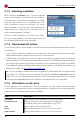


5.6 Selecting the deletion area
Entire drive
Deletes all data on the selected drive.
(6.1.3 Deleting an entire drive).
Single partition
Deletes only the data on the selected partition.
(6.1.4 Deleting a single partition).
After having selected the deletion area, move to the next step by pressing [Next] in the lower
right corner of the operating field (5.7 Selecting the medium).
Already when selecting the deletion area, HDShredder starts the recognition of connected
devices and drives. If the recognition is not finished yet, a corresponding note will be displayed
before the next dialog page will be shown. This can take up to one minute or more. The time
needed also depends on the number of drives connected. If it takes more than five minutes,
you can assume that there is a technical problem. In this case you find further information in
chapter 7 Troubleshooting.
5.7 Selecting the medium
In the two following steps, you select the medium for the deletion process. The left half of the
operating field shows a selection list. On the right side is an info box containing details on the
currently selected element. According to the selected deletion area, you can select either a
drive or a partition. The following two sub-chapters give you more detailed information. After
having selected the medium, you come to 5.9 Selecting the options.
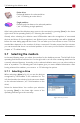
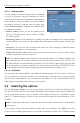
5.7.1 Selecting a drive
When selecting a drive (fig. 6), you see the devices
recognized by HDShredder in the selection list. The
info box besides the selection list shows more details
on the selected element (5.7.4 Information on the
drive).
Select the desired drive. You confirm your selection
by pressing [Next] in the lower right corner of the
operating field and go to the next step.
25
fig. 6: Selecting a drive