
Technical data


4.2 Installation with Windows
4.2.1 Installation interface
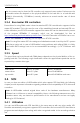
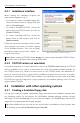
When starting the installation program the
main window appears (fig. 1).
• If you want to create a bootable floppy disk,
choose the desired drive at ‘Floppy drive’ and
click on [Create floppy].
• To create a bootable CD/DVD, choose the
desired drive at ‘CD/DVD writer’ and click on
[Create CD/DVD].
• To create a bootable USB key, choose the
desired drive at ‘USB medium’ and click on
[Make bootable].
Follow the instructions and wait until the install-
ation program announces successful creation
of the bootable medium. Then click on [Exit].
Afterwards, please proceed with chapter 5
Program instructions.
Note: When creating a CD/DVD, please always use a new, empty writeable CD/DVD. Other-
wise there may be problems when starting HDShredder.
4.2.2 CD/DVD writer not selectable
It is possible that there is no drive offered for selection at CD/DVD writer although a CD/DVD
writer is available on the system. In most cases this results from already installed software for
the CD/DVD writer (e.g. drivers for direct access to the CD/DVD writer with Windows Ex-
plorer). It reserves the drive in a way that the installation program cannot access it. If possible,
deactivate or uninstall the CD/DVD writer software. As an alternative, please create a bootable
CD/DVD from that ISO image which is also contained in the software package (4.3.2 Creat-
ing a bootable CD/DVD).
4.3 Installation with other operating systems
4.3.1 Creating a bootable floppy disk
You can also create a bootable HDShredder floppy disk without the installation program with
any operating system. For this purpose, the HDShredder software package contains a floppy
disk image in the file hdclone.img. You can create a bootable 3.5"/1.44MB floppy disk from this
image with any appropriate disk imaging program.
Tip: Under UNIX and Linux you may use the tool dd, which is available on these systems, with
the following syntax: dd if=hdshredder.img of=/dev/fd0.
19
fig. 1: HDShredder installation program