
Specifications


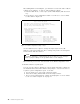
Table Of Contents
- IBM PC Server and Novell NetWare Integration Guide
- Abstract
- Contents
- Figures
- Tables
- Special Notices
- Preface
- Chapter 1. IBM PC Server Technologies
- Processors
- Clock Rate
- External Interfaces
- Processor Types
- Multiprocessing
- Memory
- Caches
- Memory Interleaving
- Dual Path Buses
- SynchroStream Technology
- Memory Error Detection and Correction
- Standard (Parity) Memory
- Error Correcting Code (ECC)
- Error Correcting Code- Parity Memory (ECC- P)
- ECC on SIMMs (EOS) Memory
- Performance Impact
- Memory Options and Speed
- Bus Architectures
- ISA Bus
- EISA Bus
- Micro Channel Bus
- PCI Bus
- Disk Subsystem
- Hard Disk Interfaces
- SCSI Technology
- SCSI Adapters
- Hard Disk Drives
- RAID Technology
- RAID Classifications
- Recommendations
- LAN Subsystem
- Shared RAM Adapters
- Bus Master Adapters
- PeerMaster Technology
- Security Features
- Tamper- Evident Cover
- Secure I/ O Cables
- Passwords
- Secure Removable Media
- Selectable Drive Startup
- Unattended Start Mode
- Systems Management
- DMI
- SNMP
- NetFinity
- SystemView
- Fault Tolerance
- NetWare SFT III
- Uninterruptible Power Supply (UPS)
- APC PowerChute
- Chapter 2. IBM PC Server Family Overview
- Chapter 3. Hardware Configuration
- The Setup Program
- Main Menu
- Advanced Menu
- Security
- EISA Configuration Utility
- SCSI Select Utility Program
- System Programs
- Starting From the System Partition
- Starting From the Reference Diskette
- Main Menu Options
- Backup/ Restore System Programs Menu
- Set Configuration Menu
- Set Features Menu
- Test the Computer
- More Utilities Menu
- Advanced Diagnostic Program
- RAID Controller Utility
- Drive Information
- Formatting the Disks
- Defining a Hot- Spare Disk
- Creating a Disk Array
- Defining Logical Drives
- Setting the Write Policy
- Initializing the Array
- Backup/ Restoring the Configuration
- Chapter 4. Novell NetWare Installation
- ServerGuide Overview
- Starting ServerGuide
- Installing NetWare 4.1 with ServerGuide
- Installing NetWare 3.12 with Diskettes
- Hardware Requirements
- Software Requirements
- Information Requested at Time of Installation
- Installation Files
- Installation Procedure
- Installing NetWare 4.1 with the Original CD- ROM
- Hardware Requirements
- Software Requirements
- Installation Procedure
- NetFinity Services for NetWare
- System Requirements
- Installing NetFinity Services for NetWare
- The RAID Administration for NetWare Utility
- Installing the Utility
- Hard Disk Failure Simulation
- Simulating with a Hot Spare Drive
- Simulating without a Hot Spare Drive
- Chapter 5. Performance Tuning
- Appendix A. EISA Configuration File
- Appendix B. Hardware Compatibility, Device Driver, and Software Patch Information
- Appendix C. Configuring DOS CD-ROM Support
- List of Abbreviations
- Index
- Special Characters C
- Numerics
- A
- B
- D
- E
- F
- H
- M
- I
- N
- K
- L
- O
- P
- S
- Q
- R
- T
- U
- V
- W
- Z
- ITSO Technical Bulletin Evaluation RED000

3.1.2.1 Advanced Menu - Boot Options
By pressing the Enter key, a screen like that shown in Figure 25 will appear.
Phoenix BIOS Setup - Copyright 1985-94 Phoenix Technologies Ltd.
Advanced
Boot Options
Boot Sequence: [A: then C:]
Swap Floppies: [Normal]
Floppy Check: [Enabled]
SETUP prompt: [Enabled]
POST errors: [Enabled]
Figure 25. PC Server 320 Setup Program - Boot Options Menu
Boot Sequence:
Boot sequence allows the user to change the order the system
uses to search for a boot device.
Other values can be:
•
C: then A:, if the user wants to boot from the hard disk first
•
C: only, if the user does not allow a boot from a diskette
Swap Floppies:
This choice allows the floppy disk drives to be redirected.
Normal is the default. When Swapped is selected, drive A becomes drive B and
drive B becomes drive A.
Note
The option Swapped does not modify the boot sequence option. So if boot
sequence is set to A: then C: and Swap floppies to Swapped, the user will get
the following error message at IPL:
0632 Diskette Drive Error
Floppy Check:
When enabled, the floppy drives are queried at boot time to
verify the correct drive type. The machine boots faster when disabled.
Setup prompt:
When enabled, the following message appears:
Press <F2> to enter SETUP
If disabled, the prompt message is not displayed but the function is still
available.
POST errors:
When enabled, if an error occurs during power on self-tests
(POST) the system pauses and displays the following:
Press <F1> to continue or <F2> to enter SETUP
Chapter 3. Hardware Configuration 69