
Specifications


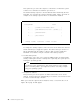
Table Of Contents
- IBM PC Server and Novell NetWare Integration Guide
- Abstract
- Contents
- Figures
- Tables
- Special Notices
- Preface
- Chapter 1. IBM PC Server Technologies
- Processors
- Clock Rate
- External Interfaces
- Processor Types
- Multiprocessing
- Memory
- Caches
- Memory Interleaving
- Dual Path Buses
- SynchroStream Technology
- Memory Error Detection and Correction
- Standard (Parity) Memory
- Error Correcting Code (ECC)
- Error Correcting Code- Parity Memory (ECC- P)
- ECC on SIMMs (EOS) Memory
- Performance Impact
- Memory Options and Speed
- Bus Architectures
- ISA Bus
- EISA Bus
- Micro Channel Bus
- PCI Bus
- Disk Subsystem
- Hard Disk Interfaces
- SCSI Technology
- SCSI Adapters
- Hard Disk Drives
- RAID Technology
- RAID Classifications
- Recommendations
- LAN Subsystem
- Shared RAM Adapters
- Bus Master Adapters
- PeerMaster Technology
- Security Features
- Tamper- Evident Cover
- Secure I/ O Cables
- Passwords
- Secure Removable Media
- Selectable Drive Startup
- Unattended Start Mode
- Systems Management
- DMI
- SNMP
- NetFinity
- SystemView
- Fault Tolerance
- NetWare SFT III
- Uninterruptible Power Supply (UPS)
- APC PowerChute
- Chapter 2. IBM PC Server Family Overview
- Chapter 3. Hardware Configuration
- The Setup Program
- Main Menu
- Advanced Menu
- Security
- EISA Configuration Utility
- SCSI Select Utility Program
- System Programs
- Starting From the System Partition
- Starting From the Reference Diskette
- Main Menu Options
- Backup/ Restore System Programs Menu
- Set Configuration Menu
- Set Features Menu
- Test the Computer
- More Utilities Menu
- Advanced Diagnostic Program
- RAID Controller Utility
- Drive Information
- Formatting the Disks
- Defining a Hot- Spare Disk
- Creating a Disk Array
- Defining Logical Drives
- Setting the Write Policy
- Initializing the Array
- Backup/ Restoring the Configuration
- Chapter 4. Novell NetWare Installation
- ServerGuide Overview
- Starting ServerGuide
- Installing NetWare 4.1 with ServerGuide
- Installing NetWare 3.12 with Diskettes
- Hardware Requirements
- Software Requirements
- Information Requested at Time of Installation
- Installation Files
- Installation Procedure
- Installing NetWare 4.1 with the Original CD- ROM
- Hardware Requirements
- Software Requirements
- Installation Procedure
- NetFinity Services for NetWare
- System Requirements
- Installing NetFinity Services for NetWare
- The RAID Administration for NetWare Utility
- Installing the Utility
- Hard Disk Failure Simulation
- Simulating with a Hot Spare Drive
- Simulating without a Hot Spare Drive
- Chapter 5. Performance Tuning
- Appendix A. EISA Configuration File
- Appendix B. Hardware Compatibility, Device Driver, and Software Patch Information
- Appendix C. Configuring DOS CD-ROM Support
- List of Abbreviations
- Index
- Special Characters C
- Numerics
- A
- B
- D
- E
- F
- H
- M
- I
- N
- K
- L
- O
- P
- S
- Q
- R
- T
- U
- V
- W
- Z
- ITSO Technical Bulletin Evaluation RED000

This option lets you select the sequence of the drives on which the system
searches for a valid boot record when you turn it on.
The default startup sequence is the first diskette drive followed by the first
hard disk. You can alter this sequence with this utility. Figure 47 shows an
example of the startup sequence when one hard disk is installed.
Set Startup Sequence
Startup Number Device
1 . . . . . .[2.88Mb 3.5-inch diskette drive ]
2 . . . . . .[SCSI ROM device slot 1 bus 0 (ID,LUN)..6,0]
3 . . . . . .[Hard disk drive 0 ]
4 . . . . . .[Not selected ]
F1=Help F3=Exit F5=Previous F6=Next F10=Save
Figure 47. Set Startup Sequence Screen
To change the startup sequence, move the cursor to the device box and use
the F5 and F6 keys to toggle the options. The devices that you can choose
will be determined by the number of devices that you have installed. A
maximum of four devices may be selected in the startup sequence.
6. Set fast startup mode
If enabled, the server runs a less extensive POST routine at cold boot time,
thereby reducing the amount of startup time required by the system prior to
loading the operating system.
Note
You will save some startup time in this mode. However, in the unlikely
event of a memory failure, you might not be aware of it until you begin
using your operating system.
7. Set power on features
This panel lets you set the options for when and how the server can be
started. It can be turned on automatically at a set time, or be turned on from
a remote location through a modem.
When you select this option from Set Features menu, a screen like the one in
Figure 48 on page 97 will appear.
96 NetWare Integration Guide