
Specifications


48 Optimizing IBM Netfinity Servers for SAP R/3 and Windows NT
Note: Please read the README file on the Netfinity 7000 BIOS flash update
diskette.
1. Unpack the downloaded Netfinity 7000 BIOS flash update diskette image file
to a diskette.
2. Make sure you have recorded any setup or SCU changes you may have made
before you do the BIOS update.
3. Insert the diskette in your floppy diskette drive and ensure that the diskette is
not write protected.
4. Reboot the server from the floppy drive.
5. The system shows a list of options:
• Option 1 is to update the system BIOS only.
• Option 2 is for an interactive version of the BIOS update utility.
• Option 3 is to update the system along with the SCSI tables.
6. Enter 3 at command prompt and press Enter.
7. Follow the instructions on the screen to finish the update.
8. When the update has completed the system will automatically reboot. Don't
remove the floppy diskette from the drive.
9. Check to make sure the BIOS version is the new version when the system
reboots.
10.Press F1 to execute the system setup utility.
11.In the setup utility press F5 to reset the system register and load setup default
values.
12.While in setup restore any settings that you made prior to the BIOS update.
13.Press F10 and Enter to save your settings and exit the setup utility.
14.The system will reboot. Boot again from the flash update diskette.
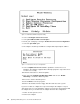
15.When the system boots after the flash update you will see the following
message during the Power On Self Test (POST):
This is the Virtual Product Data (VPD) message. The dashes indicate that the
model and serial number information have not been entered.
16.Enter the following command:
IBM Netfinity 7000
Model number = ------- Serial number = -------