
Specifications


Configuring the Hardware and Installing Windows NT 87
To install the utilities on Windows NT you only need to create a directory on your
server and copy the files from the IBM ServeRAID and ServeRAID II
supplemental diskette to this directory. The files for Windows NT are located in
the \NT directory on the diskette.
2.13.10 Repair Disk Utility
After you finish your all SAP R/3 installations we recommend that you update your
emergency repair disks created during the Windows NT installation with the
repair disk utility on every installed server. If you did not create an emergency
repair disk during the installation phase you can use this utility to create a new
one. There is no difference in the method of approach.
The repair information on your Emergency Repair Disk can be used to
reconstruct your Windows NT system files, system configuration, and startup
environment variables if they are damaged.
First you have to update the repair information for Windows NT on your hard disk.
The repair information is always created during the Window NT installation and
saved in the \Repair directory on your hard disk. This files have to be replaced
with new files from the online registry database that contain updated information
about the system configuration. Then you can create a new Emergency Repair
Disk using the repair information currently saved on your hard disk.
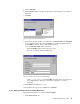
1. Type the RDISK command at a Windows NT command prompt to start the
repair disk utility.
Figure 48. Creating an Emergency Repair Disk
2. Click on the button Update Repair Info to update the repair information on the
hard disk.
3. After the repair information is updated, the utility asks if want to create a repair
disk.
4. Click on Yes to create the disk.
5. Insert a new floppy disk in your floppy drive and follow the instructions.
6. If your repair disk is lost or damaged you can also use the button Create
Repair Disk in the repair disk utility to create an emergency repair disk with
the current saved information on your hard disk.