
Specifications
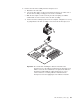
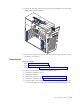


5. Free the processor from the system board by rotating the processor socket
lever arm upward to its maximum vertical position.
6. Lift the processor up and out of the computer.
To
install a processor, reverse the previous steps.
Note: When reconnecting the fan-sink cable to the system board, be sure to
connect the cable to the connector marked “CPU fan”.
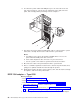
Power supply
Before you begin:
v Read “Safety information” on page 129.
v Read “Installation guidelines” on page 31.
v Review the information in “System reliability considerations” on page 31.
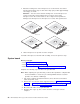
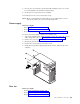
To
remove the power supply, complete the following steps:
1. Turn off the computer and all attached devices; then, disconnect all external
cables and power cords. See “Turning off the computer” on page 10.
2. Remove the cover. See “Removing the side cover” on page 52.
3. Disconnect internal cables from the system board and drives.
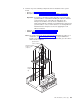
4. Remove the screws from the rear of the server.
5. Gently move the power supply away from the chassis, and lift it out of the
computer.
1
3
9
4
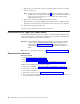
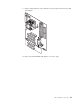
Rear fan
Before you begin:
v Read “Safety information” on page 129.
v Read “Installation guidelines” on page 31.
v Read “Installation guidelines” on page 31.
FRU information (service only) 89