
Specifications

Complete the following steps to install a DIMM:
1. Review the safety information beginning on page 129, “Installation guidelines”
on page 31, and “Handling static-sensitive devices” on page 31.
2. Remove the side cover (see “Removing the side cover” on page 52).
3. Turn off the computer and all attached devices.
4. Disconnect all external cables and power cords; then, remove the side cover
(see “Removing the side cover” on page 52.)
5. Remove the support bracket (see “Removing and installing the support
bracket” on page 53).
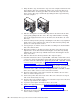
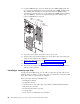
6. To make it easier to install memory modules, rotate the drive cage out of the
computer. Grasp the drive cage and rotate it until it locks into place.
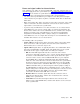
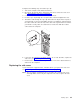
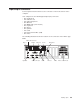
7. Locate the DIMM connectors on the system board. Determine the connectors
into which you will install the DIMMs. Remember that DIMM 1 and DIMM 3
must be paired together (and must be the first pair installed) and DIMM 2 and
DIMM 4 must be paired together.
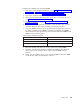
Table 4. Memory installation sequence
DIMMs Slots
1 DIMM 1
2 DIMMs 1, 3
4 DIMMs 1, 2, 3, 4
8. Open the retaining clips and, if necessary, remove any existing DIMM.
9. Touch the static-protective package containing the DIMM to any unpainted
metal surface on the computer. Then, remove the new DIMM from the
package.
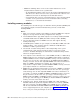
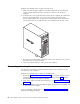
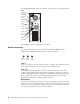
10. Gently open the retaining clip on each end of the DIMM slot. Turn the DIMM
so that the pins align correctly with the connector.
Installing options 65