
Specifications
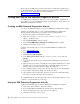
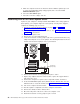
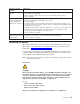


6. Locate the boot block recovery jumper (J6) on the system board, removing any
adapters that impede access to the jumper. The following illustration shows the
location of the boot block jumper on the system board.
Boot block
jumper (J6)
7. Move the jumper from pins 1 and 2 to pins 2 and 3.
8. Replace any adapters that were removed, and replace the cover (see
“Replacing the cover” on page 47 or “Replacing the side cover” on page 67).
You can now start the computer one time, without having to use the user
password and start the Configuration/Setup Utility program. At this time, you
can either delete the old password or set a new user password. If you do not
use the Configuration/Setup Utility program to change or delete the password,
the next time you start the computer, the original user password will be
reinstated.
9. Connect the computer to a power source, keyboard, monitor, and mouse.
10. Turn on the computer. The Configuration/Setup Utility program starts.
11. Follow the instructions to erase the existing password or create a new
password.
12. Select Save Settings and press Enter.
Updating BIOS code
You can download the latest BIOS code from http://www.ibm.com/pc/support/. Use
this code to create a POST/BIOS flash diskette.
Complete the following steps to update the BIOS code on the computer:
1. Insert the POST/BIOS flash diskette into drive A.
2. Turn on or restart the computer (see “Turning off the computer” on page 10 for
instructions). The computer starts from the diskette.
3. When you are prompted to save the current code to a diskette, select N. The
utility will continue to the next step. If you select Y, you are asked to name the
file to be saved, and the file is saved to the diskette.
4. When prompted to continue the POST/BIOS flash update, select Y. The flash
ROM is updated with the new code. When this step is complete, the computer
automatically restarts.
Diagnostics 25