
Operating instructions
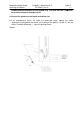

Marquette Hellige GmbH CardioSys / MicroLab V4.X Page 44
Servicing Instructions 227 436 37 Rev. B V1.3
AR200P THERMAL ARRAY RECORDER
WINDOWS 98 DEMONSTRATION SOFTWARE
INSTALLATION INSTRUCTIONS AND RELEASE NOTES
PRINTER DRIVER INSTALLATION
The installation procedure will want some files from the original
Windows 98 distribution CD, so have it ready.
Use the same Centronics printer cable that you will eventually be
using for the recorder to connect a standard printer to the LPT
port that you will be using for the recorder. Print a short test
file to verify that the cable and port are operating properly,
and that the port is not redirected to the network.
The AR200P driver is a standard Windows printer driver, and is
installed by clicking on the "printers" item off of the
"settings" choice on the Windows 98 "start" menu.
Click on "Add Printer" and follow the instructions of the "Add
Printer" wizard. Be sure to select a local LPT port. When you
see the list of manufacturers and models, click the "Have Disk"
button. The necessary files are in the root directory of the
recorder software distribution diskette. (You will also be
prompted for the original Windows 98 distribution CD.) Select
the "AR200P 8 inch Recorder," and follow the remaining prompts.
When the printer driver installation is complete, "GSI AR200P
8 inch Recorder" should appear on the list of printers. Right
click on it and select "Properties" from the pop-up menu.
Click on the "Details" tab of the property sheet, then click the
"Spool Settings" button. If you choose the "Spool print jobs..."
setting, select "RAW" as the "spool data format." Click the "OK"
button to dismiss the "Spool Settings" dialog box. Click the
"End Capture" button to make sure that the printer output will
not be redirected to a network connection. While still on the
"Details" tab of the property sheet, click the "Setup" button.
If the driver was successfully installed, you should see another
printer-properties tabbed dialog box. Click on the "Device
Options" tab and set "Print Quality" to "Normal." Click on "OK"
to dismiss it.
Under "Printer", "Properties", "Scheduling" click on:
"Print directly to Printer".
If you are unable to print to the AR200P even though the driver
was successfully installed, the problem may be the mode of the
computer's LPT port. Reboot the computer, enter the CMOS setup
program (often by pressing the "INS" or "DEL" or "F1" key
immediately after rebooting) and check the operating mode of the