
Operating instructions


Marquette Hellige GmbH CardioSys / MicroLab V4.X Page 38
Servicing Instructions 227 436 37 Rev. B V1.3
2. Switch off the printer and CardioSys /
MicoLab. (Printer power switch must
not be depressed).
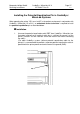
3. Open the cover of the power cord
connection on the right-hand side at
the back of the printer. Use the finger
aperture for better leverage.
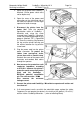
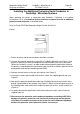
4. Disconnect the printer from the
power line! Take the potential
equalization cable of CardioSys /
MicroLab and, using the screw
removed from CardioSys / MicroLab,
screw it to the boring provided for this
purpose (labelled "PE") (Figure/Bild
3). Place the retaining ring between
the lug and the printer housing and
the washer between the lug and the
screw head.
5. Plug the power cord into the printer
power connector. To protect the
cables from mechanical strain,
secure them with a Panduit strap.
Reattach the cover of the power cord
connector and conduct both cables
through the aperture.
6. Now measure the protective earth
conductor impedance according
to IEC 601-1 between the printer's
protective earth connection (mains
plug) and the CardioSys /
MicroLab potential equalization
pin. The value must be < 0.2Ω
ΩΩ
Ω!
Also measure the enclosure
leakage current.
7. Connect the printer and CardioSys / MicroLab to separate wall outlets and
turn them on.
8. If all measurement results are within the admissible range, replace the sticker
"Important: Do not operate the device in the vicinity of the patient (1.5 m/5 ft.)"
with the sticker "CardioSys/MicroLab ..." (refer to Labelling Sheet).