
Operating instructions

Marquette Hellige GmbH CardioSys / MicroLab V4.X Page 13
Servicing Instructions 227 436 37 Rev. B V1.3
Formatting Optical Disks
You must have system administrator rights before you can do the following steps! There
is no possibility to format MO disks in USER Mode.
Before saving data to an optical disk, the disk must be formatted.
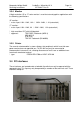
* Insert the disk.
* On the Windows screen, select ”Start” —> ”Programs” —> ”Administrative Tools
(Common)” —> ”Disk Administrator”.
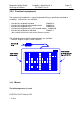
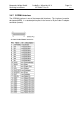
The disk administrator displays symbols for the different drives:
drive 0 = hard drive
drive 1 = optical disk (with free storage capacity)
* Click the ”Drive 1” box.
* In the ”Partition” menu select ”Create” and confirm the max. storage capacity shown
with OK.
The field for drive 1 now says ”unformatted xxx MB”.
* In the ”Partition” menu, select ”Make changes now” and click ”OK”.
The field for drive 1 now shows the drive letter, e.g. E.
* Check that the correct drive is selected (drive E in our example), because the
formatting process will clear all data on the disk.
* In the ”Options” menu, select ”Format”.
* At ”File system”, select ”NTFS”.
* Enter a name for the optical disk.
* Click ”Start” to initiate the formatting process.
* Click ”OK” to confirm the message ”All data will be cleared”.
Formatting takes about 5 minutes. A progress bar illustrates the process.
* Click ”Close” to end the session.
* Close the Disk Administrator window.