Adaptec RAID Installation Guide R
Copyright © 2001 Adaptec, Inc. All rights reserved. No part of this publication may be reproduced, stored in a retrieval system, or transmitted in any form or by any means, electronic, mechanical, photocopying, recording or otherwise, without the prior written consent of Adaptec, Inc., 691 South Milpitas Blvd., Milpitas, CA 95035. Trademarks Adaptec and the Adaptec logo are trademarks of Adaptec, Inc., which may be registered in some jurisdictions.
Regulatory Compliance Statements Federal Communications Commission Radio Frequency Interference Statement WARNING: Changes or modifications to this unit not expressly approved by the party responsible for compliance could void the user’s authority to operate the equipment. This equipment has been tested and found to comply with the limits for a Class B digital device, pursuant to Part 15 of the FCC rules.
Canadian Compliance Statement This Class B digital apparatus meets all requirements of the Canadian InterferenceCausing Equipment Regulations. Cet appareil numérique de la classe B respecte toutes les exigences du Règlement sur le matérial brouilleur du Canada.
Contents 1 Introduction Read this First 1-2 System Requirements 1-2 Storage Requirements for Drivers and Software Motherboard Compatibility 1-3 Kit Contents 1-3 Adaptec RAID Controller Features 1-4 Adaptec RAID Features – SCSI Only 1-5 About the Documentation 1-6 Using the Adaptec RAID Installation CD 1-6 Files and Folders 1-8 Product Documentation on CD 1-9 Errata and Release Notes 1-9 Installing the Adobe Acrobat Reader 1-10 Overview of the Installation Process 1-11 Cache Memory Module 1-12 Storage Manag
Adaptec RAID Installation Guide Installing Additional Cache Memory 2-6 Seating the Module – Adaptec 3200S/3400S Only 2-6 Seating the Module – Adaptec 2400A/2100S/3210S/3410S Only 2-7 Finishing up – All Models 2-7 Installing the Battery Backup Module 2-8 Installing the Controller 2-8 Determining the Booting Controller 2-9 Controller IRQ and Address 2-9 Using SMOR 2-10 3 Installing the Driver Windows 2000 3-2 Installing the Driver in a New System 3-2 Adding the Controller to an Existing System 3-3 Upgradin
Contents Installing the Driver for a Boot Controller in a New NetWare 4.2 Server 3-21 Installing the Driver in an Existing NetWare 4.2 Server 3-23 Installing the Driver for a Boot Controller in a New NetWare 5 Server 3-24 Installing the Driver in an Existing NetWare 5 Server 3-25 SCO UNIX 3-26 Installing the Driver in a New OpenDesktop 3.x System 3-26 Installing the Driver in a New OpenServer 5.0x System 3-27 Adding the Controller to an Existing OpenDesktop 3.x or OpenServer 5.
Adaptec RAID Installation Guide A Card and Module Diagrams Adaptec ATA RAID 2400A A-2 Adaptec SCSI RAID 2100S A-3 Adaptec SCSI RAID 3200S A-4 Adaptec SCSI RAID 3400S A-5 Adaptec SCSI RAID 3210S/3410S A-6 Adaptec Battery Backup Module A-8 B Controller LEDs LED During Power-up B-2 LEDs During Controller Idle B-2 LEDs During Controller Active B-2 Cache Status LEDs B-3 Cache Status LEDs – Adaptec 2400A/3200S/3400S Only B-3 Cache Status LED – Adaptec 3210S/3410S Only B-4 SCSI Bus Status LEDs B-4 SCSI Bus Sta
1 Introduction In this Chapter ➤ Read this First ➤ System ➤ Kit Requirements Contents ➤ Adaptec RAID Controller Features 1-2 1-2 1-3 1-4 ➤ About the Documentation 1-6 ➤ Using the Adaptec RAID Installation CD 1-6 ➤ Installing the Adobe Acrobat Reader 1-10 ➤ Overview of the Installation Process 1-11 ➤ Cache Memory Module ➤ Storage ➤ Safety Management Software Overview Information 1-12 1-13 1-15 1-1
Adaptec RAID Installation Guide Read this First Before you begin installing your new Adaptec RAID controller, read this chapter. This chapter is an important guide to the rest of the documentation and provides a summary of the installation process.
Introduction Motherboard Compatibility The Adaptec controller requires a motherboard BIOS that ■ Complies with the PCI Local Bus Specification (revisions 2.1 and 2.2). ■ Supports multifunction devices where one of the devices is a PCI bridge. ■ Provides large memory-mapped address ranges. Most motherboards manufactured since 1997 have these capabilities. Refer to the READ.
Adaptec RAID Installation Guide Adaptec RAID Controller Features Adaptec RAID controllers support 1-4 ■ RAID levels 0, 1, 5, multilevel 0/1 and 0/5. ■ Cache memory modules with ECC and predictive caching. ■ PCI Local Bus Specification, Revision 2.2 with PCI clock speeds up to 66 MHz. ■ Microsoft Windows 2000, Windows NT, Windows 95/98/Me, Novell NetWare, SCO UNIX, Red Hat Linux, SuSE Linux, and FreeBSD. ■ OS-independent configuration and RAID creation using SMOR.
Introduction Adaptec RAID Features – SCSI Only Adaptec 2100S, 3200S, 3210S, 3400S, and 3410S controllers support ■ Legacy SCSI drives (including hard disk, tape, CD-ROM, CD-RW, and Magneto-Optical drives) and jukeboxes. ■ Active termination. ■ SAF-TE (SCSI Accessed Fault-Tolerant Enclosure) and SES (SCSI Enclosure Services) for high-availability LAN (Local Area Network) servers and storage subsystems.
Adaptec RAID Installation Guide 3 SCSI RAID controllers support Ultra160 and legacy hard drives and non-harddrive devices, such as CD and tape drives. 4 Adaptec RAID software supports up to 64 hard drives per array and up to 2 Terabytes of storage capacity. 5 VHDCI (Very High Density Connector Interface). 6 Requires a special hot-swap carrier. 7 Indicates when activity has occurred that may require operator attention.
Introduction The Adaptec RAID Installation CD is a bootable disc, which means you can use it to start up a computer that has no operating system and configure a RAID, provided your computer recognizes bootable CDs. Note: If your computer is not set for bootable CD support, change the system BIOS so that the CD drive is used as a boot device.
Adaptec RAID Installation Guide ■ Install Adaptec Storage Manager—Installs Storage Manager software. For an overview of the storage management software options, refer to Storage Management Software Overview on page 1-13. ■ Install Adaptec Storage Manager Pro—Installs Storage Manager Pro software and Java environment. For an overview of the storage management software options, refer to Storage Management Software Overview on page 1-13.
Introduction Product Documentation on CD The Adaptec RAID Installation CD contains the following documents: Subject CD Location Adaptec RAID Installation Guide /docs/RAID Install Gd 512910vAA.pdf Storage Management Software User’s Guide /docs/StorageMgt SW Gd 512862vAA.pdf Storage Manager Pro User’s Guide /docs/SM Pro SW Gd 512730vAA.pdf You can view these documents only if you have Acrobat Reader or Viewer installed on your computer.
Adaptec RAID Installation Guide Installing the Adobe Acrobat Reader Both Adobe Acrobat Reader and Viewer are provided on the Adaptec RAID Installation CD. These applications enable you to view the Portable Document Format (PDF) files on the Adaptec RAID Installation CD. Acrobat Reader is also available from Adobe as a free download. For details, go to http://www.adobe.com. How you use Reader or Viewer varies by operating system, as described below: ■ Windows—To install Acrobat Reader, click autorun.
Introduction Overview of the Installation Process The following steps provide an overview of the process of installing and setting up the controller and configuring the RAID: 1 Read this entire chapter. 2 Verify that your motherboard is compatible with the controller. For details, refer to Motherboard Compatibility on page 1-3. 3 Gain familiarity with the features and functions of the Adaptec RAID Installation CD. Refer to page 1-6 for details.
Adaptec RAID Installation Guide Cache Memory Module Adaptec cache memory modules provide up to 256 MB of highspeed SDRAM disk cache with ECC (Error Correction Coding). Note: You must have at least 32 MB of cache installed. The on-board processor uses 16 MB of the available memory. Therefore, the RAID software shows 16 MB less than is actually installed. When ECC memory is installed, the green ECC Enabled (ECCEN) LED is lit. (Non-ECC memory could work in your controller, but is not recommended.
Introduction Storage Management Software Overview Your Adaptec RAID controller includes the following software tools to manage your storage subsystem: ■ Storage Manager Pro—The Graphical User Interface (GUI) through which you interact with the storage subsystem. It provides an intuitive graphical interface that enables you to do such things as create and manage RAID arrays, set up security levels for users and administrators, establish the means of notifying users of disk failures, etc.
Adaptec RAID Installation Guide has not yet been incorporated into Storage Manager Pro. Keep in mind however, that the advantage of Storage Manager Pro over Storage Manager is its newer GUI, and its consistent look and feel across operating systems and between client and server platforms (due to it’s Java-based architecture). You can use either tool as the primary RAID management utility. For details, refer to the Adaptec Storage Management Software User’s Guide.
Introduction Safety Information Any device that uses electricity must be treated with caution. To ensure general safety, follow these guidelines: ■ Keep your work area and the computer clean and clear of debris. Eliminate hazards such as spills or bad wiring. ■ Before opening the system cabinet, unplug the power cord.
Adaptec RAID Installation Guide To prevent ESD damage, follow these guidelines: ■ Always use an ESD wrist or ankle strap and ensure that it makes skin contact. ■ Connect the equipment end of the strap to an unpainted metal chassis surface. ■ If no wrist strap is available, ground yourself by touching the metal chassis. ■ When installing or removing a component, use any available ejector levers or captive installation screws to properly seat the bus connectors in the backplane or card slot.
2 Installing Your Controller In this Chapter ➤ Configuring ATA Drives 2-1 ➤ Configuring SCSI Devices 2-2 ➤ Installing Additional Cache Memory 2-6 ➤ Installing the Battery Backup Module 2-8 ➤ Installing the Controller 2-8 ➤ Using SMOR 2-10 Configuring ATA Drives When configuring drives for the Adaptec 2400A, you need to ■ Select and configure compatible drives.. ■ Attach supplied ATA cables. ATA Drives Your Adaptec 2400A controller supports ATA/66 and ATA/100 hard drives only.
Adaptec RAID Installation Guide ATA Cables ATA RAID controllers use ATA/100 cables. The cables supplied with your controller kit have a blue connector at one end and a black connector at the other end. Plug the blue connector into the controller and the black connector into the hard drive. ! Caution: Reversing the connection degrades the controller performance.
Installing Your Controller Wide devices allow data to be transferred at twice the rate of Narrow devices. The Wide bus is backward compatible with Narrow devices, allowing both types of SCSI devices to be used with the same controller. The Narrow interface is still used with some SCSI devices, such as tape and CD drives. LVD and SE Devices Attaching a single-ended (SE) SCSI device to an LVD bus causes the bus to slow down to Ultra SCSI speed (20 MHz) for all devices.
Adaptec RAID Installation Guide If necessary, the Adaptec RAID controller ID can be changed to any ID from 0 through 7. You can use SMOR or the Configure Host Bus Adapter window in Storage Manager to change the controller SCSI ID. Note: Changing the controller ID is not recommended. You should leave the Adaptec RAID controller set at SCSI ID 7. SCSI Termination The basics of termination are as follows: ■ ■ Enable termination on the devices on each physical end of a SCSI cable.
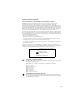
Installing Your Controller By using a 68-pin to 50-pin SCSI cable adapter, a Narrow device can be attached to a Wide cable along with Wide devices. However, the device at the end of the cable must be a Wide device so that all SCSI signals are terminated. For internal and external cables where one cable is Narrow, set the controller termination to High Only. The following figure shows various SCSI cabling examples.
Adaptec RAID Installation Guide Installing Additional Cache Memory Adaptec RAID controllers can be upgraded with additional cache memory. See Cache Memory Module on page 1-12 for additional information about memory modules for cache memory. To install cache memory modules 1 Ground yourself and take appropriate ESD precautions. 2 If necessary, power down your system and remove the RAID adapter.
Installing Your Controller From the side view shown below, you can see that the module is placed into the socket at an angle. Then, press the module into place until the metal clips click into the sides of the module and holds it securely. Seating the Module – Adaptec 2400A/2100S/3210S/3410S Only Holding the circuit board and module by the edges, slide the module into the socket as shown below. Refer to Appendix A for the location of the socket.
Adaptec RAID Installation Guide Installing the Battery Backup Module To install the battery backup module in Adaptec 3200S, 3210S, 3400S, and 3410S controllers, plug it in as shown below. Note: The socket location in the figure below is for Adaptec 3200S/3400S controllers only. Refer to Appendix A for socket locations on Adaptec 3210S/3410S controllers.
Installing Your Controller need to move another controller in your system to accommodate this requirement. 4 SCSI only—Connect any external cables to the controller. Note: If you have disk drives attached to a SCSI controller with a Symbios chipset, use SMOR to set the Bootable Devices option to Disable. Determining the Booting Controller Adaptec RAID controllers are shipped with a controller BIOS ROM enabled for PCI assignment.
Adaptec RAID Installation Guide Using SMOR You need to run SMOR in systems where you need to configure the controller and set up disk arrays before the operating system has been installed. Run SMOR as directed in the installation procedures in this Installation Guide to: ■ Check the cache memory module after installing the controller (refer to Step 2 on page 2-7). ■ Configure the controller as a boot controller after installing the controller (refer to Determining the Booting Controller on page 2-9).
Installing Your Controller 3 If the boot device will be an array, create that array now. You can create or modify array groups later. 4 Exit SMOR. The system begins building arrays that you created or modified. For large arrays, this process may take several hours. You can perform other activities on the system while the build operation continues. However, access time will be slower until the build is complete.
3 Installing the Driver In this Chapter ➤ Windows 2000 3-2 ➤ Windows NT 4.0 3-5 ➤ Windows 95, Windows 98, and Windows Me ➤ Novell ➤ SCO NetWare UNIX 3-11 3-18 3-26 ➤ FreeBSD 3-29 ➤ Linux 3-30 This chapter presents several scenarios for installing the controller driver. Identify the appropriate scenario and read the entire procedure and related explanations before proceeding.
Adaptec RAID Installation Guide Windows 2000 The following sections describe procedures for installing the Adaptec RAID controller with Windows 2000. The following installation scenarios are described: ■ Installing the Driver in a New System on page 3-2 ■ Adding the Controller to an Existing System on page 3-3 ■ Upgrading Windows NT to Windows 2000 on page 3-4 Note: The Adaptec driver for Windows 2000 does not include a digital signature. Your system may display warning messages about this condition.
Installing the Driver 3 Shut down the system and remove the Adaptec RAID Installation CD and the driver floppy disk. 4 Insert the Windows 2000 setup media (floppy disk or CD) and restart the system to begin the Windows 2000 installation. 5 When the Windows 2000 installation starts, a blue screen appears after the hardware detection message. When prompted to install a third-party driver, press F6. Note: You only have 5 seconds to press the F6 key during the installation startup.
Adaptec RAID Installation Guide c Follow instructions and respond to prompts as necessary to get to the Adaptec splash screen. d When you see the Adaptec splash screen, click Create Driver Disk. Then, click the appropriate operating system. e Insert a floppy disk and click OK. The system creates the driver disk. 2 Shut down the system and remove the Adaptec RAID Installation CD and the driver floppy disk.
Installing the Driver d When you see the Adaptec splash screen, click Create Driver Disk. Then, click the appropriate operating system. e Insert a floppy disk and click OK. The system creates the driver disk. 2 Shut down the system and remove the Adaptec RAID Installation CD. 3 Restart the system. 4 Click the Windows Start button, select Run, and type a:\w2kprep.exe. 5 Remove the driver disk. 6 Insert the Windows 2000 CD and run the setup.exe program.
Adaptec RAID Installation Guide ■ Upgrading the Controller in an Existing System on page 3-8 ■ Changing the Driver in an Existing System on page 3-9 Note: If you choose the Microsoft I2O Operating System Module (OSM) in place of the Adaptec driver, you cannot use Adaptec storage management software. Installing the Driver in a New System with Only One Controller In this scenario, you are installing an Adaptec RAID controller and Windows NT 4.
Installing the Driver 4 Shut down the system and remove the Adaptec RAID Installation CD and the driver floppy disk. 5 Insert the Windows NT setup media (floppy disk or CD) and restart the system. 6 If prompted, skip Setup’s mass storage detection. Press S to Specify Additional Devices. 7 Select Other, then insert the driver disk you created in Step 3. 8 Select Adaptec I2O RAID Host Adapter Driver for NT 4.0.
Adaptec RAID Installation Guide 4 Start up the system. During startup, press Ctrl+A to start SMOR. Use SMOR to create the RAID. For details, refer to Using SMOR on page 2-10. 5 Insert the Windows NT CD in the drive and restart the system. 6 When prompted, press Enter to initiate Setup’s mass storage detection. Windows NT detects any controllers for which it has built-in drivers. Once your other hardware is detected, cancel out of any further detection. 7 Shut down and restart your system.
Installing the Driver c Follow instructions and respond to prompts as necessary to get to the Adaptec splash screen. d When you see the Adaptec splash screen, click Create Driver Disk. Then, click the appropriate operating system. e Insert a floppy disk and click OK. The system creates the driver disk. 2 Shut down the system and remove the Adaptec RAID Installation CD and the driver floppy disk. 3 Restart the system and open the Control Panel. Click the SCSI Adapters icon.
Adaptec RAID Installation Guide d When you see the Adaptec splash screen, click Create Driver Disk. Then, click the appropriate operating system. e Insert a floppy disk and click OK. The system creates the driver disk. 2 Shut down the system and remove the Adaptec RAID Installation CD and the driver floppy disk. 3 Restart the system and open the Control Panel. Click the SCSI Adapters icon. Then select the Drivers tab and click Add.
Installing the Driver Windows 95, Windows 98, and Windows Me The following installation scenarios are discussed: ■ Installing the Driver in a New Windows 98/Me System on page 3-12 ■ Installing the Driver in a New System with Windows 95 (OEM SR2 – Version 95B) on page 3-14 ■ Adding the Controller to an Existing Windows 95/98/Me System on page 3-16 ■ Upgrading Windows 95 to Windows 98/Me (Upgrade Version) on page 3-18 Creating the Driver Disk Each of the procedures for installing the driver in each
Adaptec RAID Installation Guide ■ If the CD drive is on a SCSI controller other than an Adaptec RAID SCSI controller, refer to the CD drive guide. ■ If the CD drive is on an Adaptec SCSI RAID controller, create a driver disk for DOS in addition to creating a driver disk for Windows as described in Creating the Driver Disk on page 3-11. Use the DOS driver disk to execute setupcd.exe to establish CD-ROM support.
Installing the Driver 11 During one of the device detection boot processes, Windows identifies a PCI Card device. Click Next and display the list of drivers from a specific location. Note: If you are not prompted for a PCI card or the Device Manager shows PCI Card with a yellow exclamation mark in the Other Devices list, you might need a patch so that your motherboard chipset recognizes multifunction bridge controllers. Contact your motherboard vendor and apply the patch.
Adaptec RAID Installation Guide Installing the Driver in a New System with Windows 95 (OEM SR2 – Version 95B) In this scenario, you are installing a bootable Adaptec RAID controller in a new system with Windows 95 (OEM SR2 version). Note: If your version of Windows predates SR2, you must install windows and upgrade to SR2 before installing the Adaptec RAID controller. To install the driver 1 Install and configure your Adaptec RAID controller and hard drives according to the instructions in Chapter 2.
Installing the Driver 14 Open the Device Manager. Look for a PCI Card entry under the Other Devices category. There may be multiple entries if you have multiple Adaptec RAID controllers installed. There may also be an entry called PCI Memory Controller. 15 Select PCI Card and then select Update Driver from the Driver tab.
Adaptec RAID Installation Guide 22 If you system contains multiple Adaptec RAID controllers, repeat Steps 14 through 21 for each controller. The system should ask you to reboot when this action is completed. 23 The Device Manager should now show an Adaptec I2O RAID Host Adapter in the SCSI and RAID Controllers section. 24 Optional: Using a text editor, remove the following entries from your config.sys file: device=i2oddl.sys device=dptcdrom.
Installing the Driver 5 If Windows did not discover the devices during startup, open the Device Manager. Look for a PCI card entry in the Other Devices category. There may be multiple entries if you have multiple Adaptec RAID controllers installed. There may also be an entry for a PCI memory controller. Note: If you are not prompted for a PCI card or memory controller driver, open the Device Manager.
Adaptec RAID Installation Guide 13 If your system contains multiple Adaptec RAID controllers, repeat Steps 6 through 12 for each Adaptec RAID controller. 14 Restart the system and then open the Device Manager. It should now show an Adaptec I2O RAID Host Adapter in the SCSI and RAID Controllers section.
Installing the Driver Installing the Driver for a Boot Controller in a New NetWare 4.11 Server In this scenario, you are installing an Adaptec RAID controller as a boot controller in a new NetWare 4.11 server with other hardware. Note: Part of this procedure requires that you have enough free space on your C drive to hold the contents of the NetWare CD. To install the driver 1 Create a driver floppy disk using the Adaptec RAID Installation CD.
Adaptec RAID Installation Guide 8 Insert the driver disk you created in Step 1 and run dpt411.bat. This utility copies the necessary files to the C drive. 9 Run install.bat from the C drive. 10 When asked to select a disk driver select i2opci.nlm. Enter the slot number where the controller is installed and press F10. 11 Select Save parameters and load driver. 12 Select Yes to select another driver. 13 Select bkstrosm.ham. Enter the slot number where the controller is installed and press F10.
Installing the Driver 3 Shutdown the server. 4 Install and configure your Adaptec RAID controller as a secondary controller according to the instructions in Chapter 2. Note the slot occupied by the controller; you will need this information later in the install process. 5 Start up the server. During restart, press Ctrl+A to start SMOR. Use SMOR to create the RAID. For details, refer to Using SMOR on page 2-10. 6 Start NetWare. 7 When the console prompt appears, type load install and press Enter.
Adaptec RAID Installation Guide c Remove the Adaptec RAID Installation CD and the driver floppy disk. 2 Install and configure your Adaptec RAID controller as the primary controller according to the instructions in Chapter 2. 3 Create a directory on the C drive named nwupdate. 4 Insert the driver disk you created in Step 1. 5 Type copy a:\*.* c:\nwupdate. 6 Start the NetWare installation program from the NetWare CD. Select the Custom Installation option.
Installing the Driver Installing the Driver in an Existing NetWare 4.2 Server In this scenario, you are integrating an Adaptec RAID controller into an existing Novell NetWare 4.2 server as a secondary controller. To install the driver 1 Upgrade your NetWare server to the minimum patch level specified by Novell. 2 Create a driver floppy disk using the Adaptec RAID Installation CD.
Adaptec RAID Installation Guide 13 Select Edit startup.ncf. If needed, edit the file so that i2opci.nlm is listed before bkstrosm.ham in your startup.ncf file. 14 Shutdown and restart the server. Installing the Driver for a Boot Controller in a New NetWare 5 Server In this scenario, you are installing the Adaptec RAID controller as a boot controller in a new NetWare 5 server. To install the driver 1 Create a driver floppy disk using the Adaptec RAID Installation CD.
Installing the Driver 12 Select Edit startup.ncf. 13 Install the latest support pack for NetWare 5. Installing the Driver in an Existing NetWare 5 Server In this scenario, you are integrating an Adaptec RAID controller into an existing Novell NetWare 5 server as a secondary controller. To install the driver 1 Upgrade your NetWare server to the minimum patch level specified by Novell. 2 Create a driver floppy disk using the Adaptec RAID Installation CD.
Adaptec RAID Installation Guide SCO UNIX The Adaptec RAID Installation CD contains a driver for each version of SCO. You use the CD to create driver disks. Two disks are required to store all of the drivers. To create the driver disks 1 Start up the system from the CD and select Create driver disks. 2 Select the SCO operating system you are using. 3 Insert floppy disks when prompted until all drivers are copied.
Installing the Driver Installing the Driver in a New OpenServer 5.0x System In this scenario, you are installing SCO UNIX OpenDesktop 3.x or OpenServer 5.0x on a single drive or array group. To install the driver 1 Start up the system with the SCO UNIX boot disk. 2 For OpenServer 5.0x, at the boot prompt type defbootstr ahslink=dpti5 For OpenServer 5.
Adaptec RAID Installation Guide 4 To run the installpkg utility, type installpkg -d disk/. SCO UNIX reads the disk and prompts you to enter the package name to be installed. 5 Type dpti4 for Open Desktop 3.x and dpti5 for SCO OpenServer 5.x. 6 After the package is installed, rebuild the kernel. 7 Restart the system. 8 Install the new kernel. 9 Add devices to the controller.
Installing the Driver 8 9 If you need to add devices to a secondary controller, open a terminal window and type sdiconfig -l. This utility returns the device address for all controllers recognized by the operating system and any attached devices. (You will need this information to perform Step 9.) The device address is of the format cCCbBBtTTdDD, where ■ CC specifies the controller ID. ■ BB is the controller channel (or bus) number of the bus to which the disks are attached. The range is 0 - 7.
Adaptec RAID Installation Guide Linux The Adaptec RAID controller supports Red Hat 6.2 and 7.0 and SuSE 6.4 and 7.0 with kernel versions 2.2.14-5.0, 2.2.16-22, 2.2.14, and 2.2.16. Note: For the most up-to-date information on Adaptec’s support of Linux, or to download driver sources, visit http://linux.adaptec.com. Installing the Driver in a New Linux System In this scenario, you are installing the controller in a new Red Hat Linux system. Note: This installation procedure applies to Red Hat Linux only.
Installing the Driver 2 Install and configure your Adaptec RAID controller and hard drives according to the instructions in Chapter 2. 3 Start up the server. During startup, press Ctrl+A to start SMOR. Use SMOR to create the RAID. For details, refer to Using SMOR on page 2-10. Note: Any partitions created on disks that are not part of an array will be unavailable if you subsequently use the disk in a RAID configuration.
Adaptec RAID Installation Guide Installing the Driver in an Existing Linux System The Adaptec RAID Installation CD contains precompiled module drivers and storage management software in RPM (Red Hat Package Manager) format. For current information, visit http:// linux.adaptec.com. The 2.0 driver RPM has precompiled module drivers for the following kernels: Vendor Version Kernel Version Red Hat 7.0 2.2.16-22; 2.2.16-22smp 6.2 2.2.14-5.0; 2.2.14-5.0smp 7.0 2.2.16; 2.2.16smp 6.4 2.2.14; 2.2.
4 Installing Storage Management Software In this Chapter ➤ System Requirements 4-2 ➤ Installing Storage Manager Pro 4-2 ➤ Installing Storage Manager 4-8 As described in Storage Management Software Overview on page 1-13, you can use either Storage Manager or Storage Manager Pro as your primary RAID management utility. Familiarize yourself with the differences between these two software tools to ensure that you choose the option that best suits your needs.
Adaptec RAID Installation Guide System Requirements You need a system that meets the following minimum hardware requirements: ■ Pentium or equivalent CPU that is at least as fast as 200 MHz ■ 64 MB of RAM (128 MB of RAM for NetWare) ■ 60 MB of disk space for Storage Manager Pro.
Installing Storage Management Software Installation Prerequisites The prerequisites for installing Storage Manager Pro are that you have already installed the following: ■ Adaptec RAID controller and drives. Refer to Chapter 2, Installing Your Controller. ■ Controller driver. Refer to Chapter 3, Installing the Driver. Storage Manager Pro requires approximately 60 MB of free disk space during the installation process.
Adaptec RAID Installation Guide 2 If your Windows system is configured to automatically start CD software, insert the Adaptec RAID Installation CD into your drive and when the installation menu appears click Install Adaptec Storage Manager Pro. If your system does not start the CD automatically, browse the CD and click autorun.exe. Click Install Adaptec Storage Manager Pro to begin the installation. 3 From the drop-down list box, select the language you want.
Installing Storage Management Software Note: Storage Manager Pro does not run on JRE 1.2.2. Therefore, if you have JRE 1.2.2 installed on your server, you still need to install JRE 1.1.7B. 5 Edit the server’s sys:\system\autoexec.ncf file by typing startx at the end of the file. This command initializes the graphics console and the appropriate Java modules for Storage Manager Pro. To install Storage Manager Pro 1 Insert the Adaptec RAID Installation CD into your drive.
Adaptec RAID Installation Guide The autoexec.ncf file now contains search add SYS:\Adaptec\SMPro asmpsrvr.ncf 8 Press Esc to exit when prompted. 9 To begin using Storage Manager Pro, restart the server. Alternatively, you can start Storage Manager Pro without shutting down the server by typing startx search add sys:\adaptec\SMPro asmpsrvr.ncf NetWare 5.x As prerequisites for installing Storage Manager Pro in a NetWare 5.
Installing Storage Management Software 4 From the Select Product Option window, select Adaptec Storage Manager Pro and press Enter. When the process is complete, the files will be installed in sys:\adaptec\smpro. 5 Press Enter to continue or F3 to specify a different path. 6 When you are asked to update the autoexec.ncf file, press Enter. The appropriate NLM command lines and search path are added to autoexec.
Adaptec RAID Installation Guide Installing Storage Manager Storage manager occupies approximately 5 MB of hard disk space. Operating System Compatibility Storage Manager runs on the following operating systems: ■ Microsoft Windows 2000, Windows NT 4.0, and Windows 95/98/Me (see page 4-8) ■ Novell NetWare 4.x and 5.x (Remote communication client only) (see page 4-9) ■ SCO UNIX OpenServer 5 and UnixWare 7.
Installing Storage Management Software 1 Start Storage Manager and double-click on the controller icon to display the Host Bus Adapter Info window. 2 Select Configure to display the Configure Host Bus Adapter (HBA) window. 3 Select Caching. When the HBA Caching Configuration dialog box appears, click Advisory for both settings. 4 Select OK to exit the dialog and save the changes. 5 Restart your computer so that changes take effect.
Adaptec RAID Installation Guide SCO UNIX Note: The Motif version of Storage Manager for SCO UNIX will not display colors correctly if your video display adapter is set to display more than 256 colors. Adaptec Storage Manager for SCO UNIX is installed automatically by the installpkg utility during the driver installation process. Refer to Installing the Driver in a New OpenDesktop 3.x System on page 3-26.
Installing Storage Management Software Linux Storage Manager for Linux requires X-Window support. Storage Manager includes LessTif components and supports the following environments: ■ K Desktop Environment (KDE) ■ GNU Network Object Environment (GNOME) GUI Note: Use of more than 256 colors in your GUI can result in Storage Manager displaying incorrect colors. If this occurs, reset your color setting to use only 256 colors.
A Card and Module Diagrams In this Appendix ➤ Adaptec ATA RAID 2400A A-2 ➤ Adaptec SCSI RAID 2100S A-3 ➤ Adaptec SCSI RAID 3200S A-4 ➤ Adaptec SCSI RAID 3400S A-5 ➤ Adaptec SCSI RAID 3210S/3410S A-6 ➤ Adaptec Battery Backup Module A-8 A-1
Adaptec RAID Installation Guide Adaptec ATA RAID 2400A IRQ ECCEN ECCERR 876543 21 LEDs J1 J7 J8 J10 1 Busy LED J4 IDE 0 J6 IDE 2 J11 IDE 1 J12 IDE 3 J16 SIMM Socket P1 PCI Connector Part Description ECCEN ECC enabled LED (green) ECCERR ECC error LED (red) IRQ, 8..
Card and Module Diagrams Adaptec SCSI RAID 2100S J10 IRQ 8 7 6 5 4 3 21 P6 P4 J1 P9 J11 PCI Connector Part Description IRQ, 8..1 Adapter activity LEDs J1 Cache memory socket. (During operation, this socket must contain a memory module.) J10 Internal Wide Ultra160 SCSI connector for Channel A J11 External Wide Ultra160 SCSI connector for Channel A P1 PCI connector P4 Pins 1–2 NVRAM reset Pins 3–4 Reserved—do not use P6 Hard drive activity LED connector.
Adaptec RAID Installation Guide Adaptec SCSI RAID 3200S IRQ 8 7 6 5 4 3 2 1 P4 P6 Audible Alarm ECCERR TRMEN-B TRMENHD-A TRMEN-A TRMPWR-B TRMPWR-A ECCEN P3 P9 J10 J14 J7 J12 J11 J8 J2 J1 J15 P1 PCI Connector Part ECCEN ECCERR IRQ, 8..1 J1 J2 J7, J8 J10 J11 J12 J14 J15 P1 P3 P9 P4 P6 TRMEN-A/B TRMENHD-A TRMPWR-A/B A-4 Description ECC enabled LED (green) ECC error LED (red) Adapter activity LEDs Cache memory socket 1. (During operation, this socket must contain a memory module.
Card and Module Diagrams Adaptec SCSI RAID 3400S IRQ P4 P6 87654321 Audible Alarm ECCERR TRMEN-B TRMENHD-A TRMEN-A TRMPWR-B TRMPWR-A ECCEN P3 P9 J10 J14 J7 J12 J11 J8 J2 J1 J15 PCI Connector Part Description ECCEN ECC enabled LED (green) ECCERR ECC error LED (red) IRQ, 8..1 Adapter activity LEDs J1 Cache memory socket 1. (During operation, this socket must contain a memory module.) J2 Cache memory socket 2. (Memory is optional for this socket.
Adaptec RAID Installation Guide Adaptec SCSI RAID 3210S/3410S J10 J12 J11 J16 Busy LED HPT370 Not available on Model 3210S NVRAM MISCL J5 J18 J14 Adaptec Adaptec AIC-7899W Audible Alarm J6 J1 PCI Connector J19 Front View ECCERR TERMEN_A TPOWERA TERMEN_B TPOWERB TERMEN_C TPOWERC TERMEN_D TPOWERD IRQ 1 2 3 4 5 6 7 8 Back View — LEDs Only A-6
Card and Module Diagrams Part Description ECCERR ECC Error LED (red) IRQ, 8..1 Adapter activity LEDs J1 Cache memory socket. (During operation, this socket must contain a memory module.
Adaptec RAID Installation Guide Adaptec Battery Backup Module TRICKLE CHARGE WARNING: If the battery is incorrectly replaced, it can explode. Replace only with the same or equivalent type recommended by the manufacturer. Dispose of used batteries according to the battery manufacturer’s instructions.
B Controller LEDs In this Chapter ➤ LED During Power-up B-2 ➤ LEDs During Controller Idle B-2 ➤ LEDs During Controller Active B-2 ➤ Cache ➤ SCSI Status LEDs Bus Status LEDs B-3 B-4 Adaptec RAID controllers provide LEDs that let you visually monitor controller activity. Several different controller states are indicated by the LEDs as outlined in the following sections. Additional LEDs indicate the status of the cache memory on the controller.
Adaptec RAID Installation Guide LED During Power-up During its power-up sequence, the controller passes through the following states in sequence, as indicated by the LEDs: Note: The address translation unit (ATU), PCI bridge, and cache module (if installed) must be configured and enabled before controller initialization can be completed. If any of these components are not configured or become disabled during the Fast Idle phase, the pattern reverts to the wait pattern of the affected component.
Controller LEDs When the power-up sequence is complete, viewing the LEDs can help you determine the operating status of the controller. These LED patterns are also useful for troubleshooting. Refer to Appendix C for more information on interpreting LED patterns. LED Function 1 Indicates that controller is working and interrupts are enabled. During controller activity, this LED flashes four times per second.
Adaptec RAID Installation Guide is correctable), ECCERR remains lit until the controller is powered down. Refer to Appendix A for the location of the LEDs on your controller. Cache Status LED – Adaptec 3210S/3410S Only These controllers provide the ECCERR (ECC Error) cache status LED. This LED is lit (red) when a correctable or noncorrectable error has been detected in the cache memory module.
Controller LEDs SCSI Bus Status LEDs – Adaptec 3410S Only The following bus status LEDs are provided: ■ TPOWER_A, TPOWER_B, TPOWER_C, TPOWER_D—Lit when termination power is supplied by the controller for the respective channels. ■ TERMEN_A, TERMEN_B, TERMEN_C, TERMEN_D—Lit when termination is enabled on the controller for the respective channels.
C Troubleshooting This appendix provides answers to many frequently asked questions. If a situation occurs that is not covered in this appendix, or if these recommendations do not correct the problem, contact Adaptec Technical Support. When the controller BIOS displays the hard drives during startup, a device fails to appear. The power cable or the interface cable may be loose or disconnected. Windows NT displays a blue screen error message that references the system video controller.
Adaptec RAID Installation Guide The controller fails to respond and the IRQ LED (and possibly other LEDs) remains lit. The IRQ LED indicates that the controller IRQ assignment is pending. This usually indicates an IRQ conflict with another card. Verify that each card is set to a unique IRQ. Refer to Appendix A for the location of the LEDs on your controller.
Troubleshooting The controller fails to respond and various IRQ LEDs in the 1–4 range flash once per second. This LED pattern indicates an internal microprocessor error occurred in the controller. Shut down the computer and unplug all cables. Restart the computer. If the condition does not reappear, reconnect the cables and devices, one device at a time, until the faulty hard drive or cable is isolated. If the error persists, contact Adaptec Technical Support.
Adaptec RAID Installation Guide The Adaptec controller BIOS reports a drive as a disk instead of a drive. This condition can occur if SMOR is used to disable Boot Enable. If you require access to disk drives connected to the Adaptec controller during the boot process, set Bootable Devices to Normal. After updating the Adaptec controller firmware or BIOS and restarting, LEDs 1 and 5 or 2 and 5 flash once per second.
D Controller Reset Procedures In this Appendix ➤ ✮✶✲✡✭ ✲❅▲❅▼ ✤ ✒ ➤ ✦●❁▲❈ ✭❏❄❅ ✐ ✤ ✒ This Appendix describes procedures that you can use to reset your controller in the event the controller becomes inoperable for the reasons described below: ■ NVRAM Reset—The controller was improperly configured. ■ Flash Mode 0—An upgrade to the controller was attempted, but failed.
Adaptec RAID Installation Guide NVRAM Reset Adaptec RAID controllers retain their setup parameters even when powered OFF. These parameters are stored on the controller in an area of nonvolatile memory (NVRAM). There is a possibility that, through improper configuration, the controller can be put into a state where it hangs the system during boot. If this happens, the parameters stored in the NVRAM can be restored to their default settings by following these steps: 1 Power OFF the system.
Controller Reset Procedures 4 When you see the Adaptec splash screen, click Create Driver Disk. Then, click the appropriate menu option. 5 Insert a floppy disk and click OK. The system creates the bootable SMOR disk. 6 Remove the Adaptec RAID Installation CD and the driver floppy disk. 7 Shut down the system. 8 If necessary, reinstall the controller in your system.
E Specifications DC Power Requirements Voltage 5 V ± 5% Ripple and noise 50 mV peak-to-peak maximum Current Requirements Adaptec 2400A/2100S 1.5 A Adaptec 3200S/3210S/3410S 2.0 A Adaptec 200S bus expansion module 1.7 A Battery backup module Nominal Charging 0.27 A 1.16 A Memory module 0.
R Adaptec, Inc. 691 South Milpitas Boulevard Milpitas, CA 95035 © 2000, 2001 Adaptec, Inc. All rights reserved. Adaptec, and the Adaptec logo are trademarks of Adaptec, Inc. which may be registered in some jurisdictions. STOCK NUMBER: 512910-06, Ver.