
Installation guide

IBM Eserver xSeries 366 Technical Introduction 11
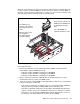
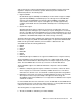
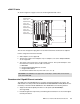
When the cover and bezel are removed, the memory cards are easily accessible (Figure 8).
In order to replace or add any DIMM, you need to remove the memory card. See “Memory
mirroring” on page 13 and “Hot-add memory” on page 15, to see how this can be done even
while the system and the operating system are up and running.
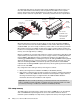
Figure 8 x366 memory card and location
Key configuration rules:
Because the x366 uses two-way interleaving memory, DIMMs must be installed in
matched pairs. Supported DIMM options are:
– 2 GB (part number 73P2866) containing two 1 GB DIMMs
– 4 GB (part number 73P2867) containing two 2 GB DIMMs
– 8 GB (part number 30R5145) containing two 4 GB DIMMs
Memory cards have part number 13M7409. One is standard and up to four can be
installed. Each memory card has four DIMM sockets.
There are two ways to fill the DIMMs sockets, depending on whether cost or performance
is the more important consideration:
– Cost-effective configuration: To minimize cost, you can install the memory DIMMs by
filling each memory card before adding DIMMs to the next memory card.
– Performance-optimized configuration: As described in “IBM XA-64e third-generation
chipset” on page 3, there are four independent memory ports. Therefore, to optimize
performance, you can spread the DIMMS (still installed in matched pairs) across all
four memory cards, before filling each card with two more DIMMs.
AC
DC
Each memory card has four
DIMM sockets. DIMMs must
be installed in matched
pairs.
Two 1 GB DIMMs are
installed standard in card 1.
The x366 has one
memory card standard
and supports up to four
cards.
Memory cards can be
hot-swapped or
hot-added (specific
restrictions apply).