
User`s guide


9A-4 A-63054 February 2004
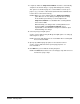
8. If desired, enable the Maximum skew allowed check box and enter the
allowed degree of skew (1 to 15 degrees).
When this option is enabled, the scanner stops and a message appears
when the degree of skew exceeds the maximum level regardless of
whether the Stop scanner on error option in the Application Setup is
enabled or disabled.
NOTES: The Maximum skew allowed option is not available when you
are scanning with a scanner equipped with Document Image
Manager (deskew is performed by the scanner during scanning).
Maximum skew allowed is not yet functional on color images
and therefore cannot be used when scanning with a Color
Scanner 4500.
9. Select the Overcrop check box to remove or append additional pixels to
all sides of an auto-cropped image. Enter the amount of overcrop in pixels
(-15 to 15).
After deskew and auto-crop, a small black border may still remain on
portions of the images. Overcrop can completely remove any remaining
black border.
NOTES: A negative overcrop value will add pixels to each image.
Overcrop is not yet functional on color images.
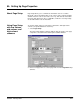
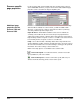
10. Set any front or rear image setup options. Capture Software allows
different image setups for front and rear sides of a page.
To set the front or rear options:
Check the Front (or Rear) check box.
• Select the desired image setup for both front and rear sides from the
drop-down list box.
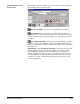
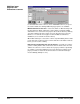
• If you want to create a new image setup or modify the one selected,
click Setup. The Image Setup dialog box appears.
• Select the desired options on the Filters, Check and Mask tabs.
• Click OK on each tab when you are finished setting options.
For complete details on image setup, see the section entitled “Using
Image Setup.”
NOTE: When scanning from the Scanner 1500 flatbed, the Front image
setup is used.