
User`s guide


3B-40 A-63054 February 2004
Split
The Split tool allows you to split a document into two documents.
If you do not separate documents with patch codes, bar codes, or after
X pages, you will start a new document by using the New Document button.
If you forget to do this, the next document is appended to the current
document. To correct this, cut off the part belonging to the next document
with the Split tool to create a new document.
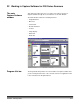
1. Select the Split tool and click on the first image in the new document.
That image and all subsequent images are cut from the screen and moved
to a new document. The new document is appended to the end of the
current batch. Capture Software shows the new document with the
cut images.
2. When you click on the rear of a page that also contains a front, the
message Splitting a document in the middle of a front and a rear of a
page is not allowed appears.
If you want to undo this action, select the Undo option from the Image menu
and the cut images are returned in their original document (right-clicking on the
image accesses the context-sensitive Image menu).
NOTE: This option is not available for Capture Software Lite for the
i50/i60/i80 Scanners.
Print
You can print a complete document or specific images within a document with
the Print tool.
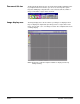
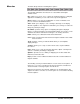
1. Click on the Print tool.
2. Click on the image you want to print.
A standard Windows Print dialog box is displayed. For example:
3. Select the image page or pages that you want to print. By default, Capture
Software selects the image page that was selected with the Print tool.
4. Select any of the other options/properties on the Print dialog box.
5. Click OK to start printing.
NOTE: Color images may not be printed. Only black-and-white images can be
printed at this time.