
User guide

104 Enhanced OS-9 for X86 PCAT
1
Installing and Configuring Enhanced OS-9
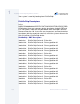
From fdisk, select option 6 to create the Master Boot Record. Respond
with y <ENTER>, then <ESC> to return to the fdisk main menu
Use option 1 to create an OS-9000 partition. Press <ENTER> to accept
the partition size, then selection option 1 to create an OS-9000/386
partition. Press <ESC> to return to the fdisk main menu.
At the main menu, select option 2 to make the newly created partition
active. You must type the partition number (1 in this case) and press
<ENTER>. Press <ESC> to return to the fdisk main menu.
Press <ESC> to exit fdisk. You will be prompted for confirmation to
change the disk. Type y <ENTER>
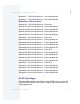
Formatting the Partition
Now the DiskOnChip contains an OS-9000 partition. Format this
partition with the following command:
$ format /dochc1fmt -np -nv -r -v
Installing Boot Files on DiskOnChip
Use the following commands on your OS-9 computer to install the boot
image onto the DiskOnChip device.
$ bootgen -iiplhdnoq -lfirstboot /dochc1fmt
$ bootgen /dochc1fmt sysboot
Booting OS-9 from the DiskOnChip
Booting OS-9 from the DiskOnChip device allows you to use the
DiskOnChip as the only disk in the system, holding the operating
system itself in addition to all other applications and files.
Please follow the steps described in the following paragraphs in order to
use the DiskOnChip as the boot device.
Updating the DiskOnChip Firmware
By default, the DiskOnChip firmware installs the DiskOnChip as an
additional disk in the system. This default allows you to boot an
Operating System from the DiskOnChip on a diskless machine. In case
your machine is equipped with other hard disk(s) and you still want to
boot from the DiskOnChip, you need to install the DiskOnChip as the
first drive.
In order to install the DiskOnChip as the first drive, boot your target
system into MS-DOS and perform the following command: