User's Manual (c) 2013 R-Tools Technology Inc. All rights reserved. www.r-tt.
© 2013 R-tools Technology Inc. All rights reserved. No part of this User's Manual may be copied, altered, or transferred to, any other media without written, explicit consent from R-tools Technology Inc.. All brand or product names appearing herein are trademarks or registered trademarks of their respective holders. R-tools Technology Inc. has developed this User's Manual to the best of its knowledge, but does not guarantee that the program will fulfill all the desires of the user.
Contents I Table of Contents I Introduction to R-Studio 1 1 R-Studio Features ................................................................................................................................... 1 2 System Requirements ................................................................................................................................... 3 3 Contact Information ......................................................................................................................
II R-Studio Manual R-Studio Agent ......................................................................................................................................................... for Window s 133 R-Studio Agent ......................................................................................................................................................... for Mac 135 R-Studio Agent ..............................................................................................................
Contents III 1 Contact................................................................................................................................... Information and Technical Support 220 2 Installing ................................................................................................................................... R-Studio Agent Emergency Startup Media Creator 220 3 Creating ...............................................................................................................
1 R-Studio Manual Introduction to R-Studio I R-Studio is a family of powerful and cost-effective undelete and data recovery software. Empowered by new unique data recovery technologies, it is the most comprehensive data recovery solution for recovering files from FAT12/16/32, exFAT, NTFS, NTFS5 (created or updated by Windows 2000/XP/2003/Vista/2008/7/8), ReFS (Resilient File System, a new local file system Microsoft has introduced in its Windows 2012 Server.
Introduction to R-Studio 2 floppy disk, Compact Flash Card, USB drive, ZIP drive, Memory Sticks, and other removable media. Scan process visualization. While scanning an object, R-Studio graphically shows items that have been found, including files of known types, FAT and NTFS MFT records, boot records, etc. Mass file recovery support. Support for file recovery lists - lists of files that can be exported from R-Studio, manually edited, and then loaded back.
3 R-Studio Manual license you may run the R-Studio Emergency or/and install the R-Studio Windows version on one PC only and you may not transfer the licensed software to another PC. R-Studio recovers files: That have been removed without the Recycle Bin, or when the Recycle Bin has been emptied; Removed by virus attack or power failure; After the partition with the files was reformatted, even for a different file system; When the partition structure on a hard drive was changed or damaged.
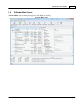
Introduction to R-Studio 1.4 4 R-Studio Main Panel When R-Studio starts, its main panel appears on the Windows desktop. R-Studio Main panel © 2002...2013 R-Tools Technology Inc.
5 R-Studio Manual panel: You can select an object by clicking on it. Drives A logical disk may be represented by its name or its partition. © 2002...2013 R-Tools Technology Inc.
Introduction to R-Studio 6 tab: This tab shows the properties of an object selected on the Drives panel. Properties Depending on the selected object, information on this Properties tab may vary. The Properties tab names and values are described in detail on the Properties tab topic. Log panel Changing the program language You may select the language of R-Studio main panel and its help. To do so, select an available language on Change Language on the Help menu.
7 R-Studio Manual If you have several tabs in the right pane, you may easily switch to any of the tab by selecting on the View menu Properties Tab to view the Properties tab Scan Information to view the Scan Information Tab tab Tab Parents Tab to view the Parents tab Select data types in which the data will be represented Properties Connect to Remote Click this button to connect to a remote computer on a network. Refresh Click this button to refresh the panels.
Introduction to R-Studio 8 You may select the units in which object's start and size are displayed To select the units 1 Select Devices on the View menu 2 Select the units in which you want to see object sizes. You may select Show as Bytes Show as Sectors Show as Bytes and Sectors Depending on the task R-Studio performs, its panel may vary. Those panels are described in appropriate topics. The Properties tab names and values are described in detail on the Properties tab topic.
9 R-Studio Manual scans. The information obtained from the disc scan can be stored in a file. It may be loaded and processed later at any convenient time. 1.5 R-Studio Settings You may specify some global setting for R-Studio on the Settings dialog box. You may reach it by selecting Settings on the Tools menu. Main Main dialog box Main settings System Options Enable Write Debug Mode Notifications Reset all hidden notifications User's file types File name User's RAID layout File name © 2002...
Introduction to R-Studio 10 user's RAID layouts are stored HexView templates path Location Specifies the path for pattern description files for Text/ Hexadecimal editor. File Systems File Systems dialog box © 2002...2013 R-Tools Technology Inc.
11 R-Studio Manual File Systems Default encoding for HFS volumes Default encoding for Ext2/Ext3/ Ext4/UFS volumes Disable any sorting Minimize disk access Show deleted empty folders Select the national encoding for the HFS partitions. Select the national encoding for the Ext2, Ext3, Ext4, and UFS partitions. Select this option if the number of files on the disk is so large that RStudio sorts files in selected folders for too long time. Select this option if a lot of bad sectors are on the hard drive.
Introduction to R-Studio Recover Disk Network 12 If this check box is selected, R-Studio logs all events with the recovering processes. If this check box is selected, R-Studio logs all events with disks. If this check box is selected, R-Studio logs all events with network operation. Severity Error Warning Information Success If this check box is selected, R-Studio adds error messages into its log. If this check box is selected, R-Studio adds warning messages into its log.
13 R-Studio Manual Known File Types Reset Select All Clear All Reload User's File Types Edit User's File Types Click this button to reset the settings to the previous state. Active until the Apply button is clicked. Click this button to select all file types in the list. Click this button to clear all file types in the list except some predefined ones. Click this button to apply new file types after the user's file types file has been changes from the Main tab.
Introduction to R-Studio 14 Bad Sectors settings Default read attempts Set for all drives Pattern to fill bad blocks Specifies a default value for I/O Tries, or how many times R-Studio will try to read a bad sector. You may specify this parameter for each drive separately on the Properties tab. Click this button to reset I/O Tries for all drives to the default value.
15 II R-Studio Manual Data Recovery Using R-Studio Depending on the situation, data recovery may vary: 1. Recovery of deleted files that have resided on an existing logical disk This can be done using Basic File Recovery. 2. Recovery of files that have resided on a data disk with a damaged file system, or on a previously deleted or re-formatted partition If the file system on such logical disk is damaged, the operating system sees that logical disk as a partition without a valid file system.
Data Recovery Using R-Studio 16 Data Recovery over Network Text/hexadecimal editor Technical Information and Troubleshooting R-Studio Emergency R-Studio Agent Emergency 2.1 Basic File Recovery NEVER TRY TO SAVE RECOVERED FILES/FOLDERS TO THE SAME LOGICAL DISK WHERE THEY RESIDE!!! Or you may obtain unpredictable results and lose all of your data. See the Data Recovery Issues topic for details.
17 R-Studio Manual R-Studio Main panel Panel view options You may set which panels and bars to enable/disable.
Data Recovery Using R-Studio Folders 18 panel Deleted folder Marked folder (all child objects in this folder are marked) Partially marked folder (some child objects in this folder are marked) Cross-linked folder (A FAT folder containing data which also belongs to other FAT folders.) Questionable crosslinked deleted folder (A FAT folder found by RStudio, but with apparently invalid content.) © 2002...2013 R-Tools Technology Inc.
19 R-Studio Manual Files panel: Deleted file: Marked deleted file Selected deleted file You may also arrange the data as required: by their extensions, creation/modification time, or as a real file structure See Find and Mark Multiple Files for more details Find Results panel Select Drive Click this button to return to the R-Studio main panel to select another drive. Reopen Drive Files Click this button to list files again. Recover Click this button to recover selected folders/ files.
Data Recovery Using R-Studio 20 Find Click this button to find or/and mark a particular file/folder. Find Next Click this button to find the next object specified in the Find/Mark dialog box Find Previous Click this button to find the previous object specified in the Find/Mark dialog box. File Mask Click this button to specify a file mask. Stop Click this button to stop the current operation. Up Click this button to move highlighting one folder up.
21 R-Studio Manual need to use Advanced Data Recovery to find them. 3 Click the Recover or Recover Marked button Other ways to recover selected files Right-click the selected file/folder and select Recover or Recover Marked on the shortcut menu, or Select Recover or Recover Marked on the File menu or Press the F2 button.
Data Recovery Using R-Studio 22 Recover real folders structure Enabled when the files are sorted by their extensions or date. See Find and Mark Multiple Files for details. If this check box is selected, R-Studio recovers the real folders/files structure on the disk rather than that of sorted files. Skip files with bad sectors If this check box is selected, R-Studio skips files with bad sectors and displays their list on the Files with bad sectors dialog box when the recovery has been completed.
23 R-Studio Manual If there is no space available for the recovered files, the There is not enough space on the disk dialog box will appear. You may either select other place to store the files, skip that particular file or abort the recovery process. There is not enough space on the disk dialog box > R-Studio will recover the selected/marked files/folders to the specified folder and show the results in the Log pane The Recovery progress indicator will show the log and progress of recovery process.
Data Recovery Using R-Studio 24 or Select a folder and select Find on the Tools menu 2 Specify a file to be found and its options on the Find dialog box, and click the OK button Note that a File Mask may be applied. Find/Mark (Main) dialog box Find/Mark options You may specify how to treat specified strings. Please note that R-Studio stores previously entered search strings. Files If this option is selected, R-Studio treats specified strings as file names.
25 R-Studio Manual appear on the Find Results panel. Find first matched file. R-Studio stops at the first found file. Mark matched files. R-Studio marks all found files. Unmark matched files. R-Studio unmarks all found files. Please note, that when performing a new find and mark/unmark task, R-Studio does not takes into consideration the previous marked/unmarked state of files. For example, if you first mark all doc files, and then all txt files, all doc files remain marked, too.
Data Recovery Using R-Studio 26 To preview a file 1 Right-click a file to preview on the Files panel and select Preview on the shortcut menu Other ways to preview the file Select the file on the Files panel and click the Preview button, or Select the file on the Files panel and select Preview on the File menu > R-Studio will show the content of the file If you have several files open in the previewer, you may instantly close all of them by selecting Close All Previews on the File menu.
27 R-Studio Manual Image Magick Imaging Fax Intergraph Format Joint Photographic Experts Group Jeff's Image Format Kodak Cineon Kodak DC120 Digital Camera Kodak DC25 Camera Kodak Photo CD Konica Camera File LucasFilm Format MTV Ray-tracer Macintosh Quickdraw/Pict Mayura Draw Multiple Network Graphics OS/2 Bitmap Open Image Library Format PaintShopPro Browser Cache File PaintShopPro Frame PaintShopPro Image PaintShopPro Mask PaintShopPro Pattern PaintShopPro Picture Tube PaintShopPro Texture Palm Pilot Peg
Data Recovery Using R-Studio Quantel VPB Quicktime Picture Rayshade Ricoh Digital Camera SciTex Continuous Tone Seattle Film Works Seattle Film Works multi-image Sega SJ-1 DIGIO Silicon Graphics RGB Softimage bitmap Sony DSC-F1 Cyber-shot Sony Playstation TIM PSX Sun Icon/Cursor Sun Raster Images Sun TAAC file format Synthetic Universe TIFF Revision 6 vpb qtif qti pic j6i sct sc sfw pwp sj1 rgb bw iris sgi pic si pmp tim icon cursor pr ras rast sun sr scr rs iff vff suniff taac synu syn tif tim tiff True
29 R-Studio Manual 2.1.3 File Masks R-Studio shows only those files/folders that match the specified file mask. File mask affects files/folders that are processed by the Recover and Find commands.
Data Recovery Using R-Studio 30 regular-expression syntax. .
31 R-Studio Manual Attention: Scanning large areas may be a very lengthy process! NEVER TRY TO SAVE SCAN INFORMATION TO THE OBJECT BEING SCANNED!!! Or you may obtain unpredictable results and lose all of your data.
Data Recovery Using R-Studio Extra search for Known File Types Save scan Info to File: Simple view Detailed view None Buttons Scan Advanced Known File Types... Cancel 32 Recovery on HFS/HFS+ file system for details. Enables search for Known File Types. If this checkbox is selected, R-Studio will save scan information to a specified file. Later this file may be opened. Please note, that this option does not save actual disk data, only information on disk data structure gathered during disk scan.
33 R-Studio Manual File Types dialog box Known File Types Set as Default Revert to Default Select All Clear All Click this button to set the current list of selected file types as default values. Click this button to revert the default settings specified on the Known File Types tab of the Settings panel. Click this button to select all file types in the list. Click this button to clear all file types in the list except some predefined ones.
Data Recovery Using R-Studio Document: Spreadsheet Lotus Spreadsheet: .wks Lotus3 Spreadsheet: .wk3 34 Microsoft Excel2 Spreadsheet: .xls Document: Database Data Interchange Format file: .dif Microsoft Excel3/4 Spreadsheet: .xls Microsoft Excel 2007 XML Document*: .xlsx Quattro Pro Spreadsheet: .wq1 dBase III Database: .dbf Microsoft Access 2007 Database: .accdb Microsoft Access Database: .mdb Microsoft SQL Log: .ldf Internet-related files Compiled HTML file: .chm Microsoft Linker Database: .
35 R-Studio Manual Dr. Halo palette: .pal Fractal Image Format: .fif GOES Satellite Image: .goe Hotspot Image: .shg IBM Picture Maker Image: *.pic JPEG Digital Camera*: .jpg Lightwave Object: .lwo Enhanced MetaFile Image: .emf Freehand (MX) Database: .fh10 Graphics Workshop for Windows Thumbnail: .thn HP Command Language Image: .pcl iPhoto Image: .attr Epson Stylus Image: .prn GEM Raster Image: .img Gridded Binary Image: .grb Erdas LAN/GIS Image: .lan GEM VDI Image: .gdi Hitachi Raster Image: .
Data Recovery Using R-Studio DiamondWare Sound: .dwd Extended M3U playlist: .m3u MIDI Instrument definition: .idf MPEG Layer I Audio: .mpg Musepack Audio: .mpc Digital Speech File: .dss FLAC Audio Digital Voice File: .dvf La Lossless Audio: .la File: .voc EA ASF/MUS Audio: .asf Liquid Audio: .la1 MIDI Music: .mid MIDI stream: .mds Monkeys Audio: .ape MPEG Layer II Audio*: .mp2 Next/Sun Sound: .au MPEG Layer III MUS Music: .mus Audio*: .mp3 Ogg Vorbis Audio: .ogg OptimFROG Audio: .
37 R-Studio Manual File: .mxf Archive Files 7-Zip archive: .7z ARX archive: .arx video: .rm BOA archive: .b58 CPIO archive: .cpio FOXSQZ archive: .sqz HPACK archive: .hpk ACE archive: .ace Aladdin Systems StuffIt archive: .sit BZip2 archive: .bz2 CRUSH archive GZip archive: .gz Hyper archive: .hyp InstallShield archive LHA/LZARK archive: JAM archive: .jam LIMIT archive: *.lim AIN archive: .ain BAG archive: .bag ARJ archive: .arj BIX archive: .bix BlackHole archive: .bh ChArc archive: .
Data Recovery Using R-Studio Microsoft Precompiled header: .pch Microsoft Program database OMF Object library: .lib Other file types ABBYY Lingvo dictionary: .lsd OziExplorer Map data:.map Windows Clipboard file: .clp Windows Password file: .pwl Windows shortcut: .lnk 38 Resource template: .resx Microsoft Visual C++ Database: .mdp Microsoft Visual C++ project VisualBasic Database: .vbp file: .clw database Microsoft Visual Studio Database: .
39 > R-Studio Manual R-Studio starts scanning the object, and its panel will show information about new found objects: R-Studio Main panel © 2002...2013 R-Tools Technology Inc.
Data Recovery Using R-Studio 40 panel after scanning: You can select an object by clicking on it Drives The Log pane will show scan progress. Scan may be stopped by clicking the Stop button on the toolbar. Later the scan process may be resumed with different scan parameters. You may see which file object(s) is/are on a particular disk part. Click the corresponding rectangle on the Scan Information pane and view the information on the Scan Information dialog box. © 2002...2013 R-Tools Technology Inc.
41 R-Studio Manual Scan Information dialog box Double-click an object to view/edit the file object in the Text/hexadecimal editor. When an object is scanned, a number of Recognized partitions will appear. R-Studio shows them in different colors depending on which elements of the partition have been found.
Data Recovery Using R-Studio 42 All scanned information may be deleted on the shortcut menu for a scanned object. Scan information may be saved in a file. Previously saved scan information may be loaded. This can be done on the Drive or shortcut menu for a selected object. Multiple scans If the selected object has been completely scanned, you may rescan it either completely or with new scan parameters.
43 R-Studio Manual Advanced Scan dialog box Managing scan information Scan information may be saved to a file. Previously saved scan information may be loaded. To save scan information 1 Select an object on the R-Studio Drives panel 2 Select Save Scan Information on the Drive or shortcut menu and save the scan information in a file The default file extension is *.scn.
Data Recovery Using R-Studio > 44 The scan information will appear in the Drives panel To remove scan information 1 Select an object on the R-Studio Drives panel 2 Select Remove Scan Information on the Drive or shortcut menu > The scan information will disappear from the Drives panel NEVER TRY TO SAVE SCAN INFORMATION ON THE OBJECT BEING SCANNED!!! Or you may obtain unpredictable results and lose all your data. 2.2.
45 2 R-Studio Manual Click the Create File Types button and specify File type properties Edit User's File Types dialog box File Types properties id digit Required group string Optional descrip tion feature s string Optional NO_SCAN TXT_ANS I TXT_UNI CODE Optional extensi on Optional © 2002...2013 R-Tools Technology Inc. Digital file type identifier. Should be unique for each custom file type. Specifies a file type group in which found files will appear.
Data Recovery Using R-Studio 3 46 Click the Add Signature button, specify the signature parameters, and click the Save button Edit User's File Types dialog box File signature properties Begin Specifies from where the signature begins. End If End, the offset is from the end of file to the first byte of the signature. AND OR From That is, if the signature is two bytes long, the offset value should be 2.
47 > R-Studio Manual The newly specified file type will appear on the Edit User's File Types dialog box and the File Types dialog box Edit User's File Types dialog box 2.2.3 Customizing File Types-I The syntax of signature description is similar to that of the XML language. They are stored in the file specified on the R-Studio Main settings dialog box. More advanced features are described in Customizing File Types-II. Signature file example
Data Recovery Using R-Studio group Optional description features NO_SCAN TXT_ANSI TXT_UNICODE Optional Optional extension Optional Should be unique for each file type. Specifies a file type group in which found files will appear. You may specify either your own groups or those predefined on the File Types dialog box. Brief file description Additional properties of the file type. If you want to specify several properties, they should be separated by a space.
49 R-Studio Manual size Optional from begin end Optional bytes in the element. If only one signature can be on this offset, count should be equal "1", and size should be equal to the length (the number of bytes) of the signature. Decimal number specifying the number of bytes in the signature. Specifies from where the offset is calculated. If end, the offset is from the end of file to the first byte of the signature. That is, if the signature is two bytes long, the offset value should be 2.
Data Recovery Using R-Studio 50 Abc\x5c\x00\x04 \x23\x01\xf4 Section FileType This is a description of each file signature. Attributes: id Required group Optional description features NO_SCAN TXT_ANSI TXT_UNICODE Optional Optional extension Optional Digital file type identifier. Should be unique for each file type.
51 R-Studio Manual Document: Spreadsheet Executable/Library/DLL Other file types This section can contain an unlimited number of the Signature elements.If there are several Signature elements, that means that all those signatures are simultaneously present in the file. Such signatures should have different offset attributes and they should not overlap.
Data Recovery Using R-Studio 52 RTD CP RTD ABC CDEFG DE RTD CP RTD Section FileType Thi
53 R-Studio Manual ... ... ... [attributes]> ... [attributes]> ... [attributes]> ... [attributes]> ... Sections AND and OR These sections can contain one of several elements Signature. And one or several elements OR or AND.
Data Recovery Using R-Studio 54 part of the string section of the signature Attributes: offset from Optional Optional to Optional size Optional Decimal offset for the signature Decimal number specifying the leftmost possible offset for the file signature. Ignored if the offset attribute is specified. Decimal number specifying the rightmost possible offset for the file signature. Ignored if the offset attribute is specified.
55 2 R-Studio Manual Specify required parameters on the Create region dialog box and click the Create button Create region dialog box Region options Disk size: Shows size of the object where the region is to be created. The region cannot be larger than this size. Start: Start point of the region Size: Size of the region. Cannot be larger than Disk size. Numbers in these fields can be in bytes or sectors. If no letters are after the numbers, R-Studio assumes the numbers are in bytes.
Data Recovery Using R-Studio 56 actual data on the disk.
57 R-Studio Manual To remove an exclusive region * Remove button, or Right-click the selected region and select Remove Region on the shortcut menu. Select an Exclusive Region on the R-Studio Drives panel and click the To change the size of an exclusive region * Right-click an Exclusive Region on the R-Studio Drives panel, select Edit on the shortcut menu, and add/remove excluded areas on the Edite Exclusive Region dialog box.
Data Recovery Using R-Studio 58 Create Image (Main) dialog box Create Image (Scan Information) dialog box Create Image (Advanced) dialog box © 2002...2013 R-Tools Technology Inc.
59 R-Studio Manual Image Options Image name Specifies the name and path for the image file If this option is selected, R-Studio will create a simple exact copy of the object. This image format is compatible with the previous versions of R-Studio. Compressed image (R- If this option is selected, R-Studio will create an image file which can be Drive Image compressed, split into several parts, and password-protected.
Data Recovery Using R-Studio > 60 R-Studio will start creating the image, the Progress message showing the progress. To process an already created Image, the image file should be opened. To open an image 1 Click the Open Image button, or Select Open Image File on the Drive menu If a remote computer is connected for Data Recovery over Network, the Open Image File dialog box will appear when you select a place to load the image file from. You may load it from the local or remote computer.
61 R-Studio Manual Compressed (R-Drive Image compatible) images Byte-to-byte images 2.2.8 Object Copy You may copy any object in the Drives panel to any other object, if there is enough space on the target one. Before Copy object to... becomes enabled on the Create menu, you need to enable writing. To enable writing, 1 On the R-Studio main panel, select the Tools menu, then Settings, and select Enable Write on the Settings dialog box. > The Copy object to... will be enabled on the Create menu.
Data Recovery Using R-Studio 62 To perform a binary copy of an object, 1 Select Copy object to... on the Create menu 2 Select a source and destination objects on the Drives Copy Wizard panel and click the Next button Drives Copy Wizard © 2002...2013 R-Tools Technology Inc.
63 3 R-Studio Manual Select Binary (byte to byte) copy on the Copy Options dialog box, specify copy options, and click the Next button Copy options dialog box Copy options Source Copy whole object Copy range Offset Size Destination Offset Select this option if you want to copy the entire source object to the destination one Select this option if you want to copy a part of the source object Specify the offset from which the source object data will be copied to the destination object Specify the size of
Data Recovery Using R-Studio 3 64 View the copy task settings on the Drives Copy Wizard and click the Finish button Drives Copy Wizard or click the R-Studio will start copying data from the source object to the destination one. Smart partition copy Only partitions can be copied with this option to other partitions or empty spaces. You may change some parameters of the the copied partition(s) on the destination drive.
65 2 R-Studio Manual Select source and destination partitions on the Drives Copy Wizard panel and click the Next button Drives Copy Wizard © 2002...2013 R-Tools Technology Inc.
Data Recovery Using R-Studio 3 66 Select Smart partition copy on the Copy Options panel, specify copy options, and click the Next button Copy options dialog box Copy options Destination Copy without stretching Copy to: Free space before Partition size Partition type Primary (Active)/ Primary/Logical Select this option if you want to copy the partition exactly to the destination place Select this option if you want to change some parameters of the copied partition on the destination place Specify how mu
67 3 R-Studio Manual View the copy task settings on the Drives Copy Wizard and click the Finish button Drives Copy Wizard or click the R-Studio will start copying data from the source partition to the destination place. Smart drive copy Only whole drives can be copied with this option to other drives. You may change some parameters of the copied drives. To perform a smart drive copy of a hard drive, 1 Select Copy object to... on the Create menu © 2002...
Data Recovery Using R-Studio 2 68 Select a source and destination hard drives on the Drives Copy Wizard panel and click the Next button Drives Copy Wizard 3 Select Smart drive copy on the Copy Options panel, specify copy options, and click the Next button Copy options dialog box © 2002...2013 R-Tools Technology Inc.
69 R-Studio Manual Copy options Copying mode Copy all partitions onto original places One partition after another Expand/Shrink partition to whole disk 3 Select this option if you want to copy all partitions to their original places. Select this option if you want to copy the partitions one after another preserving their space. If there is empty space between the partitions, it will be omitted. Otherwise it is similar to Copy all partitions onto original places.
Data Recovery Using R-Studio 2 70 Recover all marked files in a single file recovery step Go to the Recover Multiple Files topic for more information 3 Create file recovery lists to manually edit the list of files to recovery Go to the File Recovery Lists topic for more information Memory considerations R-Studio stores information about found files in computer memory. If there are too many files, R-Studio may run out of it.
71 > R-Studio Manual R-Studio will show the sorted files in the Folders and Content panels, showing the path to each file: Folders panel for files sorted by their extensions Content panel with files/folders sorted by their extensions To return to the conventional view, * On the Drives panel, right-click the logical disk, select Open Drive Files Sorted By on the shortcut menu, and select Real File System Structure, or On the Folders panel, select Show Files Sorted By on the Drive menu and select Real
Data Recovery Using R-Studio 72 Recover (Advanced) dialog box Advanced file recovery options File Already Exists These options instruct R-Studio Prompt Rename Overwrite Skip Broken File Name Prompt Rename and change all invalid symbols to: Skip Hidden Attribute Prompt Remove Keep 2.3.3 what to do if there already exists a file with the same name. If this option is selected, R-Studio asks the user what to do for each such file. It stops file recovery until it receives the answer.
73 R-Studio Manual You may create file recovery lists for the entire disk or for specific folders. Moreover, you may create a file recovery list for all files within the disk/folder, or for marked files/folders only. Creating a file recovery list To create a file recovery list 1 For an entire disk, select Save File Names to File on the File menu, or Right-click the uppermost folder (higher than Root, usually the letter or the name of the disk) and select Save File Names to File on the shortcut menu.
Data Recovery Using R-Studio Files Files Files Files Files Files Files Files Files Files Files Files to to to to to to to to to to to to 74 Recover\Outlook_recovered_by_R_Mail.pst Recover\Picture 113.jpg Recover\Picture 149.jpg Recover\Picture 237.jpg Recover\test1.arc Recover\test3.arc Recover\Wipe Test 1.doc Recover\Wipe Test 2.doc Recover\Wipe Test 3.doc Recover\Wipe Test 4.doc Recover\Wipe Test 5.doc Recover\Wipe Test 6.doc :# PathDelim = \ stile delimiter / .
75 R-Studio Manual :-Files to Delete\File_2.pst Files to Delete\ file File_2.pst will not be marked. Loading the file recovery list To load a file recovery list into R-Studio, * Select Load File Names from File and Mark on the File menu and select the file. > R-Studio will load the file and mark the files accordingly. 2.4 Volume Sets and RAIDs R-Studio detects and processes valid hardware volume sets and RAIDs like regular drives/volumes.
Data Recovery Using R-Studio > 76 The new RAID configuration will be saved in the presets The configurations are stored in the user's RAID layout file. The path and name for this file is specified on the R-Studio Settings dialog box. If no file is specified, R-Studio will ask you to enter the name. To load your RAID configuration 1 Click the More...
77 R-Studio Manual Add Empty Space dialog box > A Missing Disk or Empty Space object will appear in the Parents tab 2.4.
Data Recovery Using R-Studio 78 To create a Stripe set object (RAID 0) 1 Click the Create Virtual RAID button and select Create Virtual Block RAID & Autodetect or select the Create Virtual Block RAID & Autodetect on the Create menu > A Virtual Block RAID object will appear on the Drives panel 2 Select RAID 0 (Stripe set) on the RAID type 3 Drag the required partitions from the Drives panel to the Parents tab Other ways to add objects Right-click the Parents tab and select the required partition fr
79 R-Studio Manual Move Up Click this button to move up the selected object in the RAID Click this button to move down the selected object in the RAID Synchronize Offsets Click this button to make the offsets the same for all objects in the RAID The Block size and Offset (in sectors) parameters must be set the same as for the original volume set. You also need to specify Block order. You may select it on the Blocks order drop-down or shortcut menu.
Data Recovery Using R-Studio You also may check the RAID consistency, if necessary. See the 80 Checking RAID Consistency help page for details.
81 2.4.2 R-Studio Manual Basic RAID 4 and RAID 5 Operations RAID 4 and RAID 5 are much similar. You may create and edit a RAID 4 object the same way as a RAID 5 one.
Data Recovery Using R-Studio 82 button to apply the changes when are you through. Note: Objects should be placed in the same order as they were in the original RAID 5. If this order is incorrect, you must change it by dragging the parents to place them in the correct order. Object control buttons Locate Click this button to locate the selected object in the Drives panel.
83 > R-Studio Manual The RAID 5 object can now be processed like regular drives/volumes If R-Studio detects a valid file system on the newly created RAID object, a partition object will appear on the Drives panel. The Description Files for RAID Configurations topic shows the RAID description file for this RAID configuration. You also may check the RAID consistency, if necessary. See the Checking RAID Consistency help page for details.
Data Recovery Using R-Studio 84 To create a RAID 6 object 1 Click the Create Virtual RAID button and select Create Virtual Block RAID & Autodetect or select the Create Virtual Block RAID & Autodetect on the Create menu > A Virtual Block RAID object will appear on the Drives panel 2 Select RAID 6/Reed-Solomon on the RAID type 3 Drag the required partitions from the Drives panel to the Parents tab Other ways to add objects Right-click the Parents tab and select the required partition from the shortc
85 R-Studio Manual Parents tab Note: Objects should be placed in the same order as they were in the original volume set. If this order is incorrect, you must change it by dragging the parents to place them in the correct order. Object control buttons Locate Click this button to locate the selected object in the Drives panel.
Data Recovery Using R-Studio 86 the Drives panel. The Description Files for RAID Configurations topic shows the RAID description file for this RAID configuration. You also may check the RAID consistency, if necessary. See the Checking RAID Consistency help page for details. 2.4.
87 3 R-Studio Manual Drag the required partitions from the Drives panel to the Parents tab Other ways to add objects Right-click the Parents tab and select the required partition from the shortcut menu, or Right-click the partition on the Drives panel, select Add to RAID on the shortcut menu, and select the RAID object you want to add the partition to. You may either make R-Studio to process your changes immediately or wait until you finish editing the RAID layout.
Data Recovery Using R-Studio 88 Synchronize Offsets Click this button to make the offsets the same for all objects in the RAID The RAID block size and Offset (in sectors) parameters must be set the same as for the original volume set. You also need to specify Blocks order (EVENODD for our case) for virtual RAID 6 (Double Xor). You may select it on the Blocks order drop-down or shortcut menu. If the those parameters are not correct, data on the parents will not be damaged, but they cannot be recovered.
89 R-Studio Manual 4 5 6 7 8 9 10 11 12 13 14 15 16 17 18 19 20 21 22 23 24 25 26 27 28 29 30 31 32 33 34 35 36 37 38 39 40 41 42 43 7 9 11 13 15 17 19 21 23 25 27 29 31 33 35 37 39 41 43 45 47 49 51 53 55 57 59 61 63 PD PD PD PD PD PD PD PD PD PD PD 8 10 12 14 16 18 20 22 24 26 28 30 32 PD PD PD PD PD PD PD PD PD PD PD PD PD PD PD PD 65 67 69 71 73 75 77 79 81 83 85 © 2002...2013 R-Tools Technology Inc.
Data Recovery Using R-Studio 44 45 46 47 48 PD PD PD PD PD 87 89 91 93 95 90 88 90 92 94 96 To create such RAID 5, 1 Click the Create virtual volume sets or RAIDs button and select Create Virtual Block RAID & Autodetect or select Create Virtual Block RAID & Autodetect on the Create menu Check that the Apply changes immediately check box is clear on the Parents tab. This will prevent R-Studio from trying to start processing the RAID configuration until you specify it completely.
91 3 R-Studio Manual Specify the Block size and Offset parameters on the Parents tab Disregard the Block order field. 4 Specify the parity delay number in the Parity delay control on the Parents tab. The number of rows will change to 48. If necessary, adjust the First parity parameter By default, this parameter is set equal to Parity delay. By changing it, you may "shift" the block order table. For example, when the First parity parameter is set as 1 for the RAID 5 of 3 disks with Parity delay of 3.
Data Recovery Using R-Studio 92 5 Select Left Asynchronous (Continuous) on the Block Order Field and click the Apply button on the Parents tab > The created Virtual Block RAID 1 object can now be processed like regular drives/volumes If R-Studio detects a valid file system on this RAID object, a partition object will appear on the Drives panel. The Description Files for RAID Configurations topic shows the RAID description file for this RAID configuration.
93 2.4.6 R-Studio Manual Working with Advanced RAID Layouts R-Studio allows you to create and process very complex custom RAID layouts.
Data Recovery Using R-Studio 3 94 Specify the Block size and Offset parameters on the Parents tab Disregard the Block order field. 4 Manually enter 9 to Number of rows on the Parents tab Block order will change to Custom. 5 Enter the block order in the table on the Parents tab Use the RAID Sequence window to move from one row to another. Using the keyboard: arrow keys to navigate, digit and p keys to enter the block order.
95 R-Studio Manual Corrections: R-Studio will tell you if some digits are not correct. Navigate to the required cell and enter the correct value. Use the Delete key to clear a cell. © 2002...2013 R-Tools Technology Inc.
Data Recovery Using R-Studio 96 Clear the table: Right-click the table and select Clear all on the shortcut menu. 6 When you finishes entering the information, click the Apply button on the Parents tab > The created Virtual Block RAID 1 object can now be processed like regular drives/volumes If R-Studio detects a valid file system on this RAID object, a partition object will appear on the Drives © 2002...2013 R-Tools Technology Inc.
97 R-Studio Manual panel. The Description Files for RAID Configurations topic shows the RAID description file for this RAID configuration. You also may check the RAID consistency, if necessary. See the Checking RAID Consistency help page for details. Advanced RAID 5 Another example is a RAID with the following layout, similar to that used in Mac Pro internal RAID cards with 4 hard drives.
Data Recovery Using R-Studio Add Empty Space/Add Missing Disk Remove Move Up Move Down Synchronize Offsets 3 98 Click this button to add an empty space or missing disk object to the RAID Click this button to remove the selected object from the RAID Click this button to move up the selected object in the RAID Click this button to move down the selected object in the RAID Click this button to make the offsets the same for all objects in the RAID Specify the Block size and Offset parameters on the Parents
99 R-Studio Manual 11 Move to the next sequence in the RAID Sequence window and repeat the procedure for cells 4, 5, and 6. Do that for the rest of the sequences until you fill all cells in the block order table in the Parents tab. > The created Virtual Block RAID 1 object can now be processed like regular drives/volumes If R-Studio detects a valid file system on this RAID object, a partition object will appear on the Drives panel.
Data Recovery Using R-Studio 100 Parity of all is used for error correction. 1 Click the Create virtual volume sets or RAIDs button and select Create Virtual Block RAID & Autodetect or select Create Virtual Block RAID & Autodetect on the Create menu Check that the Apply changes immediately check box is clear on the Parents tab. This will prevent R-Studio from trying to start processing the RAID configuration until you specify it completely.
101 R-Studio Manual RS Reed-Solomon SP Spare Part I Ignore Note: You should specify an error correction block only when the correct sequence is selected on the RAID Sequences window. Using the keyboard: arrow keys to navigate, digit, and rs, pd, pa, u, i keys to enter the block order. Using the mouse: right-click the cell and select the number or parity from the shortcut menu. If the block table is too large, you better use the keyboard to enter the digits.
Data Recovery Using R-Studio 6 When you finishes entering the information, click the Apply button on the Parents tab > The created Virtual Block RAID 1 object can now be processed like regular drives/volumes 102 If R-Studio detects a valid file system on this RAID object, a partition object will appear on the Drives panel. The Description Files for RAID Configurations topic shows the RAID description file for this RAID configuration. You also may check the RAID consistency, if necessary.
103 R-Studio Manual RAID5E RAID5EE RAID6E 2.4.7.1 RAID10 (1+0) A RAID 10 (or 1+0) is a stripe of mirrors.
Data Recovery Using R-Studio 104 Object control buttons Locate Click this button to locate the selected object in the Drives panel.
105 > R-Studio Manual The RAID 10 object can now be processed like regular drives/volumes If R-Studio detects a valid file system on the newly created RAID object, a partition object will appear on the Drives panel. The Description Files for RAID Configurations topic shows the RAID description file for this RAID configuration. You also may check the RAID consistency, if necessary. See the Checking RAID Consistency help page for details. 2.4.7.
Data Recovery Using R-Studio > A Virtual Block RAID object will appear on the Drives panel 2 Drag the required partitions from the Drives panel to the Parents tab 106 Other ways to add objects Right-click the Parents tab and select the required partition from the shortcut menu, or Right-click the partition on the Drives panel, select Add to RAID on the shortcut menu, and select the RAID object you want to add the partition to.
107 R-Studio Manual it. If the file appears correct, you have created a correct RAID 1E layout. Parents tab > The RAID 1E object can now be processed like regular drives/volumes If R-Studio detects a valid file system on the newly created RAID object, a partition object will appear on the Drives panel. The Description Files for RAID Configurations topic shows the RAID description file for this RAID configuration. You also may check the RAID consistency, if necessary.
Data Recovery Using R-Studio 2.4.7.3 108 RAID5E RAID 5E (where E stands for Enhanced) is a RAID 5 layout with an integrated hot-spare drive, where the spare drive is an active part of the block rotation scheme. An example of such RAID layout is in the table below: 1 2 3 4 5 A B C D 1 5 9 PD SP 2 6 PD 10 SP 3 PD 7 11 SP PD 4 8 12 SP where PD and SP stand for Parity of Data and Spare Part.
109 R-Studio Manual Object control buttons Locate Click this button to locate the selected object in the Drives panel.
Data Recovery Using R-Studio > 110 The RAID 5E object can now be processed like regular drives/volumes If R-Studio detects a valid file system on the newly created RAID object, a partition object will appear on the Drives panel. The Description Files for RAID Configurations topic shows the RAID description file for this RAID configuration. You also may check the RAID consistency, if necessary. See the Checking RAID Consistency help page for details. 2.4.7.
111 R-Studio Manual > A Virtual Block RAID object will appear on the Drives panel 2 Drag the required partitions from the Drives panel to the Parents tab Other ways to add objects Right-click the Parents tab and select the required partition from the shortcut menu, or Right-click the partition on the Drives panel, select Add to RAID on the shortcut menu, and select the RAID object you want to add the partition to.
Data Recovery Using R-Studio 112 it. If the file appears correct, you have created a correct RAID 5EE layout. Parents tab > The RAID 5EE object can now be processed like regular drives/volumes If R-Studio detects a valid file system on the newly created RAID object, a partition object will appear on the Drives panel. The Description Files for RAID Configurations topic shows the RAID description file for this RAID configuration. You also may check the RAID consistency, if necessary.
113 2.4.7.5 R-Studio Manual RAID6E RAID 6E (where E stands for Enhanced) is a RAID 6 layout with an integrated hot-spare drive, where the spare drive is an active part of the block rotation scheme. An example of such RAID layout is in the table below: A B C D E F 1 RS 1 2 3 4 PD 2 5 6 7 8 PD RS 3 10 11 12 PD RS 9 4 15 16 PD RS 13 14 5 20 PD RS 17 18 19 6 PD RS 21 22 23 24 7 SP SP SP SP SP SP where RS, PD and SP stand for Reed-Solomon, Parity of Data, and Spare Part, respectively.
Data Recovery Using R-Studio 114 incorrect, you must change it by dragging the parents to place them in the correct order. Object control buttons Locate Click this button to locate the selected object in the Drives panel.
115 > R-Studio Manual The RAID 6E object can now be processed like regular drives/volumes If R-Studio detects a valid file system on the newly created RAID object, a partition object will appear on the Drives panel. The Description Files for RAID Configurations topic shows the RAID description file for this RAID configuration. You also may check the RAID consistency, if necessary. See the Checking RAID Consistency help page for details. 2.4.
Data Recovery Using R-Studio > 116 R-Studio will start searching for the RAID parameters and show the most probable one on the RAID Parameter Detection dialog box RAID Parameter Detection dialog box R-Studio will change the RAID layout to the selected one on the Parents 2 Click the Apply button and tab. 3 Click the Apply button on the on the Parents tab and > R-Studio will use the found parameters for the RAID.
117 2 R-Studio Manual Specify the necessary detection parameters on the RAID Parameter Detection dialog box and click the Start detection button RAID Layout Autodetect dialog box You may change the disk order, offset for disk(s), and enable /disable disks. Advanced Parameters Max offset: The area on the disk to find RAID parameters in. Offset search performance RAID layouts search performance 3 Cumulative parameters that estimates the probability of certain found RAID parameters.
Data Recovery Using R-Studio 4 Select a RAID variant on the Found RAID layouts pane and click the Apply button 5 Click the Apply button on the on the Parents tab and > R-Studio will use the found parameters for the RAID. 118 If necessary, you may return to the RAID Parameter Detection dialog box by clicking the Choose Variants button, and select another RAID layout. 2.4.
119 R-Studio Manual Sectors/Bytes/KB... Specifies the dimension of the data in the Offset field. Moves to the previous/next part of the data. +/Zooms into/out of, the data. 2.4.10 Syntax of a Description File for RAID Configurations Previous/Next You may create and store your own RAID configurations The syntax of those files is similar to that of the XML language. They are stored in an .xml file specified on the R-Studio Settings.
Data Recovery Using R-Studio 120 File structure File header The file starts with a standard XML header: Section RAIDList It can contain any number of the sections and requires a closing element . Section structure example: ... ... ... Section RAID This section describes each RAID layout.
121 R-Studio Manual ... ... ... ...Data Recovery Using R-Studio 122 Element example: See the RAID configuration file example. Section Offsets This section describes the offsets of each parent object.. It contains the elements which number should not exceed the value of the parents attribute of the section. If the section is absent, offsets are treated as zero. Section structure example: ...123 R-Studio Manual Basic RAID 5 The RAID layout is described in the Working with Basic RAID 4 and RAID 5 Operations topic.
Data Recovery Using R-Studio 12 id="C6">XorOfData id="A7">13 id="B7">14 id="C7">XorOfData
125 R-Studio Manual 47 id="B24">XorOfData id="C24">48 id="A25">49 id="B25">XorOfData id="
Data Recovery Using R-Studio 126 82 XorOfData 83 84 XorOfData 85 86 XorOfData 87 88 XorOfData 89 90 XorOfData 91 92
127 R-Studio Manual XorOfData 12 13 14 XorOfData 15 16 XorOfData 17 18 XorOfData
16777216 16777216 16777216 Advanced RAID The RAID la
Data Recovery Using R-Studio 128 RAID 6 Reed-Solomon (Left Synchronous (Standard)) Preset The RAID layout is described in the Working with RAID 6 Presets topic.
129 R-Studio Manual 9 XorOfData ReedSolomon 7 12 XorOfData ReedSolomon 10 11 XorOfData ReedSolomon 13 14 15 XorOfAll XorOfAl
Data Recovery Using R-Studio 130 2 3 3
RAID5E The RAID layout is described in the RAID5E topic.
131 R-Studio Manual id="C3">5 id="D3">6 id="A4">XorOfData id="B4">7 id="C4">8 id="D4">Ignore RAID6E The RAID layout is described in the RAID6E topic.
Data Recovery Using R-Studio 132 id="B7">Ignore id="C7">Ignore id="D7">Ignore id="E7">Ignore id="F7">Ignore RAID6 (Double Xor) The RAID layout is described in the Working with RAID6 (Double Xor) Presets topic.
133 R-Studio Manual computers accessible over network. R-Studio supports the TCP/IP protocol and any protocol supported in Microsoft Network. R-Studio Agent must be installed on computers where files are to be recovered. This program gives R-Studio access to local disks on remote computers over network. If, due to file system crash, the network computer where you are going to recover your data cannot start, you may use R-Studio Agent Emergency to start the computer.
Data Recovery Using R-Studio 134 -console starts R-Studio Agent as a console application Started without a switch, R-Studio Agent runs as a GUI application and its icon appears on the taskbar tray. In this mode, it can be configured and its log may be viewed. Simply connect to the remote computer providing a desired password for R-Studio Agent in the Connect to Remote Computer dialog box. R-Studio checks if there is R-Studio Agent running on this computer. If not, a Can't connect... message will appear.
135 R-Studio Manual R-Studio Agent Options Password: Enter a password to obtain access to this computer from a network. Re-Enter: Re-enter the password. Accepted Protocols Pipes TCP/IP Port supported by Windows NT/2000/XP/2003/Vista/2008/7 only. To improve security, this option should be disabled. supported by any network OS. port for incoming connections Accepted IP Addresses IP Address specifies addresses from which this computer can be accessed.
Data Recovery Using R-Studio 2 136 Specify required parameters on the Please configure R-Studio Agent dialog box and click the OK button Please configure R-Studio Agent Mac dialog box R-Studio Agent for Mac Options Password: Enter a password to obtain access to this computer from a network. Re-Enter: Re-enter the password. Incoming connection preferences Enable incoming Select this checkbox if you want to allow incoming connections.
137 R-Studio Manual Connect to R-Studio settings Server Port Password > Specify the DNS name or IP address of the host where R-Studio is running. Specify the port set on the R-Studio Connect to Remote Computer dialog box. Specify the password set on the R-Studio Connect to Remote Computer dialog box. R-Studio Agent for Mac will connect to the computer where R-Studio is running and it will show the hard drive and logical disk structure of the remote computer.
Data Recovery Using R-Studio 138 R-Studio Agent for Linux Configuration dialog box R-Studio Agent for Linux Options Specify password Enter a password to obtain access to this computer from a network. for incoming connection Confirm password for incoming connection Specify IP address... Re-enter the password for confirmation. Specifies addresses and a subnet mask from which this computer can be accessed. Enter 0 to allow connections from any address.
139 R-Studio Manual Connecting from R-Studio Agent for Linux to R-Studio. To establish a connection from R-Studio Agent for Linux to R-Studio, R-Studio Agent for Linux and press Enter 1 Run the 2 Enter the necessary information Connect to R-Studio dialog box > R-Studio Agent for Linux will connect to the computer where R-Studio is running and it will show the hard drive and logical disk structure of the remote computer. It can be processed the same way as that on a local computer. 2.5.
Data Recovery Using R-Studio 140 Connect to Remote Computer dialog box 2 Select a computer from the list on the Connect to Remote Computer dialog box and enter the password Otherwise, you need to specify in the Computer: field the name or IP address of the remote computer where data are to be recovered. The Port should coincide with the port specified for the R-Studio Agent. The Password: field is for the password of R-Studio Agent running on the remote computer.
141 R-Studio Manual Recover dialog box When the Recover dialog box appears, you may select whether you want to save recovered files on the local or remote computer. Saving recovered files on a remote computer may be useful when the remote computer has a healthy disk because you do not have to transfer files over network. It may be an external USB hard drive, for example. When R-Studio connects to the remote computer, it check if R-Studio Agent is present and its password.
Data Recovery Using R-Studio 142 Connection directions * Both R-Studio and R-Studio Agent have public IP addresses (no NAT/firewall) or the ports on the NAT/ firewall are forwarded/opened. A connection can be made either from R-Studio or from R-Studio Agent. * R-Studio is behind a NAT and R-Studio Agent has a public IP address or the ports on its NAT/firewall are forwarded/opened. A connection should be made from R-Studio. © 2002...2013 R-Tools Technology Inc.
143 * R-Studio Manual R-Studio has a public IP address or the ports on its NAT/firewall are forwarded/opened and R-Studio Agent is behind a NAT. A connection should be made from R-Studio Agent. * Both R-Studio and R-Studio Agent are behind NATs/firewalls. No connections are possible. Connection from R-Studio Agent to R-Studio R-Studio settings If a connection is to be made from R-Studio Agent to R-Studio, R-Studio should be set to accept connection on the Connect to Remote Computer dialog box.
Data Recovery Using R-Studio 144 Connect to Remote Computer dialog box Select Wait connection from remote computer, and specify options for incoming connections. R-Studio Incoming Connection Options Password: Enter a password to obtain access to this computer from a network.
145 R-Studio Manual Connecting from R-Studio Agent to R-Studio. To establish a connection from R-Studio Agent to R-Studio, (See the R-Studio Agent for Mac or R-Studio Agent for Linux help page to learn how to establish connections from those R-Studio Agent versions). R-Studio Agent tray icon and select Connect 1 Right-click the 2 Enter the necessary information on the Connect to R-Studio dialog box and click the Connect button.
Text/hexadecimal Editor 146 Creating Custom Patterns Pattern Example I Pattern Example II R-Studio Features Contact Information and Technical Support Data Recovery Using R-Studio Basic File Recovery Advanced Data Recovery Mass File Recovery Volume Sets and RAIDs Data Recovery over Network Technical Information and Troubleshooting R-Studio Emergency R-Studio Agent Emergency 3.
147 R-Studio Manual opened by some other programs. If a hard drive is opened in Text/hexadecimal Editor, the Lock command locks the drive if all its logical disks can be locked. That may cause problems is one of the logical disks is a system one.
Text/hexadecimal Editor Data Parsed According to the Selected Pattern Object Sector Mapping 148 Object Properties Data Shown as Various Digits © 2002...2013 R-Tools Technology Inc.
149 R-Studio Manual Binary view Text view © 2002...2013 R-Tools Technology Inc.
Text/hexadecimal Editor 150 Find Results List of Bookmarks Viewer/Editor status Previous Pattern Click this button to go to the previous pattern. Next Pattern Click this button to go to the next pattern. Save Changes Click this button to save changes. Code pages Turns supported code pages on/off. Autoflow Click this button to turn autoflow on. Panel view options You may set which panels and bars to enable/disable.
151 2 R-Studio Manual View the information and make necessary changes Select Save Changes on the Tools menu if you want to save changes. Other ways to save changes Select Save Changes on the File menu or Press the Ctrl+S keys Viewing There are up to four tabs showing the data in different representations. Actual number of tabs depends on the object and property being viewed/edited. Std Exact attribute data. If the attribute is compressed, R-Studio decompresses it prior to showing.
Text/hexadecimal Editor 152 Search dialog box Search options Search for HEX ANSI OEM UNICODE Match case Search area From current position From start position From Address Field for the string to search for in the hexadecimal representation Field for the string to search for in the ANSI encoding Field for the string to search for in the OEM encoding Field for the string to search for in the UNICODE encoding Select this check box to make the search case-sensitive Select this check box to start search from
153 R-Studio Manual Bookmark pane. You may easily move to the required bookmark by clicking it in the list. You may control bookmarks on the Edit menu. Filling an area with a pattern To fill an area with a pattern, select Fill on the Edit menu, and specify the pattern and area on the Fill dialog box.
Text/hexadecimal Editor 154 Select dialog box 2 Select an appropriate item in the Tools menu to save the data in a required format and specify its file name Select: Save to Binary File... Save to Hexadecimal File to save the data in the binary format (default extension is .bin) to save the data in the binary format (default extension is .hex) on the Tools menu. If a remote computer is connected for Data Recovery over Network, the Save as...
155 R-Studio Manual Pattern structure Pattern header Each pattern starts with a standard header Section template Each pattern starts with a section giving to the pattern a name that will be shown in the parsed data pane. Attributes: name Specifies the pattern name shown in the parsed data pane Example: ........
Text/hexadecimal Editor 156 int32 int64 uint8 uint16 uint32 uint64 uintX Attributes: endian: (be | le | system) base: (decimal | hex | octal) as-offset: Optional. Default: system. Optional. Specifies data representation. Default: decimal. Optional. Specifies that this field is an offset and its value should be evaluated using the expression. A special variable this returns the value of this field. purpose: (offset Optional. Specifies the type of the as-offset expression result .
157 R-Studio Manual filetime Shows time in the DOS format (date: hiword, time: loword) bits Attributes: size: pos: Mandatory. Mandatory. Specifies bit positions in a data block. Commands goto Specifies a jump to a specified offset (either absolute or relative one) Attributes: address: Specifies an absolute address to jump to. Specifies a relative offset to jump by. One and only one of the attributes should always be specified.
Text/hexadecimal Editor 158 Expressions Expressions in the patterns are arithmetic expressions which syntax is similar to that of the C language, including operation preceding. The following operations are supported: + - * / & | > < <= >= != == || && Predefined variables offset An offset in bytes from the pattern beginning data is currently read at. start_position An absolute position of the pattern beginning. offset + start_position = absolute offset.
159 R-Studio Manual