
Specifications


DocSTAR Level 2 Service Training Workbook Page 85
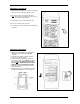
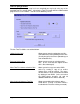
Replacing a Power Supply:
1. While the External RAID is running, identify
which power supply has failed by the
Power Supply LED indicator on the front.
Whichever LED is not lit, indicates the
failed power supply.
2. Switch off and unscrew the failed power
supply and slide the power supply out as
shown at right.
3. Replace the power supply with a new power
supply, screw it in, and switch it on.
4. Then press the RESET switch to link the 2
power supplies again and stop the buzzer
sound. The RESET switch is located above
the AC Power Input Socket.
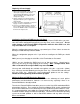
Configuring the External RAID from the LCD Panel
To change any of the configuration parameters of the External RAID device you must
enter the built-in configuration program by pressing ‘Enter’ on the front panel. Do not
make changes to the External RAID configuration while the Host CPU is on, this
may cause data loss or corruption.
When the configuration program requests a password, press ‘Enter’ 4 times to enter the
default password default password is ‘0000’.
When the configuration program asks if you wish to re-configure the RAID you should
answer:
‘NO’ if you are just changing the SCSI ID #, SCSI Termination, or Password.
‘YES’ if you are changing the RAID Level or # of Hot-Spare disks. (Should not be
necessary since they are setup properly at the factory). Note: Changes made, when
YES is selected for Re-configure RAID, may cause data loss.
You may now scroll through the available menu options using the ? (up) and ? (down)
keys. You may enter that option by pressing the ‘Enter’ key. Select the desired value and
press the ‘Enter’ key. Scroll to the ‘Save Configuration’ option to save the settings.
Restart the unit by powering down and back up again.
Making the External RAID Device the Boot drive
Using the External RAID as the boot drive offers the advantage of much quicker
performance and fault tolerance, however it is not necessary especially if there is an
Internal RAID device already installed.
To make the External RAID the boot drive you must set the Host CPU motherboard BIOS
to boot from SCSI first. Then enable the SCSI Host Adapter BIOS, on the card attached
to the External RAID and set it to boot from the SCSI ID that the External RAID is set to.
It is recommended that you partition the External RAID for a 4GB boot partition and the
remainder for data storage if it will be the boot drive. You will have to install the operating
system on the boot partition as well as DocSTAR software and any other necessary
drivers and software.