
Specifications


Page 80 DocSTAR Level 2 Service Training Workbook
Making the Internal RAID Device the Boot drive
Using the Internal RAID as the boot drive offers the advantage of fault tolerance.
However, it is not necessary for Two-Tier Storage. To make the Internal RAID device the
boot drive you must enter the Motherboard BIOS and set the Primary/Secondary Master &
Slave drives to ‘None.’ It is recommended that you partition the Internal RAID for a 4GB
boot partition and the remainder for data storage if it will be the boot drive. You will have
to install the operating system on the boot partition as well as DocSTAR software and any
other necessary drivers and software.
Internal RAID Software
In addition to the above-mentioned components, the Internal RAID device comes with (2)
floppy disks containing software. The first disk contains the driver software for Windows
to recognize the Promise Fasttrak66 RAID Controller. The second disk contains the
FastCheck Monitoring Utility software.
Upon first installation of the Promise Fasttrak66 RAID Controller, Windows will display a
screen requesting the driver software for this device. You may insert the first floppy disk
labeled ‘Driver disk’ or ‘Disk 1 of 2.’
Once the driver has been installed and the system has been rebooted, you may use the
second disk, labeled ‘Utility Disk’ or ‘Disk 2 of 2,’ to install the FastCheck Utility software.
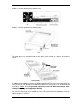
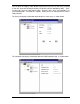
Insert the floppy disk into the floppy drive and select ‘Run’ from the start menu. Type
A:\Setup.exe and the setup program will be launched.
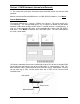
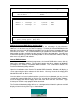
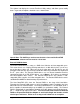
The FastCheck Monitoring Utility will run as a background task from this point on and will
display an icon in the System Tray as shown below:
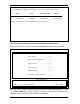
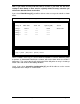
FastBuild (tm) Utility 1.xx (c) 1996
-
2000 Promise Technology, Inc.
[ Adapter Configuration - Options ]
Halt On Error : Enable
[ System Resources Configuration ]
Channel 1 Interrupt : A I/O Port : 6800
Channel 2 Interrupt : A I/O Port : 7000
[ Keys Available ]
[? ,? ,Space] Change Option [ESC] Exit