
Specifications


DocSTAR Level 2 Service Training Workbook Page 47
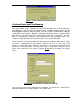
Now that the network hardware, software, sharing, drive mapping, and DocSTAR
Licensing have been addressed, install the DocSTAR software on the client station as a
View or View/File, whichever is appropriate. See Figure 3.26.
Figure 3.27 DocSTAR Setup Window
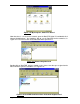
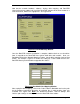
Once the DocSTAR software installation is complete, double-check to see what drive
letter is mapped to the DocSTAR Host System hard drive and record it. Next, run
DocAdmin and click the ‘Network Mappings’ button. Set the drive mappings for that client
station. For example, Figure 3.27 shows the setting for a client station that has the
DocSTAR Host System hard drive mapped to drive letter F.
Figure 3.27 DocAdmin Drive Mapping Window
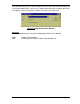
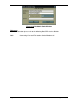
After setting the drive mappings, click on the ‘Paths’ button in DocAdmin and set the path
for the Database and Inbox directories by replacing the C:\ with the drive letter you
recorded. See Figure 3.28. Note: The ‘Archive to Jukebox’, ‘Two-Tier Storage’, and
‘Archive’ path settings are not adjustable on the DocSTAR client stations.