
Specifications


DocSTAR Level 2 Service Training Workbook Page 43
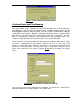
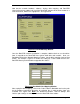
Figure 3.18 File and Printer Sharing Options
Creating Shares and Drive Mapping
Once your network setup is complete, you will have to actually create a Share and create
Drive Mappings. You can share an entire drive letter, sub folder, and/or a printer. We will
be dealing with sharing an entire drive letter, since this is what is required when setting up
a DocSTAR on the network. Mapping a Network Drive simply means assigning a local
drive letter on a PC that represents a drive letter or folder on a remote PC. You can
browse a mapped drive exactly as you would that PC’s own hard drive letter. For
example, I assign drive letter G: on my PC to represent C: on the DocSTAR.
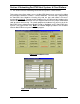
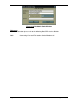
The first step is to share out the DocSTAR Host System’s Hard Drive (drive letter C:) with
full access. Double-click on My Computer, right-click on the ‘C:’ drive and select
‘Sharing...’. Select ‘Shared As’ and enter a share name. The share name doesn’t have to
be the same as the drive letter. You may share it out as ‘Hard_Drive’ or ‘Docstar_C’ for
clarity. Also select ‘Full’ as the Access Type but do not enter a password. See Figure
3.19.
Figure 3.19 S50-0001049 (C:) Properties, Sharing
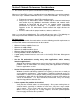
Once you have successfully shared out the hard drive, you should see a hand appear
under the Hard Drive (C:) in My Computer. See Figure 3.20.