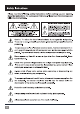
Safety Instr Please read the following safety Instructions before setting up your system. Keep the instructions for subsequent reference. Please heed the warnings and follow the Instructions.
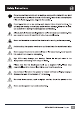
Safety Instructions Do not expos this product to rain or moisture, never wat the inside with any liquid and never pour or spill liquids directly onto this unit. Please do not put any objects filled with liquids {e.g. vases, sic.) onto the speaker. Do not place this unit on an unstable cart, stand or tripod, bracket or table. The unit may fall, causing serous Injury and/or serious damage. When cart Is used, use caution when moving the cart/apparatus combination. Ways use fully checked cables.
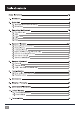
[EYE] Safety INSOMUCH IEEE sees eases eae 23 1. Introduction 2. Quick Start .. 2.1 important 2.2 Quick Start 3. Connecting the Speakers . 8.4 The stereo link 32 UsB 3.3 3.8mm jack JANGLER BERIA. 4. Speaker Placement 4.1 General recumbent 4.2 Vertical set up 473 Horizontal set up 4.4 Stand {wall mounting (ASTIR S only} 4.5 Tester at the height of ears 4.6 The stereo tangle 47 Surround placement 5. Speaker Adjustment . 5.4 Controls 8.2 Taster love! £3 High / low she 6. Troubleshooting .. €.
Dear customer, Thank you for choosing an ADAM Audio multimedia loudspeaker of the Artist series. ADAM loudspeakers are bully for maximum quality reproduction and audio perfection. The Artist series is a precise, high-resolution speaker system which meets highest expectations In sound quality and craftsmanship.
2.1 Important Information for set up After having unpacked your loudspeaker, please allow the system to acclimate to the temperature of the room for approximately an hour. It is important to ensure the speakers sit firmly on a solid surfaces! ‘We recommend that you retain the original packaging, as it is the best way to guarantee safe transportation should the need to do so arise. Please note that the loudspeakers will take some break-in time to achieve optimum sonic performance. 2.
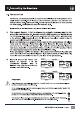
3. Connecting the Speakers 3.1 The Stereo Link The Stereo Link makes it possible to adjust the overall volume of both speakers with a single master control. You will need to use the Stereo Link when you connect your speakers either via 3.5 jack or via USB. You can opt for the Stereo Link when you use the RCA inputs. The Stereo Link does not work with XLR.
3. Connecting the Speakers use You can choose the USB input on the rear side of the speaker. Please note that this speaker will automatically carry the left channel, so it needs to be the speaker on the left side within your set up. This speaker then must ba connected to the right speaker via Stereo Link as described 0 under 3.1. The computer automatically detects your ADAM speakers that are connected via USB, you only have to select the “USB Audio DAC” In your system's audio preferences.
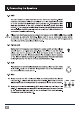
4. Speaker Placement 4.1 General recommendations If you use the monitors on a desktop, they usually will need to be angled. Desktop stands for the Artist 3/5 are available from ADAM Audio. Please note that vibrating parts of nearby objects can mask the sound Please make sure that there are no obstacles In the way from the monitor to your ears. ‘You should be able to see the speakers completely. The bass reflex tubes are located on the back of the speaker.
4. Speaker Placement 45 a6 a7 Tweeter at the height of ears The Tweeter should be positioned approximately at the height of your ears. If the speaker does not point right in your direction, you might lose sound information. In case you need to position the speaker In a significant lower or higher position, the monitor should be angled accordingly.
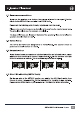
5.1 Controls On the rear side you will find controls that allow detailed fine-tuning of your loudspeakers to your 5 ' particular room acoustics and personal listening (0 (DD (D preferences. WF WF Ng The following tips are intended to assist you at using the controls in the best manner. SHEFFIELD LOWLIFE TWEETER. Please note that using the controls may have a great A impact on the overall sound characteristics of your loudspeakers.
Troubleshooting All ADAM products are designed and manufactured to the highest quality standards. However, if any problems with your speaker occur, we recommend to proceed as follows: 6.1 Problem: The LED shows normal operation (green) but there Is either no or only a distorted audio signal. If both (all) speakers are affected, the reason can probably be found within the signal path. If only one speaker Is affected, the problem will probably be within this speaker. a) Check the wiring.
7. Maintenance A Please switch the loudspeaker off before cleaning! Please note that the diaphragms bulls up a magnetic field. Do not ply with magnetic tem at close range to the diaphragms. Please make sure that no liquids get Inside the cabinet. Do not spray any fluids on the speaker. Do not use a wet cloth for cleaning. Do not touch the membranes of the loudspeakers. J Do not use flammable or acidic chemicals for cleaning. A We recommend using a lint-free, damp cloth for cleaning.
ADAM Audio Gm provides a five year limited warranty for this product. 10.1 Terms and Conditions This warranty is limited to the repair of the equipment or, if necessary, the replacement of parts or the product and rectum shipping within the country of purchase. This warranty complements any national/regional law obligations of dealers or national distributors and does not affect your statutory rights as a customer.
2. Erquicke Start zur Inbetriebnahme 2.1 Allgemeine Hinweise zur Inbetriebnahme Nach dem Auspacken und der Aufstellung des Lautsprechers sollte dieser ca. eins Stunde uneingeschossen rauben, um sich der jeweiligen Raumtemperatur anpassen zu kennen, Bitte beachten Sie, dass dieser Monitor, abhängig von Pegel und Nutzungsfrequenz, singe Tage benötigt, um seine optimale Klangqualität zu erreichen.
Anschluss der Lautsprecher 3.2 UsB Fir den direkten Anschluss an einen Computer empfehlt sich der USB Anschluss, der sich auf der Rockseite des Lautsprechers befindet. Bitte beachten Sis, dass der per USB angeschossene LS automatisch den linken Kanal übertragt und dieser daher links in einem Stereo-Setup platziert werden sollte. Verbinden Sle dann den rechten LS User den Stereo Link, wie unter 3.1 beschrieben.
Fehlerbehebus Alle ADAM Produkte werden nach höchsten Qualitätsstandards gefertigt Solide wider Erwarten dennoch sin Problem auftauchen, empfehlen wir, zunächst folgende Mainahmen durchzuführen: 6.1 Dis LED zeigt normalen Betrieb an (grinse, es wird aber kein oder nur ein gestörtes Signal ausgegeben: Betrifft das Problem beide Lautsprecher, liegt die Ursache zumeist innerhalb der Signalkette; betrifft es nur einen Lautsprecher, ist wahrscheinlich dieser die Fehlerquelle.
Die ADAM Audi GmbH gewahrt auf Ihre aktiven Lautsprecher eine beschrankte Garantie von § Jahren. Alle Produkte werden nach den höchsten Qualitätsstandards entwickelt und hergestellt. Sollte sin Produkt wider Erwarten dennoch Mangel aufweisen, gelten folgende Bedingungen fair dis Inanspruchnahme der Garantie: 10.
INEZ 2 1= long term IEC285-8-Wima/ minim 2= nominal IEG265-8 = Peak Prows 5 pose.