
Product Manual


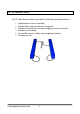
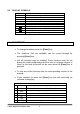
Table Of Contents
- 1.0 INTRODUCTION
- 2.0 TECHNICAL SPECIFICATIONS
- 3.0 UNPACKING THE SCALE
- 4.0 SETTING UP THE SCALE
- 5.0 KEYPAD AND DISPLAY
- Description
- Symbol
- 6.0 FUNCTIONS
- 6.1 bL = AUTOMATIC BACKLIGHT CONTROL
- 6.2 AVE = DISPLAY AVERAGING RATE
- 6.3 FIL = ADC FILTER RATE
- 6.4 bod = BAUD RATE SELECTION
- 6.5 cont = CONTINUOUS PRINTING
- 6.6 PIECE = PARTS COUNTING
- 6.7 StEPS = CHECK-WEIGHING FUNCTION (LOW-OK-HIGH)
- 6.8 CALIbr = CALIBRATION ROUTINE
- 6.9 rePL = RESULTS PRINTED AUTOMATICALLY OR MANUALLY
- 6.10 StAb = PRINT WHEN STABLE or INSTANTANEOUS
- 6.11 Aut = AUTOZERO FUNCTION
- 6.12 t1 = AUTOMATIC POWER SWITCH OFF
- 6.13 toP = HOLD MAXIMUM VALUE
- 6.14 nE = WEIGH IN NEWTONS
- 6.15 SuPP = Power supply voltage to PCB
- 7.0 COMMUNICATION WITH A COMPUTER/PRINTER

© Adam Equipment Company 2005
4
3.0 UNPACKING THE SCALE
• Remove the 2 sets of pallet beams using the handles provided.
• Take care while removing the beams to avoid banging or injury.
• Remove the Indicator and the power supply adapter packed seperately.
• Place it on a levelled and firm floor.
• Position the beams side by side.
4.0 SETTING UP THE SCALE
• Plug in the Indicator into the socket provided at the back of the
pallet beam (the one having two sockets).
• Ensure both the beams are connected via the beam-to-beam
cable.
• Attach the Power Supply adapter to the Indicator and switch the
main supply to ON.
• Read this User Manual before starting the weighing operation.
• Place the pallets on the beams for weighing.