
Datasheet


CircuitPython Thermal Camera
The MLX90640 comes with STEMMA QT/QWIIC connectors which makes it super simple to plug into projects with no
soldering needed. Adafruit sells a STEMMA to STEMMA QT cable (https://adafru.it/IDk) that allows you to plug this
breakout into the STEMMA connector found on a number of Adafruit microcontroller boards, including PyBadge and
PyGamer. The following example uses the PyBadge or PyGamer and the MLX90640 to create a super easy-to-
assemble thermal camera with a display!
CircuitPython Microcontroller Wiring
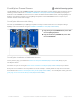
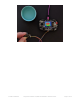
First wire up a MLX90640 to your PyBadge or PyGamer exactly as shown below. Here's an example of wiring a
PyBadge to the sensor with I2C using the STEMMA to STEMMA QT cable (https://adafru.it/IDk):
Plug the larger end (STEMMA/Grove) of the cable
into the PyBadge/PyGamer.
Plug the smaller end (STEMMA QT) of the cable
into the MLX906740.
CircuitPython Installation of Additional Libraries
On the previous page, you installed the Adafruit CircuitPython MLX90640 (https://adafru.it/IBv) library on your
CircuitPython board.
First make sure you are running the latest version of Adafruit CircuitPython (https://adafru.it/Amd) for your board.
Next you'll need to install the necessary libraries to use this example -- carefully follow the steps to find and install
these libraries from Adafruit's CircuitPython library bundle (https://adafru.it/ENC). Our CircuitPython starter guide has a
great page on how to install the library bundle (https://adafru.it/ABU).
© Adafruit Industries https://learn.adafruit.com/adafruit-mlx90640-ir-thermal-camera Page 23 of 30