
Datasheet


Arduino Thermal Camera
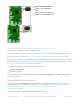
The PyBadge and PyGamer boards both have displays built in, as well as STEMMA I2C connectors. The MLX90640
comes with STEMMA QT/QWIIC connectors to allow for attaching the board easily to projects with no soldering
required. Adafruit sells a STEMMA to STEMMA QT cable (https://adafru.it/IDk) that allows you to plug this breakout into
the STEMMA connector found on a number of Adafruit microcontroller boards, including PyBadge and PyGamer. The
following example uses the PyBadge or PyGamer and the MLX90640 to create a super easy-to-assemble thermal
camera with a display!
Start by following your board's guide on installing Arduino IDE, and support for the board you have. Then, follow the
instructions on the Arduino page in this guide (https://adafru.it/IDl) to install the base libraries needed for this breakout.
Finally, install the Adafruit Arcada libraries (https://adafru.it/EUk) (there's a
lot
of em!).
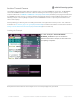
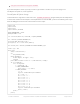
Loading the Example
Go to File > Examples > Adafruit MLS90640 >
MLX90640_arcadacam to open the ArcadaCam
Arduino thermal camera example, and then load it onto
your PyBadge or PyGamer.
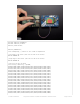
Now point the thermal camera at various objects to see a heat map displayed on your board!
© Adafruit Industries https://learn.adafruit.com/adafruit-mlx90640-ir-thermal-camera Page 14 of 30