
Datasheet


image_ratio = image.width / image.height
screen_ratio = display.width / display.height
if screen_ratio < image_ratio:
scaled_width = image.width * display.height // image.height
scaled_height = display.height
else:
scaled_width = display.width
scaled_height = image.height * display.width // image.width
image = image.resize((scaled_width, scaled_height), Image.BICUBIC)
Next we want to figure the starting x and y points of the image where we want to begin cropping it so that it ends up
centered. We do that by using a standard centering function, which is basically requesting the difference of the center
of the display and the center of the image. Just like with scaling, we replace the image variable with the newly
cropped image.
x = scaled_width // 2 - display.width // 2
y = scaled_height // 2 - display.height // 2
image = image.crop((x, y, x + display.width, y + display.height))
Finally, we take our image , draw it to the frame buffer and display it. At this point, the image should have the exact
same dimensions at the display and fill it completely.
display.image(image)
display.display()
Now go to the command prompt on your Raspberry Pi and run the script with the following command:
python3 epd_pillow_image.py
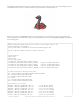
After a few seconds, your display should show this image:
© Adafruit Industries https://learn.adafruit.com/adafruit-eink-display-breakouts Page 49 of 61