
Datasheet


Python Code
Wiring
It's easy to use eInk breakouts with Python and the Adafruit CircuitPython EPD (https://adafru.it/BTd) library. This
library allows you to easily write Python code to control the display.
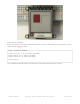
We'll cover how to wire the display to your Raspberry Pi. First assemble your display.
Since there's
dozens
of Linux computers/boards you can use we will show wiring for Raspberry Pi. For other
platforms, please visit the guide for CircuitPython on Linux to see whether your platform is
supported (https://adafru.it/BSN).
Connect the display as shown below to your Raspberry Pi.
Raspberry Pi 3.3 to display VIN
Raspberry Pi GND to display GND
Raspberry Pi SCLK to display SCK
Raspberry Pi MOSI to display MOSI
Raspberry Pi GPIO CE0 to display
ECS
Raspberry Pi GPIO 22 to display D/C
Raspberry Pi GPIO 27 to display RST
Raspberry Pi GPIO 17 to display BUSY
Setup
You'll need to install the Adafruit_Blinka library that provides the CircuitPython support in Python. This may also
require enabling SPI on your platform and verifying you are running Python 3. Since each platform is a little different,
and Linux changes often, please visit the CircuitPython on Linux guide to get your computer
ready (https://adafru.it/BSN)!
Python Installation of EPD Library
Once that's done, from your command line run the following command:
sudo pip3 install adafruit-circuitpython-epd
If your default Python is version 3 you may need to run 'pip' instead. Just make sure you aren't trying to use
Note this is not a kernel driver that will let you have the console appear on the eInk. However, this is handy
when you want to use the eInk display purely from 'user Python' code!
You can only use this technique with Linux/computer devices that have hardware SPI support, and not all
single board computers have an SPI device, so check before continuing
© Adafruit Industries https://learn.adafruit.com/adafruit-eink-display-breakouts Page 37 of 61