
Datasheet


These can be set in the sketch to any pins you like but to follow the exact example code we'll use the following:
ECS connects to our e-Ink Chip Select pin. We'll be using Digital 10 but you can later change this to any pin
D/C connects to our e-Ink data/command select pin. We'll be using Digital 9 but you can later change this pin
too.
SRCS connects to our SRAM Chip Select pin. We'll be using Digital 8 but you can later change this to any pin
RST connects to our e-Ink reset pin. We'll be using Digital 5 but you can later change this pin too.
BUSY connects to our e-Ink busy pin. We'll be using Digital 3 but you can later change this pin too.
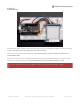
FeatherWing Connection
FeatherWing usage is easy, simply plug your Feather into the Wing
Install Adafruit_EPD & GFX libraries
To begin reading sensor data, you will need to install the Adafruit_EPD library (code on our github
repository) (https://adafru.it/BRK). It is available from the Arduino library manager so we recommend using that.
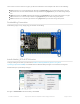
From the IDE open up the library manager...
And type in adafruit EPD to locate the library. Click Install
© Adafruit Industries https://learn.adafruit.com/adafruit-eink-display-breakouts Page 21 of 61