
User Manual
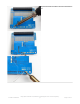

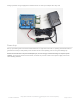
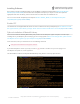
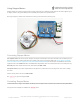
Table Of Contents
- Guide Contents
- Overview
- Assembly
- Solder on Headers and Terminal Block
- Powering Motors
- Voltage requirements:
- Current requirements:
- Power it up
- Installing Software
- Enable I2C
- Python Installation of MotorKit Library
- Using DC Motors
- Connecting DC Motors
- Controlling DC Motors
- Full Example Code
- Using Stepper Motors
- Connecting Stepper Motors
- Controlling Stepper Motors
- Stepping
- Full Example Code
- Python Docs
- Stacking HATs
- Addressing the HATs
- Stacking in Code
- Downloads
- Files
- Schematic
- Fabrication Print

Controlling DC Motors
To demonstrate the usage, we'll initialise the library and use Python code to control a DC motor from the Python REPL.
First you'll need to import and initialize the MotorKit class.
The four motor spots on the Pi hat are available as motor1 , motor2 , motor3 , and motor4 .
In this example we'll use motor1 .
Now to move a motor you can set the throttle attribute. We don't call it speed because it doesn't correlate to a
particular number of revolutions per minute (RPM). RPM depends on the motor and the voltage which is unknown.
For example to drive motor M1 forward at a full speed you set it to 1.0 :
To run the motor at half throttle forward use a decimal:
Or to reverse the direction use a negative throttle:
You can stop the motor with a throttle of 0 :
To let the motor coast and then spin freely set throttle to None .
That's all there is to controlling DC motors with the Adafruit CircuitPython MotorKit library! With DC motors you can
build fun moving projects like robots or remote controlled cars that glide around with ease.
Full Example Code
from adafruit_motorkit import MotorKit
kit = MotorKit()
kit.motor1.throttle = 1.0
kit.motor1.throttle = 0.5
kit.motor1.throttle = -0.5
kit.motor1.throttle = 0
kit.motor1.throttle = None
© Adafruit Industries
https://learn.adafruit.com/adafruit-dc-and-stepper-motor-hat-for-raspberry-
pi
Page 18 of 31