
Datasheet


Breakout Wiring & Test
There are two ways to wire up these displays - one is a more flexible method (you can use any pins on the Arduino)
and the other is much faster (4-8x faster, but you are required to use the hardware SPI pins) We will begin by showing
how to use the faster method, you can always change the pins later for flexible 'software SPI'
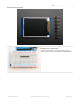
Wiring up the display in SPI mode is pretty easy as there's not that many pins! We'll be using hardware SPI, but you can
also use software SPI (any pins) later. Start by connecting the power pins
3-5V Vin connects to the Arduino 5V pin - red wires
GND connects to Arduino ground - black wires
CLK connects to SPI clock. On Arduino Uno/Duemilanove/328-based, thats Digital 13. On Mega's, its Digital 52
and on Leonardo/Due its ICSP-3 (See SPI Connections for more details (https://adafru.it/d5h)) - this is the orange
wire
MOSI connects to SPI MOSI. On Arduino Uno/Duemilanove/328-based, thats Digital 11. On Mega's, its Digital 51
and on Leonardo/Due its ICSP-4 (See SPI Connections for more details (https://adafru.it/d5h)) - this is the white
wire
CS connects to our SPI Chip Select pin. We'll be using Digital 10 but you can later change this to any pin - this is
the yellow wire
RST connects to our TFT reset pin. We'll be using Digital 9 but you can later change this pin too - this is the blue
wire
D/C connects to our SPI data/command select pin. We'll be using Digital 8 but you can later change this pin too -
this is the green wire
Install Adafruit ST7735 TFT Library
We have example code ready to go for use with these TFTs. It's written for Arduino, which should be portable to any
microcontroller by adapting the C++ source.
Three
libraries need to be installed using the Arduino Library Manager…this is the preferred and modern way. From
© Adafruit Industries https://learn.adafruit.com/1-8-tft-display Page 9 of 36